Sunday, July 31, 2016

Dimension Loading: Source sends same record with different Source ID

An interesting question was raised during my lecture today and it was related to dimension loading. The question was; how can we identify and update the dimension record that is already exist if the key of the entity has been changed in the source.

Let me explain the question with more details. Assume that we have a dimension named DimCustomer and it is loaded with following two records;


And with the next loading, what if we get some new records (last three records - 150, 151, 152) and Id 151 is actually the old record which had Id of 100. This can happen with various business scenario, and, since the source id is new, we always consider it as a new record without checking.


This has to be checked, we need to make sure that SourceKey of the dimension record is changed with new SourceId (CustomerId) without inserting a new record, duplicating this customer: Jane Knight. How do we do it with our SSIS package?

Generally, if we cannot find changes in the source, we get all records from the source to ETL package and then check for new records using a Lookup configured for the data warehouse. With a scenario like this, what we have to do is, once new records are identified, use FuzzyLookup for checking and seeing whether records that are similar are exist with records found as "New". We can use exact matching (equi-join) without using Fuzzy Lookup but there can be slight changes which cannot be found using exact matches. If we find some matching rows, we need to update them without inserting.

Have a look data flow in this ETL package;


This package extracts Customers from the source using Get Customers from the source. I have used the query shown above for that. Then the Lookup: Lookup - Find new Customers is used for matching with existing records in DimCustomer and finding new customers. The Lokkup No Match Output gives us new records.


Next is the Fuzzy Lookup for finding whether records identified as "New" are already exist with old records. For this, we have to connect again with the data warehouse and look for similarities on Customer Name and Town. If exist, need to get the existing CustomerKey as CurrentCustomerKey. Not that the Similarity Threshold is set to 95%, not to 99%.


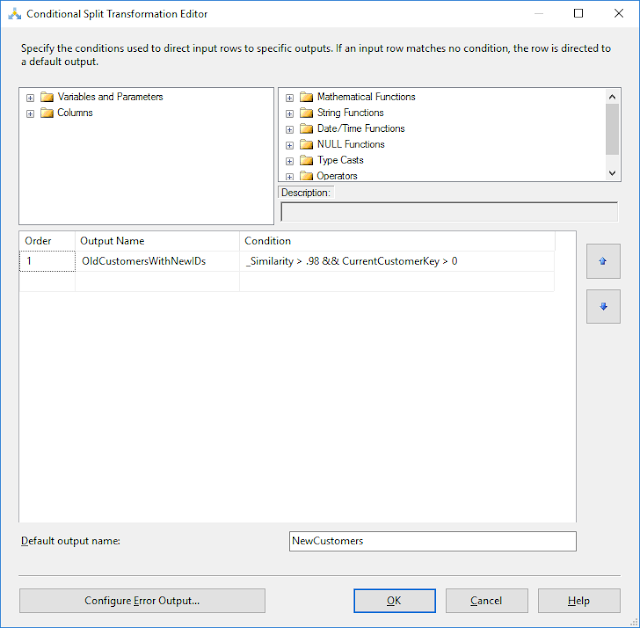
If we get a value for CurrentCustomerKey, and similarity is closer to 100%, we can consider the records as an old records though we get it as a new record from the source. The added Conditional Split checks it and allows us to create two flows for "real new" records and "old but new" records.


After that, we can have two destinations, one for inserting new records, and one for updating old records with new CustomerId. For update, as you see, Script Component is used as below;

xxx

When run the package, as you see, 4 records are coming from the source, three records are identified as new records, Fuzzly Look along with Conditional Split gives 2 records as new and 1 record as a new record but related to an old record. Therefore package inserts two new records and update one records. Here is the result now;


Saturday, July 30, 2016

SQL Server Brain Basher of the Week #049 - SSIS Package Store

Let's talk about Integration Services in this week for Brain Basher. SQL Server supports two deployment models named Package Deployment Model and Project Deployment Model. The Package Deployment Model was the initial model available with SQL Server and this allows us to deploy packages and manage individually. The Project Deployment Model was introduced with SQL Server 2012 and it allows us to deploy all packages as a single unit. This week question is based on old model; Package Deployment Model.

What is SSIS Package Store?

When deploying with Package Deployment Model, individual files can be deployed either to msdb database or to file system. There are multiple ways of deploying individual packages. One way is, importing packages using Import Package in SSMS Integration Services to import into SQL Server. When importing to SQL Server using Import Package, if you select the destination as File System instead of MSDB database, the package is saved in the SSIS Package Store.

The path of the SSIS Package Store is C:\Program Files\Microsoft SQL Server\{version}\DTS\Packages. Let's deploy a package to SQL Server / File System and see how it goes to SSIS Package Store.

Let's open SSMS and connect with Integration Services;


Once connected, right click on File System and select Import Package, you need to select the package for importing (or deploying).


Once imported, you can have a look on relevant installation folder, you should see the package deployed.


Should we use this or not? It depends, I prefer File System not SQL Server / File System or SQL Server / MSDB. Biggest issue with this is, no specific folders in this folder for instances if you have multiple instanced from the same version. You may encouter some issues with security as well. Therefore, for older way, File System is better and if possible, go for the latest way which Project Deployment Model.


Friday, July 29, 2016

Fact Loading: Switching a loaded temporary table into an empty partition of the fact table

Fact table in data warehouses are always partitioned and with most of solutions, it is partitioned on a date key. Generally, we use SSIS for loading dimensions and fact tables and ETLs written for loading the Fact Table can be optimized by loading data into another table and switching it to an empty partition of the fact table. This is one of the best practices in data warehousing data loading and technique for doing is not a complex task.

Assume you have a Fact Table that is partitioned by moths, example, one partition for 201601, another for 201602, and so on, and data is loaded till July 2016 (201607). Then when we load August data, we can load the data into a new table that has the same structure and then switch that table in to 201608 partition in the fact table for optimizing the data loading and minimizing the impact to the fact table. The below diagram shows it;


Here is the way of doing it. I will take the same Fact Table created with this post: SSIS - Fact Loading with Dimension Type II and Dimension Type I. You can use the same code for creating dimension tables and fact tables for trying out this. In that post, I have loaded data related to June and July 2016. Let's see how we can load August data using the technique discussed in this post.

1. Let's take this data set for loading August data.

SELECT CONVERT(date, '2016-08-01') As TransactionDate, 22 AS ProductId, 100 AS CustomerId, 200 AS EmployeeId, 500 AS SalesAmount, 2 AS SalesQuantity
UNION ALL
SELECT CONVERT(date, '2016-08-12') As TransactionDate, 23 AS ProductId, 101 AS CustomerId, 200 AS EmployeeId, 500 AS SalesAmount, 2 AS SalesQuantity
UNION ALL
SELECT CONVERT(date, '2016-08-14') As TransactionDate, 23 AS ProductId, 100 AS CustomerId, 201 AS EmployeeId, 500 AS SalesAmount, 2 AS SalesQuantity
UNION ALL
SELECT CONVERT(date, '2016-08-22') As TransactionDate, 22 AS ProductId, 100 AS CustomerId, 201 AS EmployeeId, 500 AS SalesAmount, 2 AS SalesQuantity

2. We need a different table with the same structure for loading processed data. The below code creates another table for holding data temporarily. Note that it has same columns and it is partitioned same as FactSales table.

CREATE TABLE FactSalesTemp
(
 DateKey int NOT NULL INDEX IX_FactSalesTemp CLUSTERED,
 ProductKey int NOT NULL,
 CustomerKey int NOT NULL,
 EmployeeKey int NOT NULL,
 SalesAmount money NOT NULL,
 SalesQuantity smallint NOT NULL
)
ON ps_SalesDate (DateKey)
GO

3. I will be using the same SSIS package used with my previous post. As you see, now the destination is set to newly created table which is FactSalesTemp.


4. Before loading data into new table, let's add another partition to both table for August data. All we need to do is, add a file group to the scheme and boundary value to the function;

-- Add another file group to the scheme 
ALTER PARTITION SCHEME ps_SalesDate
NEXT USED [PRIMARY]
GO

-- splitting the last partition by adding another boundary value
ALTER PARTITION FUNCTION pf_SalesDate ()
SPLIT RANGE (20160801)
GO

5. Now we can execute the SSIS package and load data into newly created table. Once the data set is loaded into FactSalesTemp, we can check both tables and how partitions are filled.

How partitions are filled;


How tables are filled;


6. As you see, data is loaded into newly created table and they are in partition 9. Now we need to switch the new table into FactSales 9th partition. Here is the way of doing it.

ALTER TABLE dbo.FactSalesTemp 
SWITCH PARTITION 9 TO dbo.FactSales PARTITION 9;

7. Now if you check the records in the table, you will see the FactSales is loaded with new data, and it is loaded to the correct partition.


You can have Altering scheme and function in the Control Flow as a Execute SQL Task before the Data Flow Task added. And, you can have Switching partition  with another Execute SQL Task just after the Data Flow Task for completing the SSIS package.

Thursday, July 28, 2016

SSIS - Fact Loading with Dimension Type II and Dimension Type I

The Dimensional Modeling in data warehousing, either using Star or Snowflake schema is still the most famous structure applied and widely used, though summarized tables using in-memory and columnstore concepts are slowly taking over the traditional method. It is very common to see that SSIS (or SQL Server Integration Services) is used for data loading, applying various patterns. Searches show different types of articles and posts but it is rare to find a complete post that talks about loading a Fact table using SSIS, looking up type I and II dimensions. That is the reason for this post, this talks about how to load a Fact Table, getting keys from both Type I and Type II dimensions.

Let's make a small data warehouse with Star Schema and populate some sample records. The following code creates a database called SalesDataWarehouse and then creates dimension tables named DimDate, DimCustomer, DimProduct, and DimEmployee. As you see, DimEmployee is a slowly changing dimension type II dimension.

CREATE DATABASE SalesDataWarehouse;
GO

-- Connect and create tables
USE SalesDataWarehouse;
GO

CREATE TABLE dbo.DimDate
(
 DateKey int  primary key
 , [Date] date not null
 , [Month] varchar(20) not null
 , MonthNumber smallint not null
 , QuarterName varchar(20) not null
 , QuarterNumber smallint not null
 , [Year] smallint not null
);

CREATE TABLE dbo.DimCustomer
(
 CustomerKey int identity(1,1) primary key
 , FullName varchar(100) not null
 , Town varchar(100) not null
 , SourceKey int not null
);

CREATE TABLE dbo.DimProduct
(
 ProductKey int identity(1,1) primary key
 , Product varchar(100) not null
 , Brand varchar(100) not null
 , SourceKey int not null
);

CREATE TABLE dbo.DimEmployee
(
 EmployeeKey int identity(1,1) primary key
 , Name varchar(100) not null
 , SalesTown varchar(100) not null
 , StartDate date not null
 , EndDate date  null
 , IsCurrent bit not null default (1)
 , SourceKey int not null
);

The next code is for loading some sample records. Note that DimDate is loaded with WideWorldImportersDW database as its date dimension table contains records for the current year. However, this can be loaded using a simple script as well.

Have a look on records related to DimEmployee. Since it is a SCD Type II dimension, it holds history records. As you see, there are two records to James Phil with validity period.

-- Inserting date records from AdventureWorks table
INSERT INTO dbo.DimDate
 (DateKey, [Date], [Month], MonthNumber, QuarterName, QuarterNumber, [Year])
SELECT CONVERT(int, CONVERT(varchar(8), [Date], 112)), [Date], [Month], [Calendar Month Number]
 , 'Quarter ' + CONVERT(varchar(2), DATEPART(Q, [Date])), DATEPART(Q, [Date]), [Calendar Year]
FROM WideWorldImportersDW.Dimension.Date;

-- Inserting records to Customer
INSERT INTO dbo.DimCustomer 
 (FullName, Town, SourceKey)
VALUES
 ('Jane Knight', ' Town 1', 100)
 , ('Jack walter', 'Town 2', 101);

-- Inserting records to Product
INSERT INTO dbo.DimProduct 
 (Product, Brand, SourceKey)
VALUES
 ('Product 1', ' Brand 1', 22)
 , ('Product 2', 'Brand 3', 23);

-- Inserting records to Customer
INSERT INTO dbo.DimEmployee
 (Name, SalesTown, StartDate, EndDate, IsCurrent, SourceKey)
VALUES
 ('Peter Kevin', 'Town 1', '2016-06-01', null, 1, 200)
 , ('James Phil', 'Town 2', '2016-06-01', '2016-06-30', 0, 201)
 , ('James Phil', 'Town 3', '2016-06-30', null, 1, 201);


Next code is for creating the Fact table. Generally, Fact Table is a partitioned table. Therefore, this code creates a partition function and scheme for it. Note that, the best practice is, have different File Groups for partitions but let's just use PRIMARY (I will be discussing partition switching on fact loading with another post, extending the same code).

-- creating the partition
CREATE PARTITION FUNCTION pf_SalesDate (int)
AS RANGE RIGHT
FOR VALUES (20160101, 20160201, 20160301, 20160401, 20160501, 20160601, 20160701)
GO

-- creating the scheme
CREATE PARTITION SCHEME ps_SalesDate
AS PARTITION pf_SalesDate
TO ([PRIMARY], [PRIMARY], [PRIMARY], [PRIMARY], [PRIMARY], [PRIMARY], [PRIMARY], [PRIMARY])
GO

CREATE TABLE FactSales
(
 DateKey int NOT NULL INDEX IX_FactSales CLUSTERED,
 ProductKey int NOT NULL,
 CustomerKey int NOT NULL,
 EmployeeKey int NOT NULL,
 SalesAmount money NOT NULL,
 SalesQuantity smallint NOT NULL
)
ON ps_SalesDate (DateKey)
GO

Let's insert some sample records into the Fact Table too.

INSERT INTO FactSales (DateKey, ProductKey, CustomerKey, EmployeeKey, SalesAmount, SalesQuantity)
VALUES
 (20160605, 1, 1, 1, 500, 2)
 , (20160615, 2, 2, 1, 500, 2)
 , (20160622, 2, 2, 2, 500, 2)
 , (20160624, 2, 1, 1, 500, 2)

Done, now we have to create a SSIS package for loading new records. As you noted, we have records related to June 2016, and we will be loading records related to July 2016. Let's use following recordset for loading the Fact Table.

SELECT CONVERT(date, '2016-07-01') As TransactionDate, 22 AS ProductId, 100 AS CustomerId, 200 AS EmployeeId, 500 AS SalesAmount, 2 AS SalesQuantity
UNION ALL
SELECT CONVERT(date, '2016-07-12') As TransactionDate, 23 AS ProductId, 101 AS CustomerId, 200 AS EmployeeId, 500 AS SalesAmount, 2 AS SalesQuantity
UNION ALL
SELECT CONVERT(date, '2016-07-14') As TransactionDate, 23 AS ProductId, 100 AS CustomerId, 201 AS EmployeeId, 500 AS SalesAmount, 2 AS SalesQuantity
UNION ALL
SELECT CONVERT(date, '2016-07-22') As TransactionDate, 22 AS ProductId, 100 AS CustomerId, 201 AS EmployeeId, 500 AS SalesAmount, 2 AS SalesQuantity


Let's create a SSIS package and add a connection to the data warehouse. I have a database named Sales and will be using it as the source even though we do not extract records from the source. As you see, I have a DataFlow Task in the Control Flow.


Since we do not get surrogate key values from the source, we need to have Lookups for dimension tables for getting surrogate key values. As you see with the image below, I have added OLEDB Source to connect with Sales and four of Lookups for getting surrogate key values related to Date, Customer, Employee and Product.


Let's have a look on source first. It is configured with Sales database and the query above is used for populating required records.


There are three Type I type dimensions. Let's have a look on one and see how it needs to be checked. In order to get DateKey from the DimDate dimension, we need to look up DimDate by using TransactionDate that comes with the source. We need to configure the lookup to DataWarehouse connection and select the lookup table as DimDate. Once the connection is set, we need to link TransactionDate coming from the source with Date in the dimension. We need to select DateKey as it is the one we need when we insert records to the Fact Table. The selected DateKey is added to the flow automatically.


The similar configuration is required for DimCustomer and DimProduct for getting surrogate key values. We need to link CustomerID of the source to SourceKey in the DimCustomer table and get the CustomerKey. We need to link ProductID of the source to SourceKey in the DimProduct table and get the ProductKey. However, getting EmployeeKey is different as it is as SCD Type II dimension. Let's have a look on the configuration of Employee Lookup.

I will take you through the steps required for configuring this. First we need to make sure that Cache mode is set to either Partial Cache or No Cache because we are going to parameterize the lookup query.


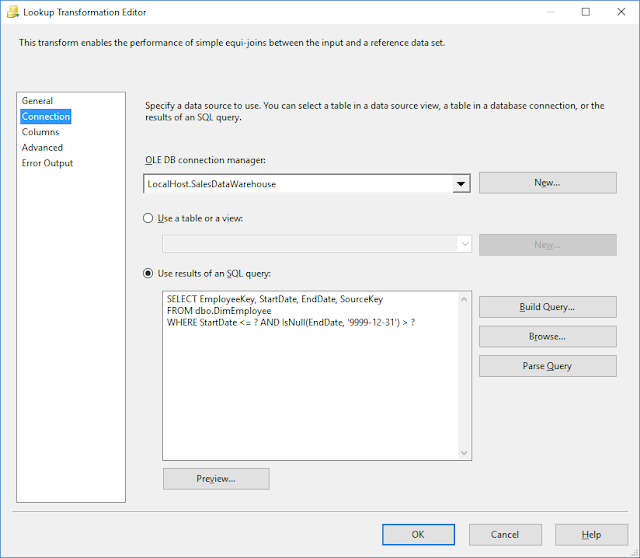
Next is setting up the connection. We need to connect it to DataWarehouse and use a query for loading dimension records. Note the way it has been written. I have used question marks for parameterizing the query as we need to pick the right record related to the TransactionDate.


Just like the other dimensions, we need to match two columns from the source and dimension to find the record. However, additional link is required for getting values for parameters, hence need to link TransactionDate with StartDate though that is not the exact link we need.


You will see the reason for joining TransactionDate and StartDate with next step. We need to adjust the lookup query now, need to do it with Advanced section. It is required to adjust the query like below.


Once adjusted, need to set parameters like below. It allows us to select TransactionDate as a parameter value because the above join. Note that parameters a 0-based indexed.


All done, finally it needs the destination. Set OLEDB Destination for loading the FactSales as the last step the of the DataFlow task. Once all configurations are done, you can run the package and see how the FactSales has been loaded.


Wednesday, July 27, 2016

What is Table Value Constructor?

I am sure that many have used this without knowing the term. However it is always better to know the term before applying because that makes sure the implementation is done with right way.

The Table Value Constructor allows us to specify set of row value expressions to into a table. This makes it possible to have set of row value expressions in a single DML statement and use it as a form of a table. Yes, this is what we used with INSERT statement when we need to insert multiple records into the table using a single INSERT statement.

The Table Value Constructor can be used with INSERT statement, MERGE statement (with USING clause) and in the definition of a derived table. Here is an example;

CREATE TABLE dbo.Customer
(
 CustomerID int identity(1,1) primary key
 , CustomerCode char(5) not null
 , Name varchar(200) not null
 , DateOfBirth date not null
);
GO

-- Inserting multiple rows with
-- Table Value Constructor
INSERT INTO dbo.Customer
 (CustomerCode, Name, DateOfBirth)
VALUES
 ('CUS01', 'Jane', '1998-01-04')
 , ('CUS02', 'Knight', '2000-05-23')
 , ('CUS03', 'Sam', '1997-2-11')

-- Using Table Value Constructor
-- with USING clause
MERGE INTO dbo.Customer t
USING (VALUES
  ('CUS01', 'Jane', '1998-02-04')
  , ('CUS04', 'Knight', '2000-05-23')) 
  AS s (CustomerCode, Name, DateOfBirth)
 ON t.CustomerCode = s.CustomerCode
WHEN MATCHED THEN
 UPDATE SET Name = s.Name, DateOfBirth = s.DateOfBirth
WHEN NOT MATCHED BY TARGET THEN
 INSERT (CustomerCode, Name, DateOfBirth)
  VALUES (s.CustomerCode, s.Name, s.DateOfBirth);

-- Using Table Value Constructor as a derived table.
SELECT Customer.CustomerCode, Customer.Name, CustomerCountry.CustomerCode
FROM dbo.Customer 
 INNER JOIN (VALUES ('CUS01', 'USA'), ('CUS04', 'LK')) AS CustomerCountry (CustomerCode, CountryCode)
  ON Customer.CustomerCode = CustomerCountry.CustomerCode

Tuesday, July 26, 2016

Result shows asterisk when converting int to varchar

I was sent a code by one engineer saying they he gets an odd error with one of calculations written. He gets the following error;

Conversion failed when converting the varchar value '* ' to data type int.

By looking at the error, I realized the issue, it is related to truncation. He converts a numeric value to a varchar variable and then again he uses the converted varchar value with another calculation, converting to back to int. This calculation causes the error because previously converted value contains asterisk, not the numeric value that was used with initial conversion.

How can it be happened? This happens when you convert character or binary expressions to an expression of a different data type. If the the result cannot be accommadate with the set data type, SQL Server either truncates the value, partially displays or throw an error.

See this code;

DECLARE @x int = 1000;
DECLARE @y char(2);

SET @y = @x;
SELECT @y;

When the value 1000 is converted to char(2), the result becomes asterisk because the set data type cannot hold 1000. The asterisk indicates that value is truncated.


Here are some known results when converting to an expression of a different data type.


Sunday, July 24, 2016

SQL Server Brain Basher of the Week #048 - Dropping Clustered Index

SQL Server mainly maintains two structures for tables: Heap and Clustered. If there is no clustered index created with the table, table is with Heap Structure else it will be with Clustered structure.

Once the Clustered Index is created, SQL Server organizes data in a form of B-Tree and data pages related to the table will be held with the last level which is called as Leaf Level. Since the Clustered Index uses data pages, it is not possible to have another Clustered Index in the same table. Now the question is;

What will happen when the Clustered Index is dropped?

Many think that it is not possible because it holds data pages related to the table. But it is possible. If you drop the index, it goes back to the Heap and table will be maintained in the Heap. Here is a code that shows it;

-- creating a test table
CREATE TABLE dbo.TestTable
(
 TestTableId int index ix_TestTable_Id clustered
 , TestTableValue1 varchar(100) not null
 , TestTableValue2 char(5) not null index ix_TestTable_Value2 nonclustered
);
GO

-- Inserting test records
INSERT INTO dbo.TestTable 
VALUES 
(1, 'Hello world', 'ABC01')
, (2, 'Hi', 'ABC02')

-- Checks indexes availeble
SELECT * FROM sys.dm_db_index_physical_stats(DB_ID(), OBJECT_ID('dbo.TestTable'), NULL, NULL, 'DETAILED');


-- Dropping the clustered index
DROP INDEX ix_TestTable_Id ON dbo.TestTable;

-- Checking the indexes and data after dropping 
SELECT * FROM sys.dm_db_index_physical_stats(DB_ID(), OBJECT_ID('dbo.TestTable'), NULL, NULL, 'DETAILED');
SELECT * FROM dbo.TestTable;


Saturday, July 23, 2016

Install SQL Server with just three clicks - The SQL Server Basic Installer

We have been installing SQL Server for long time, different versions and different editions. Everyone is familiar with installation wizard and knows that it needs to go through various steps, windows and multiple clicks. If you need an installation to be done for addressing many database requirements, then of course you need to go through almost all installation wizard pages and customize as per the requirements. But if it is for a simple database and we do not need much features installed, then it could be seen as too-much-of-clicks and too-much-of-pages.

What if we can install SQL Server with just three clicks?

Yes, now it is possible. This is called as SQL Server Basic Installer that allows you to get the database engine and click connections SDK installed without seeing much screens. This currently available for following editions;

Let's test this one of the editions. Click on the link give above for Express Edition and get the SQLServer2016-SSEI-Expr.exe file downloaded. Start installation it, this is the first screen you see with it;


You have three options for continuing. Since we need a simple installation, let's select the first option: Basic. This is the first click.

You cannot skip accepting the license terms, you get the usual screen and click on Accept. That is your second click.


Next screen is for specifying the installation location. You do not need to do anything because the default location is selected. Here is your third click, click on Install to continue.


This starts the installation, different screens appear;
Downloading....


Installing...


And finally the screen for showing and installation is completed. During the download, you will see various information on samples, forum, etc, that will be helpful for learning more on SQL Server.


This screens educates you on Connection String used for connecting with the instance, Instance ID, default administrator, installed features etc. It allows you to launch SQL Command for connecting and testing the installation. In addition to that, if you want to get SQL Server Management Studio, you can click on Install Tools for getting it.

As you noticed, it is just three clicks, try and see.

Friday, July 22, 2016

What is CATS, CRTAS and CETAS? - SQL Server CREATE TABLE AS SELECT

I am sure that everyone is well aware on SELECT INTO statement. This statement allows us to create a table using a SELECT statement just like below;

USE WideWorldImporters;
GO

SELECT o.OrderId, SUM(ol.UnitPrice * ol.Quantity) OrderAmount
INTO dbo.OrderAmount
FROM Sales.Orders o
 INNER JOIN Sales.OrderLines ol
  ON o.OrderID = ol.OrderID
GROUP BY o.OrderId;

SELECT * FROM dbo.OrderAmount;

However this has many limitations, specifically on the construction of the new table. We cannot add some elements such as constraints, indexes, when we get the table created using SELECT INTO.

SQL Server 2016 makes it possible to create the table with more control, introducing CREATE TABLE AS SELECT. But, unfortunately, this statement is available only with Azure SQL Data Warehouse and Parallel Data Warehouse. This statement is referred as CATS.

Here is an example;

CREATE TABLE myTable   
WITH   
  (   
    CLUSTERED COLUMNSTORE INDEX,  
    DISTRIBUTION = HASH (CustomerKey)  
  )  
AS SELECT * FROM dimCustomer; 


You can read more on this at: CREATE TABLE AS SELECT (Azure SQL Data Warehouse).

There are two more abbreviations like this: CRTAS and CETAS.

The CRTAS stands for CREATE REMOTE TABLE AS SELECT that allows to create a table in remote SMP SQL Server and populating data from a table in Parellel Data Warehouse.

Read more on this at: CREATE REMOTE TABLE AS SELECT (Parallel Data Warehouse).

The CETAS stands for CREATE EXTERNAL TABLE AS SELECT that allows to create an external table and export data into Hadoop or Azure Blob Storage. Again, this available only with Azure SQL Data Warehouse and Parellel Data Warehouse.

Read more on this at: CREATE EXTERNAL TABLE AS SELECT.

Thursday, July 21, 2016

Wednesday, July 20, 2016

Handout to Resolve SQL Server Connectivity Issues [Guest Post]

This post is written by Andrew Jackson.


Problem Statement
While launching Microsoft SQL Server Management Studio, sometimes user faces a problem when they try to connect with the server. After clicking on Connect button, an error message box appears, which indicates that there is some connectivity issues in the server.


End user becomes tensed when they find it impossible to connect with the server and such errors are known as SQL server connectivity issues. In this blog, we are going to discuss that why does these connectivity issues occurs and what are the measures to troubleshoot them.

Causes of Connectivity Issues in SQL Server
Generally, when one fails to connect to the SQL server, the reasons may be:
  • The network of SQL server may be disconnected or slow
  • The SQL server of machine may be improperly configured
  • There must be some problem with firewall or other network devices
  • The connection between two servers may be disconnected
  • Applications related to the server may be improperly configured
  • There may be authentication error or log-in issue on the server

Approaches To Resolve The Problem
In this section, we are going to discuss different techniques to resolve SQL server connectivity issues. Follow the below-mentioned procedure for resolving your problem:
NOTE: After performing each step, restart your machine and then try to connect to the server. If you are successfully connected to the server, then stop your procedure there only; else go to next step.

STEP 1: Resolving Networking Issue
As discussed earlier that network connection could be the one reason for connectivity error because a stable network is being required for establishing a remote connection. Therefore, the first approach should be to examine the network by executing the following commands (given in the snapshot):


STEP 2: Modify the SQL Server Configuration
Use SQL Server Configuration Manager for examining the protocols, which are used for running targeted SQL server. The server supports TCP protocol, Shared memory, and Named Pipes. If the protocols are disabled, then enable them by making use of Configuration manager. After performing configuration, restart your SQL server machine.

STEP 3: Improving Network Devices Functioning
Network devices like firewall, routers, gateway, etc., may be settled in such a way that they block the connection request. The rules of firewall may be configured in such a way that it blocks the request of SQL connection. Therefore, for resolving such error you will have to disable the functioning of firewall because if the firewall is disabled, then its will stop its functioning & hence, you will be able to connect with SQL server. Moreover, after having a successful connection, you can again enable the functioning of the firewall.

STEP 4: Resolving the Client Driver Issue
This solution is applied on the client machine. Go through the following description to troubleshoot the SQL Server connectivity issues:

“Execute the below-shown command to log-in into another client computer via TCP protocol. If TCP is disabled, then enable it and then use SQL Management Studio, OSQL, and SQLCMD for testing SQL connections.”


STEP 5: Properly Configure SQL Related Applications
Once again reconfigure the applications related to SQL server and then go through the following assumptions:
  1. The application is running on your account or on a different account. If the application is running on the different account, then configure it within your account.
  2. Analyze your connection string and check whether the string is compatible with your driver or not. If not, then make it compatible with your driver.

STEP 6: Resolve Authentication & Log-in Faults
The last step or you can say the end approach to resolve the connectivity problem is to troubleshoot faults, which occurs at the time of authentication procedure and during log-in. It relates to a network connection, machine’s operating system, and the server database.
  1. Make sure that the input credentials are valid
  2. If you are using SQL auth, then mixed authentication should be enabled
  3. Examine all the eventlog of your machine and collect some more information
  4. Analyze the permissions whether they are enabled for logging into the account or not. If not, then instantly enable them.
Conclusion
After having a brief discussion about how to deal with SQL Server connectivity issues, one can wind up with the fact that these connectivity issues are due to fault in the network, network devices, or improper configuration. Therefore, one can troubleshoot the SQL connection error 40 and SQL error 26 by going through the mentioned steps.

Tuesday, July 19, 2016

How to add a Watch Windows in SSIS

My post SSIS Progress / Execution Results Tab talked about few things related to debugging and thought to add another post on it, specifically on two windows provided by SQL Server Data Tools for observing values during debugging.

There are two windows that can be used for seeing values of variables and parameters: Locals and Watch Windows. The Locals windows allows us to see systems setting, values of variables and parameters that are currently in scope. The Watch window helps us to specify a specific item such as variable or parameter and track its value through out debugging. If you have multiple variable and parameters and you need to see how they are getting changed during the execution (or debugging), Watch window is the best. You can add multiple Watch windows for tracing multiple items.

Let'see how we can add a Watch and use it when debugging. Follow given steps for creating a package and testing;

1. Create a SSIS project and add a package.
2. Create a variable called TestVariable. Set the type as int.


3. Add a Script Task. Make sure that TestVariable is added under ReadWriteVariables of the Script Task and following code is set with the task.


public void Main()
{
    // TODO: Add your code here

 
    int x = Convert.ToInt32(Dts.Variables["User::TestVariable"].Value);
    x = x + 1;
    Dts.Variables["User::TestVariable"].Value = x;
    Dts.TaskResult = (int)ScriptResults.Success;
}

This code increases the value of the variable by one.

4. Copy the Script Task added and duplicate it two times. Now you have three Script Tasks. Connect them with Success Precedence Constraints.


5. Select the first Script Task and press F9 or use Debug -> Toggle Breakpoint menu for adding a breakpoint. Do the same for other two tasks.


6. Now start debugging. It stops at the first Script Task as we have set a breakpoint. For opening Locals window, use Debug -> Windows -> Locals menu item.

7. Once the Locals window is opened, navigate to find TestVariable. Right-click on it and add a Watch on it.


8. You should see a Watch window now. You will see that Watch window shows how value is getting changed when you continue with debugging.


Monday, July 18, 2016

SSIS Progress / Execution Results Tab

SQL Server Integration Services is The Enterprise ETL platform that supports on all ETLing scenario. Covering from small data transfer to large complex ETL solutions, it has become the number one on ETL solutions for many projects and organizations.

Just like other implementations with other tools, the packages we create with Integrations Services need to troubleshoot when it does not work as we expected. There are many way of troubleshooting, however, the most common technique is debugging. Debugging is the process of finding problems that occur during the execution, either at design stage or after deployment. We can debug SSIS package too.

There are various ways of debugging SSIS package at the development, will discuss it with different post, but let's focus on one common technique. When we run the package using SQL Server Data Tools, most of the events are recorded and can be seen with one of the Tabs in design window. This tab cannot be seen when you open the package for designing but it becomes visible as Progress when you execute and visible as Execution Results when you complete the execution. See the images below;


This tab is very useful as it explains how tasks and containers involve with the execution in a hierarchical manner. You can navigate via the tree and find out the problematic one if there is an issue.


There is a slight performance impact on this collection. Since it has to collect all information, it adds an overhead to the package execution. Even though it is a slight one, if you want, it can be disabled by toggling Debug Process Reporting menu item in the SSIS menu;