Tuesday, June 30, 2015

Double click on .sql file opens a blank Management Studio Windows

This happens mostly with older version of SQL Server such as 2005. When a SQL file with .sql extension is double-clicked, it opens Management Studio but file does not get opened. If you experience the same, all you have to do is, modify the registry entry in sqlwb.sql.9.0. It requires to add "%1" as a placeholder to sqlwb.sql.9.0 -> Shell -> Open -> Command -> Default as below.

From:
"C:\Program Files (x86)\Microsoft SQL Server\90\Tools\Binn\VSShell\Common7\IDE\sqlwb.exe" /dde

To:
"C:\Program Files (x86)\Microsoft SQL Server\90\Tools\Binn\VSShell\Common7\IDE\sqlwb.exe" "%1" /dde


Monday, June 29, 2015

.sql files are opened with older version of Management Studio, how can I get it opened with new version of Management Studio?

If you have two or more versions of SQL Server installed in your machine, most of the time, when you open a .sql file by double-clicking on it, it gets opened with older version of SQL Server. This happens because of the registry-entry registered with the registry. If you are using latest operating systems like Windows 8, then it can be simply changed by accessing Control Panel -> Default Programs -> Set Associations. It allows you to set the application for .sql extension, you can either pick one from the list or browse for ssms.exe.


If the 5 Operating System is different and you have no way of setting it, you can try changing the registry entry and see. Not sure whether this is the right way of setting it but it worked for me. If you have to do it, test it in an environment configured for testing before applying it to production environment.'

If you navigate through registry (you can open it via regedit.exe), HKEY_CLASSES_ROOT has a node for .sql.


As you see, default is set to ssms.sql.12.0. If you scroll down through nodes, you will see this node and how it is registered.


Now if you want to get your .sql opened using a different version, find a relevant node (like ssms.sql.12.0, ssms.sql.11.0) and set it with .sql.


SQL Server Brain Basher of the Week #018 - Single insert with multiple rows

Here is a basic concept you should know. It is about inserting records, specifically inserting multiple records with a single insert statement

Can we insert multiple rows using a single insert statement?

Yes, this is possible, however code has to be constructed as per the version of SQL Server. SQL Server 2008 started supporting an enhanced VALUES clause that allows us to submit multiple rows separated by comma. If the version is lower than 2008, UNION ALL has to be used for constructing the code that helps us to build a virtual table on values.

Note that both these operations are processed as an atomic operation, hence a failure on one row fails the whole operation, inserting none of the records into the table.

Here is a sample code.

-- Connecting with the temp table
USE tempdb;
GO

-- Creating a test table
CREATE TABLE dbo.TestTable
(
 Id int PRIMARY KEY
 , Value varchar(20) NOT NULL
);
GO

-- Inserting multiple rows with enhanced VALUES clause
-- This is possible only with SQL Server 2008 or later
INSERT INTO dbo.TestTable
VALUES
(1, 'abc'),
(2, 'abc'),
(3, 'abc')

-- Inserting multiple rows with UNION ALL
-- This is what we have used with older version
INSERT INTO dbo.TestTable
SELECT 4, 'abc' UNION ALL
SELECT 5, 'abc' UNION ALL
SELECT 6, 'abc';


SELECT * FROM dbo.TestTable;


Sunday, June 28, 2015

Indexes should be dropped before a bulk insert or not

If we are loading a large volume of data into an indexed table, we always drop the index, load the dataset, and re-create indexes assuming that the overhead of dropping and re-creating indexes is less than the overhead of loading data with the indexes in place. But for certain situations, this assumption may not give any benefits. When loading a small dataset, dropping and re-creating may be counterproductive, and may take more time for re-creating than the time it takes for loading data with indexes in place.

Considering that, how do we determine whether we should drop the indexes before loading or insert all records with indexes in place?

Microsoft has given set of guidelines for this. It is based on minimal amount of new data to be loaded, proportion to the total data in the table. If your new data load is equal or greater than the percentage given, it is recommended to drop the indexes before loading and re-create them after loading.

Indexes Relative amount of new data
Clustered index only 30%
Clustered and one nonclustered index 25%
Clustered and two nonclustered indexes 25%
Single nonclustered index only 100%
Two nonclustered indexes 60%

For example, if you have 100,000 records in the table that has a clustered index only and have to load 30,000 new records, it is better to drop the index before loading and re-create it afterward.

You can read more info on this at: https://msdn.microsoft.com/en-us/library/ms177445.aspx

Saturday, June 27, 2015

Ways of incrementally loading data to a data warehouse

Once I wrote a post on Incremental ETL (Incremental ETL: How to identify changes for fact data when no support from the source) that discusses how to use Checksum for identifying changes before transferring the extracted data from the source, specifically when source does not support identifying changed records. This raised a question: what are the other ways of incrementally loading a data warehouse, hence this post speaks about them.

There are multiple ways of loading incremental data into data warehouse. One has to be picked based on many factors such as performance, whether data warehouse accepts updates, whether data warehouse maintains history and whether staging environment is maintained (Do we need a staging database for warehousing projects?). Here are most common ways used;

CDC enabled source tables
If the source table is enabled with CDC (Changed Data Capture), then changes can be easily identified and warehouse table, either dimension or fact can be updated appropriately. If ETL is written with SSIS, CDC related tasks can be used for identifying changes and splitters can be used for identifying the type of the change such as INSERT, UPDATE, DELETE and the update the warehouse table accordingly.


The Slowly Changing Dimension transformation
This is the most common used one for loading dimension (not very large dimension) tables as it supports identifying changes comparing source and warehouse, doing inserts and updates, and most importantly handling type 2 type slowly changing dimensions. This does not require source maintaining high water mark and can be easily implemented using the wizard given with SSIS.


The MERGE statement
This T-SQL statement allows us to perform insert, update and delete operations using a single statement combining source and destination (warehouse). Since the code has to be executed with SQL Server engine, SQL Server instance that hosts the warehouse should be able to access the source. This accessibility is possible when source is in one of the databases in the same SQL Server instance or source can be linked as a linked server to SQL Server instance. The most common practice is, loading data from the source and performing necessary transformations using SSIS and then transformed data is loaded to a temporary table in the warehouse. A stored procedure in the warehouse then performs merging using MERGE statement.


Using Checksum
This technique is used when there is no way of identifying changes at the source and load is too heavy for Slowly Changing Transformation. This is usually implemented with staging environment and checksum value is used for identifying whether the record is changed or not. Read more on this at: http://dinesql.blogspot.com/2015/04/incremental-etl-how-to-identify-changes.html

The Lookup transformation
This SSIS transformation is used for smaller dimensions. This is not specifically given for handling this scenario but it can be used for comparing source data with existing data in the warehouse and find matching records.


Considering all five above, me preferred ones are Checksum and MERGE because they offer flexibility, maintainability and most importantly good performance.

Friday, June 26, 2015

Does Change Data Capture (CDC) capture TRUNCATE operation?

One of the sessions we had with SQL Server Sri Lanka User Group Meet-up yesterday was on Change Data Capture which is widely used for capturing changes on table modifications. At the end of the session, there were few questions on it for the sepaker, and I was asked a question on it too. The question was "Does CDC capture TRUNCATE operation?".

Considering the factors related to CDC, I gave the answer as "It should be" but later I realized that it may not possible because TRUNCATE does not log records immediately in the log file. In this case, what is the response from CDC for TRUNCATE?

Following code creates a database and a table, and enable CDC. The it inserts records and see how CDC has captured them.

-- create a database for testing
CREATE DATABASE TestDatabase;
GO

-- Connect with the database and create a table
USE TestDatabase;
GO

CREATE TABLE dbo.Product
(
 Id int PRIMARY KEY
 , Code char(5) NOT NULL
 , Name varchar(50) NOT NULL
 , Color varchar(20) NOT NULL
);
GO

-- Enable CDC for the database
EXEC sys.sp_cdc_enable_db;
GO

-- Enable CDC for the table
-- Make sure Agent is running before executing this
EXEC sys.sp_cdc_enable_table 
   @source_schema = N'dbo'
 , @source_name   = N'Product'
 , @role_name     = NULL
 , @supports_net_changes = 1;

-- Inserting records
INSERT INTO dbo.Product
VALUES
  (1, 'P0004', 'Product 1', 'Black')
, (2, 'P0004', 'Product 2', 'White')
, (3, 'P0003', 'Product 3', 'Red')
, (4, 'P0004', 'Product 4', 'Black');
GO


--Define the LSN range 
DECLARE @from_lsn binary(10), @to_lsn binary(10) 
SET @from_lsn = sys.fn_cdc_get_min_lsn('dbo_Product') 
SET @to_lsn   = sys.fn_cdc_get_max_lsn() 

-- Get all the changes for the table 
SELECT * FROM cdc.fn_cdc_get_all_changes_dbo_Product (@from_lsn, @to_lsn, N'all') ;


Now let's delete all records and see how it captures.

-- deleting all records
DELETE dbo.Product;
GO

--Define the LSN range 
DECLARE @from_lsn binary(10), @to_lsn binary(10) 
SET @from_lsn = sys.fn_cdc_get_min_lsn('dbo_Product') 
SET @to_lsn   = sys.fn_cdc_get_max_lsn() 

-- Get all the changes for the table 
SELECT * FROM cdc.fn_cdc_get_all_changes_dbo_Product (@from_lsn, @to_lsn, N'all') ;


Let's insert all records again and truncate the table.

-- Inserting records
INSERT INTO dbo.Product
VALUES
  (1, 'P0004', 'Product 1', 'Black')
, (2, 'P0004', 'Product 2', 'White')
, (3, 'P0003', 'Product 3', 'Red')
, (4, 'P0004', 'Product 4', 'Black');
GO

-- truncating the table
TRUNCATE TABLE dbo.Product;


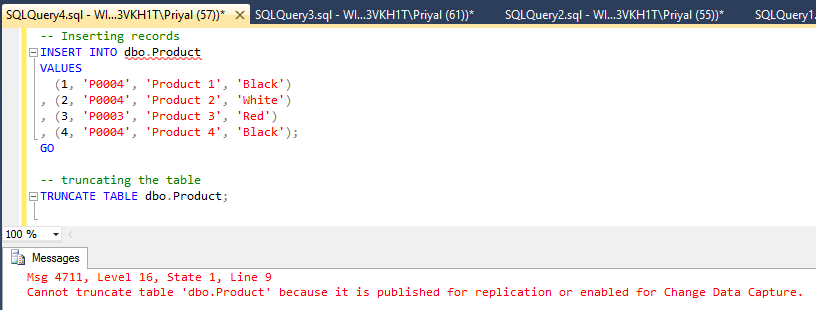
As you see, truncation is not possible with this table. The error message clearly says that truncate operation is not allowed with CDC enabled tables.

For the question I was asked, the answer I gave should be corrected. The answer should be "truncate operation is not possible with CDC enabled tables".

Wednesday, June 24, 2015

SQL Server Integration Services (SSIS) Feature Pack for Azure is released

Microsoft has released SSIS Feature pack for Azure that allows us to connect with Azure, transfer data between azure and on-premises data sources, and most importantly process data using HDInsight. It release includes following components;

Connection Managers

  • Azure Storage Account Connection Manager 
  • Azure Subscription Connection Manager

Tasks

  • Azure Blob Upload Task 
  • Azure Blob Download Task
  • Azure HDInsight Hive Task
  • Azure HDInsight Pig Task
  • Azure HDInsight Create Cluster Task
  • Azure HDInsight Delete Cluster Task

Data Flow Components

  • Azure Blob Source
  • Azure Blob Destination

Azure Blob Enumerator 

  • for Foreach Loop Container

Download the feature pack for SQL Server 2012 from herehttps://www.microsoft.com/en-us/download/details.aspx?id=47367
Download the feature pack for SQL Server 2014 from herehttps://www.microsoft.com/en-us/download/details.aspx?id=47366
Once it is installed, items should be appeared as below images;

Control Flow Items:


Data Flow Items:

Tuesday, June 23, 2015

How to block users updating records I have selected/read

We know that, with the default behavior, records are getting exclusively locked when we perform modifications against data, disallowing other users to access them. Until we complete the transaction, exclusive locks will be held by SQL Server, making sure that no one not only modify but execute SELECT statements too. However default settings does not hold locks obtained for SELECT statements blocking other users reading data you have read. But what if you need it?

If you want to make sure that no one modify records which you have read for your operation, you need to change the default Isolation Level and select data within a Transaction. The Isolation Level determines the behavior of concurrent users who read or write. Default Isolation Level is READ COMMITTED which locks records using shared locks for reading but does not hold them until the transaction is completed. In order to keep the obtained shared locks until the transaction is completed, Isolation Level has to be brought up to REPEATABLE READ Isolation Level.

REPEATABLE READ keeps acquired shared locks for read data till the end of transaction. This makes sure that no one can modify records we have read and avoid a concurrency issue called Inconsistency Analysis.

Here is the way of doing it.

Open a new connection and execute the following;

-- First connection
-- setting the isolation level
SET TRANSACTION ISOLATION LEVEL REPEATABLE READ;

-- start a transaction
BEGIN TRAN

 -- executing a select query
 SELECT * 
 FROM Sales.SalesOrderHeader
 WHERE YEAR(OrderDate) = 2011;

Then try to modify a record related to above query with another connection.

-- Second connection

-- Try to retirve data
-- This works
SELECT * 
FROM Sales.SalesOrderHeader
WHERE YEAR(OrderDate) = 2011;

-- Try to update a record
-- This will NOT work
UPDATE Sales.SalesOrderHeader
 SET ShipDate = DATEADD(dd, 1, shipdate)
WHERE SalesOrderID = 43660;


As you see, second connection will not be able to modify records until the transaction related to first connection is done.

Sunday, June 21, 2015

SQL Server Brain Basher of the Week #017 - Alternative names for objects

Microsoft SQL Server does not force you with hard rules for naming objects such as tables but some recommendations. Your tables, your procedures, you functions can be named as you want and we generally use Pascal notation for naming objects (for more info on notations: Camel notation, Pascal Notation, Hungarian Notation). Sometime this leads to have very lengthy names and not user-friendly in some context. The Brain Basher of the week is based on it;

Can I have alternative names for my objects?

This can be achieved with Synonym Objects. It allows us to add another name on objects that are exist in either local or remote server. For an example, assume that you have a table called dbo.SalesOrderHeaderForAsiaRegion and you want to have a shorter name for this, a synonym can be created on this as AsiaSales. Another example is, assume that you need to access a table called Customer exist in your database and link with another table called Customer in a different database in another instance, a synonym can be created for second Customer table exist in second instance on first instance.

Here is a sample code for this;

USE AdventureWorks2014;
GO

-- Check existing table
SELECT * FROM Sales.SalesOrderHeader;
GO

-- Create synonym on it
CREATE SYNONYM SalesHeader
FOR Sales.SalesOrderHeader;
GO

-- Checking synonym created
SELECT * FROM SalesHeader;

For more info on Synonym:

Friday, June 19, 2015

Can I create a permanent table inside the tempdb?

Microsoft SQL Server comes mainly with five system databases: master, model, msdb, tempdb and resources. In addition to that some more databases are created with different implementations such as replications. During a discussion, a question related to tempdb came up: What do not we maintain a permanent table inside the tempdb if we need to maintain some data not related to business-related database?

First thing we need to understand is, how these system tempdb works. When SQL Server services is restarted, tempdb gets recreated using the template which is model. Since it is getting recreated, we lose all our works we have done with tempdb before the restart. Considering this fact, should we create a table inside tempdb, other than temporary tables that are prefixed with either # or ##?

Here is an example, this code creates a table inside the tempdb and then it shuts down the service.

-- Connecting with tempdb
USE tempdb;
GO

-- Creating a table (permanent)
CREATE TABLE dbo.TestTable
(Id int);
GO

-- Query and see, this works
SELECT * FROM dbo.TestTable;

-- Sending shutdown singnal
SHUTDOWN WITH NOWAIT;

Once manually restarted, we can query the same table and see, result is shown below.

-- Connecting with tempdb
USE tempdb;
GO

-- Query and see, this works
SELECT * FROM dbo.TestTable;


Do you still want to create permanent tables inside the tempdb?

Thursday, June 18, 2015

Looking for a Hadoop Cluster for testing? Let's configure Hortonworks HDP Sanbox

The latest buzzword in IT, or more particularly in data analytic is Big Data. It does not come alone, it always comes with Hadoop which offers distributed storage and processing. Everyone loves to do some experiments with new technologies, or popular technologies, hence everyone loves to do the same with Big Data and Hadoop. But setting it up is not an easy task and cloud HDP subscriptions offered by various vendors are not so flexible in terms of trial-period given. However, if you really want, you can use Sanboxes offered by some vendors for testing Hadoop implementations.

One of the HDP cluster I used for testing is HDInsight. Since the trail is limited, searched for alternatives and found the Sandbox offered by Hortonworks. This sandbox is configured as a self-contained virtual machine and it can be simply used without connecting to cloud. It does not come with multiple nodes, means that all Name Node, Job Tracker, Data Node, etc. are in same virtual machine. You will not be able to get the exact picture of distribution but you can do everything you need to do with Hadoop with this.

Here are the steps for configuring HDP sandbox.

Visit http://hortonworks.com/. Click on Hortonworks Sandbox under Get Started menu that is the top menu.


This takes you to a Download and Install page. At this moment, HDP 2.2.4 is the stable and reliable version, but it offers HDP 2.3 - Preview too. HDP 2.2.4 comes in three flavors; VirtualBox, VMWare and HyperV. Download the best suited for you.


Make sure you download the Install Guides too. Configuration and usage is same for all three types, for this post, I will assume that you download VirtualBox virtual machine which is Sandbox_HDP_2.2.4.2_VirtualBox.ova. Once this is downloaded, you need to import it, it is fairly straight forward, all instructions are given with the Installation Guide, follow it for importing into your VirtualBox environment (or VMWare or HyperV).


After importing, all you have to do is, click on Start button. If your machine is ready for running virtual machines, it should start without any issue, however it is very common to see following error message with most of VMs;

Failed to open a session for the virtual machine Hortonworks Sandbox with HDP 2.2.4.2.

VT-x is not available. (VERR_VMX_NO_VMX).

Result Code: E_FAIL (0x80004005)
Component: Console
Interface: IConsole {8ab7c520-2442-4b66-8d74-4ff1e195d2b6}


There can be two reasons for that. Once is, not enabling Visualization in BIOS. Second can be, incompatibility with other virtual environments. If Virtualization is not enabled in your machine, boot the machine with BIOS and enable it. If you still get the same error, and if you are running with Windows 8, make sure you disable HyperV. This thread discusses the same, follow it: http://h30434.www3.hp.com/t5/Desktop-Hardware/How-to-Enable-Intel-Virtualization-Technology-vt-x-on-HP/td-p/3198063.

And this video shows how to disable HyperV for addressing the same error: https://www.youtube.com/watch?v=Y56boAsdptw.

Once everything is done, you should be able to start it and you should see a scree like below.


As it says, there are two ways of accessing this; you can press ALlt+F5 for logging, user id is root and password is hadoop.


Once login you can continue with your commands for working with Hadoop.


In addition to that, GUI is given too. As the first screen explains, open a browser and go for http://127.0.0.1:8888/.


Then click on http://127.0.0.1:8000 for opening hue (Hadoop User Experience). It allows you to do your Hadoop work easily.


Wednesday, June 17, 2015

Generate comma-separated value as a part of GROUP BY

This is not a new thing but it is a common requirement with many implementations, so making a post on it.

Assume that you need to get some values in the group as a comma-separated value instead of running them in an aggregate function. There are  many ways of handling this, some are complex and some are straight-forward. If it is not a complex GROUP BY and table is relatively small, following is the best I have used.

Let's say, we have an EmployeeTelephoneNumbers table like below;

EmployeeId PhoneNumber
1 0777222333
2 0777343565
2 072345345
2 0112456456
3 071578976
3 01154672121

And need to produce a result like this;

EmployeeId PhoneNumber
1 0777222333
2 0777343565, 072345345, 0112456456
3 071578976, 01154672121

As usual, we have to use GROUP BY and perform a different logic for forming the second column without using an aggregate function. For that, first we need to use is FOR XML clause, which allows us to convert the tabular resultset into an XML. It has different modes such as RAW, AUTO, EXPLICIT and PATH and PATH5 has to be used with this.


Next is STUFF function. This function inserts a string into another string deleting the given length.

For more info on STUFF function: https://msdn.microsoft.com/en-us/library/ms188043.aspx

What we have to do is, use FOR XML PATH for generating an XML that contains all values for grouping and using it as a string. Then STUFF will be used for removing the extra characters.

Here is a sample code.

USE tempdb;
GO

-- creating the table
CREATE TABLE dbo.EmployeeTelephoneNumbers
(
 EmployeeId int not null
 , PhoneNumber varchar(200) not null
);
GO

-- Inserting sample records
INSERT INTO dbo.EmployeeTelephoneNumbers
 VALUES (1, '0777222333'), (2, '0777343565'), (2, '072345345'), (2, '0112456456'), (3, '071578976'), (3, '01154672121');
GO

-- Generate the result
SELECT 
 EmployeeId
 , STUFF((SELECT ', ' + PhoneNumber
   FROM dbo.EmployeeTelephoneNumbers
   WHERE EmployeeId = t.EmployeeId
   FOR XML PATH('')), 1, 2, '') PhoneNumbers
 
FROM dbo.EmployeeTelephoneNumbers t
GROUP BY EmployeeId;

Tuesday, June 16, 2015

Different query patterns you see with HiveQL when comparing with TSQL

In recent past......... a casual conversation turned to a technical conversation......

Friend: It is a surprise to see an MVP studying hard on Open Source, anyway good see you in the club :).

Me: This does not mean that I will be completely moving to Open Source, but I like to lean some additional things and get involved with a good implementation.

Friend: Okay, you have been studying HIVE for last few weeks, tell me three types of queries you have not seen with SQL Server?

Me: Yes, have seen few, let me remind three, you can interchange blocks in SELECT like FROM clause before SELECT, one CREATE TABLE statement for creating table and loading data, and of course duplicating table with CREATE TABLE LIKE :).

Conversation continued with more interesting topics related to two different platforms, will make more posts on my-usage of open source components such as Hadoop, Pig and HIVE for solutions I work on, but thought to make a post on this three items;

There are no big differences between TSQL (or standard SQL) and HiveQL queries, but some are noticeable if you are an experienced TSQL developer. If you have used MySQL, you will not see much as HiveQL offers similar patterns.

Let me elaborate three things I mentioned with my reply, that will surely encourage you to start studying on HIVE if you have not started using it.

1. 
SELECT statement of SQL Server always start with SELECT clause and then FROM;

SELECT Col1, Col2
FROM Table1
WHERE Col3 = 1;

HiveQL allows the same but it can be written like this too;

FROM Table1
SELECT Col1, Col2
WHERE Col3 = 1;

2.
If we need to create a table with SQL Server and load data, there are two ways with pros and cons.

CREATE TABLE NewTable
(
 Col1 int
 , Col2 varchar
);

INSERT INTO Table2
SELECT Col1, COl2
FROM OldTable;

-- or

SELECT Col1, Col2
INTO NewTable
FROM OldTable;

But HIVE offers an easy way of doing it.

CREATE TABLE NewTable
STORED AS RCFile
AS SELECT Col1, Col2 FROM OldTable;

3.
When we need to duplicate a table structure, this is what we do with SQL Server;

SELECT Col1, Col2
INTO NewTable
FROM OldTable
WHERE 1=0;

and HiveQL facilitates this;

CREATE TABLE NewTable LIKE OldTable;

If I am not mistaken, some of these are supported with APS. Not only that HDInsight supports HIVE in all the ways, let's try to understand the usage of HIVE and combining it with SQL Server implementations with future posts.

Monday, June 15, 2015

ETL Data Flow Architectures

ETLing is the way of getting data from one or more sources into your reporting environment or to a repository that holds enterprise-wide data for all reporting and analytical requirements. It is a common and well-known term in data warehousing because a data warehouse solution is impossible to exist without an ETL implementation.

ETL stands for extract, transform and loading, describing the data flow. Generally we extract data from sources, do validations on extracted data, and load the destination, most of the time, destination is a data warehouse. If the ETL solution is very small and less complex, data flow is always from sources to destination without any middle components. However if it is not, the architecture related to data flow is different and it includes additional components. The architecture of the data flow can be determined by considering following;
  • The number of data sources to be accessed.
  • The amount of data to be accessed and transferred in a single execution.
  • The type of loading, whether it is complete refresh or incremental loading.
  • Complexity of validations to be applied (transformations).
  • Data generation frequency at sources.
  • The extraction windows.
  • The accessibility of data sources.
Considering above factors, there are three possible ETL data flow architectures;

Single-stage ETL architecture
The single-stage ETL architecture is suitable for small and less complex data flows. With this architecture, transformation is done at the extraction and in-flight. 


Combining First Name, Middle Name and Last Name into Full Name at the extraction and finding duplicates of Customer Entity are some examples for transformations performed with this architecture.


Two-stage ETL architecture
This data flow architecture maintains an additional environment called Staging. It can be a database (in most cases), set of text files or even Excel files. The staging is used as a temporary container for extracted data and it is implemented based on few factors such as different data acquisition windows, identifying modifications done with previously loaded data and auditing purposes. For more info o staging refer my post: Do we need a staging database for warehousing projects?.


Transformation on extracted data can be done in several stages. It can be performed at the extraction from sources and staging, and in-flight between sources and staging, and between staging and destination.

Three-stage ETL architecture
This extends two-stage architecture by introducing another layer called Landing Zone


This helps to reduce the workload (including transformation at extraction) with the sources. We can extract data as available in the source without adding any complexities for extraction queries, minimizing time it takes for completing the extraction. Then possible transformation can be applied to Landing Zone or later stages. Sometime, sources pushes data (via reports) without letting us to connect with sources. In a scenario like that, Landing Zone is the place where all source files are placed.


Sunday, June 14, 2015

SQL Server Brain Basher of the Week #016 - Views

During last 3-4 months, I have been continuously asking this question from many to understand how the fundamentals are known to everyone. A strong knowledge on fundamentals and concepts is the key for building efficient applications. Not only that, it takes us in the right path when solving problems. This question is based on Views, general views. Unfortunately, as per my rough calculation, only 30-40% were able to give the correct answer confidently. Here is the Brain Basher of the week;

Can we improve the performance of a SELECT query by creating a general view?

The answer I always expect is No but many say Yes. Of course, you can argue on this saying that it improves the performance in certain situations, but let me take that addressed later in this post.

Let's try to understand What is a View. Remember, View is just a definition, it is not a container that can hold data. We create views using either a single table or combining multiple tables. When they are called for data, the query written in the view is executed, just like we execute an ad-hoc SELECT statement. Therefore, theoretically, there cannot be any sort of improvements in terms of data retrieval with a View.

When I say No as the answer, the obvious question comes up: Why we need Views then?

Views help us in many ways. Main thing is security. It allows us to open only required columns from a table for outsiders without opening the entire table. For an example, a table that contains sensitive data such as Salary can be hidden by creating a view on top of the table with required columns and opening (or granting permission) the View to users instead of table. In addition to that, it reduces the complexity of a query with multiple joins. A SELECT query required by users (or developers) that needs many joins and filters can be made as a simple SELECT by creating a view with same query and let users to use the view instead of the query.

Okay, cannot we really improve the performance of it? Not with general Views but Index Views. A general View can be converted as an Index View by introducing a clustered index on it. Index View holds data based on the query written and when it is called, engine does not need to retrieve data from base tables and perform any calculations added to the query. However, the question discussed is not about Index View.

Saturday, June 13, 2015

What is "High Water Mark" in ETLing?

When extracting data from one database to another in continuous fashion, two common techniques are used; delete the destination and reload with extraction or load the destination as an incremental load. First technique is straight forward, but for the second, changes have to be identified, it is commonly done with a datatime column in the source that holds either created date or last modified date.

What is the link between this and "High Water Mark"? The High Water Mark is used for indicating the highest water level for a tide or flood. Same theory can be applied for our scenario, considering datetime column in the source as High Water Mark.


Friday, June 12, 2015

User needs sysadmin permission to the instance but he should be denied permission on some databases

If someone wants to manage the SQL Server instance completely and perform any activity in the server, she or he should be a member of sysadmin server-level role because it bypasses all security checks. But what if you need to someone be a member of sysadmin server-level role and restrict him to some databases? Is it possible?

Although it is not a common scenario, a requirement like this can be popped up and we may struggle to find a solution. How can we do it? If User1 is a member of sysadmin server-level role, we have no way of restricting User1 accessing a database. In order to handle the scenario, User1 needs to be given all permissions offered with sysadmin role manually without adding him to sysadmin role and limit his permission only for required databases. Yes, it is possible to address individual permission with individual statements up to some extent but it is time consuming and makes the whole process complex. It becomes more and more complex and increases the maintenance cost if more users have to be managed in similar way. The best solution is, grant Control Server permission to User1.

The Control Permission is similar to Sysadmin fixed server role but not identical. It offers all the permissions offered with Sysadmin role but there are some limitations with some objects such as DBCC commands and some system stored procedures. However, a requirement like above can possibly managed with it.


Let's test this. Assume that Jane and Joe are database administrators and they need full permissions on the instance. However, Joe should not be able to access AdventureWorksDW2014 database. Let's try to handles this scenario with Control Permission though it does not offer a 100% working solution.

Below code creates logins for Jane and Joe; Jane is in Sysadmin fixed server role and Joe has Control Server permission.

USE master;
GO

-- Create Jane login
CREATE LOGIN Jane
WITH PASSWORD = '123'
, CHECK_EXPIRATION=OFF
, CHECK_POLICY=OFF;
GO

-- Add Jane to Sysadmin role
ALTER SERVER ROLE sysadmin ADD MEMBER Jane;
GO

-- Create Joe Login
CREATE LOGIN Joe
WITH PASSWORD = '123'
, CHECK_EXPIRATION=OFF
, CHECK_POLICY=OFF;
GO

-- Grant Control Server permission to Joe
GRANT CONTROL SERVER TO Joe;
GO

Let's check permission assigned for both. Below query confirms that both have same permissions.

EXECUTE AS LOGIN = 'Jane';
SELECT * FROM sys.fn_my_permissions(null, null);
REVERT;
GO

EXECUTE AS LOGIN = 'Joe';
SELECT * FROM sys.fn_my_permissions(null, null);
REVERT;
GO

Now we need to restrict Joe to AdventureWorksDW2014 database. For testing purposes, let's deny permission to both Jane and Joe.

-- deny permission to AdventureWorksDW2014
USE AdventureWorksDW2014;
GO

-- We do not need User account in the database
-- because both Jane and Joe have admin rights
-- But let's create them
CREATE USER Jane FOR LOGIN Jane;
CREATE USER Joe FOR LOGIN Joe;
GO

-- This gives deny permission to Jane
ALTER ROLE db_denydatareader ADD MEMBER jane
ALTER ROLE db_denydatawriter ADD MEMBER Jane
GO

-- This gives deny permission to Joe
ALTER ROLE db_denydatareader ADD MEMBER Joe
ALTER ROLE db_denydatawriter ADD MEMBER Joe
GO

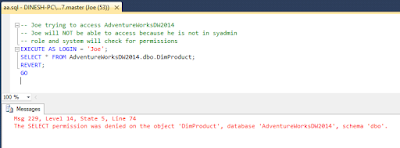
Let's see how this works now. Below code shows that Jane can still access the database (tables particularly) but Joe cannot access.

-- Jane tryint to access AdventureWorksDW2014
-- Jane will be able to access because she is in sysadmin
-- role and system bypasses security checks.
EXECUTE AS LOGIN = 'Jane';
SELECT * FROM AdventureWorksDW2014.dbo.DimProduct;
REVERT;
GO

-- Joe trying to access AdventureWorksDW2014
-- Joe will NOT be able to access because he is not in syadmin 
-- role and system will check for permissions
EXECUTE AS LOGIN = 'Joe';
SELECT * FROM AdventureWorksDW2014.dbo.DimProduct;
REVERT;
GO


Have we solve the problem with this solution completely? Since we just restrict table reading and writing, we have not addressed it fully but I believe that it is managed up to some extent now.

Can Joe change his User Account in the AdventureWorksDW2014 with high permissions?


Can Joe upgrade himself as Sysadmin?


As you see, many things are not possible with Joe's account. However this needs to be thoroughly tested as I have not used this in production.

Thursday, June 11, 2015

I did not use my HDInsight cluster but my credit is over

Have you noticed this? Or have you already experienced this? Are you going to complain on it? Then wait.............

Microsoft Azure HDInsight billing is different with other billing methods (Once I saw that it is same for all Azure offers, but I am not sure). Billing starts once the cluster is created with the storage and you will be charged continuously even though you do not use it. I know that this annoys you but that is the fact unfortunately.

For clarifying this, I checked with my account, this is what I see;

When click on View more details;


This clears shows that I am being charged for the cluster I have created even though it is not being used.

How do we stop charging? There is no way of stopping, only possible way is, once done with the cluster, drop it and if you want it again, re-create it (This annoys more, I know that).

I prefer to have some kind of facility that allows us to enable/disable but I cannot see something like that and did not see any upcoming similar facility with searches made.

If you want to know about pricing on this, have a look on this page: http://azure.microsoft.com/en-gb/pricing/details/hdinsight/

Wednesday, June 10, 2015

How to navigate HDInsight cluster easily: CloudXplorer

Once HDInsight cluster is created for Big Data implementations, navigating the cluster (or Azure Blob Storage) via logical folders and accessing files inside, writing and copying files in and out is something we really require. For that, rather than navigating via Azure Management Portal, an application like Windows File Explorer is very beneficial. There are few tools available for accessing the cluster, some can be installed as an add-on to Visual Studio too. However I found that CloudXplorer is a good tool for accessing it, hence thought to write a post on how to use it.

Let me create a HDInsight cluster. First of all, a Storage is required, below screen shows creating a storage called azure01dineshhdistorage.


And then creating a Cluster  called azure01dineshhdinsight.


Once created, need to download CloudXplorer from http://download.cnet.com/CloudXplorer/3000-18500_4-75940217.html and install it. After installation, tool can be opened and add the storage account.

In order to connect with Windows Azure Account, we need to get the Name of our storage used for hdinsight configured and the Primary Access Key of it. Follow below steps for that;

1. Open Windows Azure Management Portal.
2. Click on Storage on left panel for opening all storage added.
3. Select the one configured for hdinsight and click on Manage Access Keys button on bottom panel.
4. Get Storage Account Name and Primary Access Key copied.


Next steps are;

1. Open CloudXplorer installed.
2. Click on Accounts icon in the ribbon.
3. Click on New button and select Windows Azure Account.
4. Paste copied Storage Account Name and Primary Access Key to Name and Secret Key text boxes.


5. Click OK to save setting. Select the account added and click OK again to access the cluster.


Now we can see, copy, add, create files just like we do with Windows File Explorer. If need to see all items in the cluster, click on Report icon in the ribbon and list as you want.


Monday, June 8, 2015

SQL Server Brain Basher of the Week #015 - SSIS Failing package

Just like last Brain Basher, this week one also based on Integration Services. Let's try to understand a very common misconception on package failures.

If one of the tasks is failed during the execution, does it stop the execution of entire package?

Assume that you have configured two Script Tasks as below and the first one is configured to ForceExecutionResult to Failure.


When this package is executed, Script Task 1 gets failed. Does the execution continue with Script Task 2 or not? Let's execute and see.


As you see, the second task is not getting executed. If a question "Why" is asked, a common answer is "failure of previous task stops executing the package".

Yes, execution does not continue but it is not exact reason. The reason for this (and for many cases) is Precedence Constraint set between these two. Since it is set as Success, execution does not continue with the second task, hence it stops executing the package. However, if the Precedence Constraint is set as Completion, it executes the second task too.


Execution of the entire package at a failure of a task will be stopped if FailPackageOnFailure property is set as true for the task. It forces to stop the execution of entire package regardless of the Precedence Constraint set.


SQL Server Brain Basher of the Week #014 - SSIS Variables and Parameters

We have been using variables inside Integration Services packages for maintaining temporary values for various computations and passing external values to the package when executing. With SQL Server 2012, Parameters were introduced which is similar to variables and many still get confused with these two; what to be used and when and why they should be used, hence this week Brain Basher is based on Integration Services Variable and Parameters.

What is the difference between Variables and Parameters with Integration Services?

Variables are used to hold values temporarily for calculations and configurations. A common usage of variables is, maintaining one for Connection String of one of Connection Managers. Before SQL Server 2012, we were able to pass new values for these variables at the execution time using Configuration Files, however with SQL Server 2012 and later, it is not possible with Project-Level-Deployment.

Parameters are similar to variables. However,  they can be defined at Package Level, making them as Private to the package. They can also be defined at Project Level, making them as Global to the project. Once defined, parameters can be used for calculations and holding values for configurations. And values them can be passed at the execution time with Project Deployment Model.

The main difference between these two is, with modern deployment, variable is for internal calculations and not for getting external values at the execution time. Parameter can be used for assigning values to variables and value of it can be passed at the execution time.