Saturday, December 31, 2016

Azure SQL Databases - Prevent accidental deletes - Azure Locks

Have you ever deleted a database accidentally? If you have done, then you know very well that how it makes you uncomfortable :). If you are managing a very important database and you should make sure that even authorized users cannot easily delete the database without taking an additional action, Azure has a way of configuring it. It is called Azure Locks.

Azure Locks is part of Azure Resource Manager. It allows us to set locks on two ways;
  • Read-only - makes sure that authorized users can read the resource but editing and deleting are not possible.
  • Delete - makes sure that authorized users CANNOT DELETE the resources.
For example, if you set a Delete Lock at one of your Azure SQL Servers, no resources available under the SQL Server such as A Database cannot be deleted until the Lock is released. You can do the same for a database instead setting the lock at the server level as well.

Here is an example. If we need to set a Delete Lock for one of SQL Servers, get the Server Properties Blade opened and click on the Locks property.


Once the Locks Blade is opened, we can add a lock by clicking the Add Button. As shown in the above image, I have set the name of it as DeleteLock, Lock type as Delete and a small note. Once this is saved, this lock gets applied to all resources that come under the selected SQL Server.

If I try to delete a database in that server, Azure Resource Manager makes sure that I cannot delete the database until I remove the lock.


Friday, December 30, 2016

Inserting records, ignoring duplicates, recording them

A column like email address in en entity like Customer or Employee is always set with an UNIQUE Constraint to make sure that no duplicates values are inserted. This is achieved through an Unique Index setting up with the column. This does not annoy us when we accept only one record at a time for inserting or updating but it surely annoys us when we perform a Bulk Operation.

There are instances that we load large number of records as a single batch. For an example, if we get 1 million records to be inserted to a table like Customer that has Email Column, if one duplicate is detected within the batch, the whole batch is getting rolled back. Sometimes, we need to continue with all other records ignoring duplicates but the standard Unique Index does not allow us to do it.

Here is an example.

USE tempdb;
GO

-- Creating a table for Customers
IF OBJECT_ID('dbo.Customers') IS NOT NULL
 DROP TABLE dbo.Customers;
GO
CREATE TABLE Customers
(
 Title char(5) NOT NULL
 , FirstName varchar(50) NOT NULL
 , MiddleName varchar(50)  NULL
 , LastName varchar(50) NOT NULL
 , EmailAddress varchar(100) NOT NULL
 
)

-- Addin the unique index on the Email Column
CREATE UNIQUE INDEX IX_Customers ON dbo.Customers (EmailAddress)

-- Inserting one customer for testing
INSERT INTO dbo.Customers
 (Title, FirstName, MiddleName, LastName, EmailAddress)
VALUES
 ('Mr.', 'Dinesh', NULL, 'Priyankara', 'dinesh@dinesql.com')

If we try to insert records as a batch that has duplicates, none of them will be inserted.

-- This batch contains 4 records, note the 2nd and 3rd record
-- They have the same emial address
INSERT INTO dbo.Customers
 (Title, FirstName, MiddleName, LastName, EmailAddress)
SELECT 'Mr.', 'Yeshan', NULL, 'Santhush', 'yeshan@dinesql.com'
UNION ALL
SELECT 'Ms.', 'Jane', NULL, 'Western', 'jane@dinesql.com'
UNION ALL
SELECT 'Ms.', 'Jane', NULL, 'Black', 'jane@dinesql.com'
UNION ALL
SELECT 'Mr.', 'Jack', NULL, 'Knight', 'jack@dinesql.com'

The above operation results this;

Msg 2601, Level 14, State 1, Line 31
Cannot insert duplicate key row in object 'dbo.Customers' with unique index 'IX_Customers'. 
The duplicate key value is (jane@dinesql.com).
The statement has been terminated.

If we need to make sure that the operation ignores duplicates and continues, all we have to do is, add IGNORE_DUP_KEY option to the index.

-- dropping and recreating the index with IGNORE_DUP_KEY option
DROP INDEX IX_Customers ON dbo.Customers 
GO

CREATE UNIQUE INDEX IX_Customers ON dbo.Customers (EmailAddress) WITH (IGNORE_DUP_KEY = ON)

-- checking the insert again. It inserts all except the duplicate
INSERT INTO dbo.Customers
 (Title, FirstName, MiddleName, LastName, EmailAddress)
SELECT 'Mr.', 'Yeshan', NULL, 'Santhush', 'yeshan@dinesql.com'
UNION ALL
SELECT 'Ms.', 'Jane', NULL, 'Western', 'jane@dinesql.com'
UNION ALL
SELECT 'Ms.', 'Jane', NULL, 'Black', 'jane@dinesql.com'
UNION ALL
SELECT 'Mr.', 'Jack', NULL, 'Knight', 'jack@dinesql.com'

Though this works fine, an obvious question comes up is, how do we know what records have been ignored? There is no direct method to capture ignored records with this solution however following can be used with some additional coding;
  1. Load all email addresses to a Temporary Table or Table Variable before performing the main operation. After main Insert Operation, do a comparison using LEFT OUTER JOIN to find out records that were not inserted.
  2. Use Integration Services for the operation. It has allows you to capture problematic records using error handlers or can duplicate the flow, record all emails addresses in another container, and do the comparison at the end of the task.

Thursday, December 29, 2016

Setting a higher Priority Base value to SQL Server - are we optimizing the process or taking a risk?

There are set of server level configurations related to optimizing SQL Server but not all guarantee that the result will be as expected and friendly. The Boost SQL Server Priority is one of such settings and though we have been given it for setting it to a higher value, prioritizing SQL Server processes in the Operating System, it is not recommended to change it.

I was asked about this last week, whether we can optimize SQL Server processes by setting the property to true. Theoretically, it should optimize but it can result unexpected result as well.


In simple term, this setting allows us to set the Priority Level (or Priority Base) to 13. The default is 7, not 0 or a higher value. I am sure that the value 7 has been set for this for many reasons, hence it should not be changed. Assume that we changed this and now it is 13. This makes Operating System to give SQL Server processes to high priority than other requested processes. Experts say that this might bring you to a situation where you see something like no response from keyboard or no response from mouse

Therefore, remember, this is something you need to think twice if you are going to change it.

Wednesday, December 28, 2016

Reporting Services (SSRS) 2016 - Could not load folder contents Error - Even with SP1

I have been continuously hitting with this when the Reporting Services portal is opened first time;

Could not load folders contents
Something went wrong, Please try again later.


But if I refresh the page or reload the portal, everything starts working fine and it does not appear until I restart the service.

Not sure the reason, searched and read many posts, contacted some consultants but so far no luck. I tried with Recreating the database, Changing the credentials, Changing the TimeZone to UTC 0, But none of them worked for me.

As per the log, it fails first few attempts to connect with the database but I am not sure how it connects after (because my second attempt loads the portal).

Still expecting some answers for experts, will be updating this post once I have the answer, appreciate if can share your solution, if you have already faced this and solved.

Tuesday, December 27, 2016

Reporting Services (SSRS) - Upload Multiple Files

Although we have a new version of SQL Server 2016, multiple file upload facility is still not given as a built-in function and it annoys us when we have multiple RDL files to be uploaded manually. I am currently working on a Reporting Services project and have the same requirement, hence thought to make a simple application to upload multiple files.

If you make a search, you find related codes, written in many ways. I did a study on some of the code published and made a Windows Application for uploading my files. This is how it looks like;


I can select multiple files and upload;


It works fine for me but need to do more test, I will be continuous enhancing and testing it, if you need the same, please use the download link given below.

Link for the Windows Application: https://1drv.ms/u/s!Ahey1yiqH_9AgZwd-FOt5Qg3ej35oQ 

Monday, December 26, 2016

SQL Server Agent Error are logged in SQL Server Error Log or somewhere else?

I have written two posts on SQL Server Error Log; How to delete current SQL Server error log? My current log is in GBs and Reading SQL Server Error Log using XP_READERRORLOG, and they explain how the log is maintained, how log files are created and how the content can be read. I was asked a question on this but not exactly on SQL Server errors but SQL Server Agent errors.

Can we read/see SQL Server Agent errors in SQL Server Error Logs? Or should we see somewhere else for this? Generally, you should see all errors related to SQL Server but errors related to Agent are maintained somewhere else called Agent Error Log.

Just like the way SQL Server maintains its error logs, multiple files are maintained for Agent error logs. By default there are 10 files and they are saved in Program Files\Microsoft SQL Server\MSSQL13.MSSQLSERVER\MSSQL\Log folder.


The file named as SQLAGENT.OUT is the current one and just like the SQL Server Error logs, this gets recycled when the service is restarted. Once recycled, current one becomes SQLAGENT.1 and old SQLAGENT.1 becomes SQLAGENT.2, and so on. However, using Congfigure menu option in SQL Server Error Log node, we can adjust the number of files to be maintained but that facility is not exist with Agent Error Log.


If you see that the current log file is larger than you expect, it can be recycled by either by clicking the Recylce menu item in the context menu (see above image) or executing dbo.sp_cycle_agent_errorlog stored procedure.

Sunday, December 25, 2016

Automate adding common objects to new databases when they are created - SQL Server Brain Basher of the Week #062

Thought to share a specific conversation of one of the interviews did last month on a DBA role. The interview was done over the Skype call as the Interviewee was at a different place. We were having a conversation on past experiences of Interviewee and I learnt that he has worked for a company that maintains many databases for many clients and of course, he was explaining the work he had to do.

Here is the Brain Basher of the week based on the conversation I had. What is the best way of adding common objects to new databases when they are created?

Let me explain this by adding the conversation we had on it (Note that I have obtained permissions from the client and Interviewee for adding this small part of the interview to my blog, this is not the exact conversation had, have slightly adjusted it for writing purposes). let's call Interviewee as Jack.

Me: Okay Jack, since you have worked with a company that maintain large number of databases for clients, I am sure that you have many common objects like Tables, Stored Procedures in all databases.

Jack: Yes Dinesh. There are set of Tables and Procedures that we need to create when a new database is created to a new client.

Me: How do you do it? Are you adding them manually? Or have you done some automation on it?

Jack: I had automated it, yes, up to some extent. I have a script for creating a database and that script not only had the database creation part, I had creation code of all other required objects. So, all I had to do is, just run this script with few modification for setting up a new database.

Me: Great, do you know any other technique or method to make sure that all required common objects are available in the newly created database without adding them through the script?

Jack: There may be but, since I was comfortable with what I had, I did not look for something else. I had no issue with the ready-made code.

Me: Agree, but what if I need to make sure even I can create a database in your environment with all common objects, without your script? Or assume that one of your colleagues need to create a new database for a new client, and you are absent and he cannot find your script.

Jack: Yes, we experienced it several times and I accept that I did not have a document that explains how to do it :). But it was not a major issue at that time.

Me: Yes, it is always great to maintain a run-book (read more on Run Book: SQL Server Brain Basher of the Week #021 - Documentation). Anyway, we can use some components of the SQL Server for handling that, any idea how to use existing SQL Server components to automate some of those without having a script?

Jack: Like SQL Server Agent, using a job?

Me: How SQL Server starts the database creation when we ask to create one for us?

Jack: I am not sure about the internal operation but it requests the space from the OS based on the way we have configured the files and do some other operations, must be, and complete it.

Me: It actually takes a copy from a template and use it for creating the database. Do you know where is the template store?

Jack: Must be in one of the system folders. Sorry Dinesh, not sure where it is actually located.

Me: No problems. It is actually one of the system databases. It is Model Database.

Jack: Yes, I have heard about it but did not check much on that.

Me: You can actually add all your common objects to the Model Database and keep. Then, when anyone create a database, since it takes a copy of Model Database, the newly created database will automatically contain all required components. So, we do not need to add them manually or via a script.

Jack: Yes, I have missed that part...........

Conversation continued...........

Remember this, Model is the template and it is used by SQL Server to create databases when we ask.


Saturday, December 24, 2016

SQL Server: Calculate TimeSpan using TSQL - dd:hh:mm:ss

While coding on my new project, wanted to show the duration between two DateTime values as a Time Span like Remaining Days : Remaining Hours : Remaining Minutes : Remaining Seconds (dd:hh:mm:ss).


There are multiple solutions available in the net and you can certainly use one of them as long as they satisfy your requirements. However, this is what I wrote, it may be useful if you need the same.

DECLARE @d1 datetime = '2016-12-24T00:44:01.000'
DECLARE @d2 datetime = '2016-12-25T01:43:00.000'

SELECT 
 CASE WHEN LEN(DATEDIFF(ss, @d1, @d2) / 86400) = 1 THEN '0' + Convert(varchar(2), (DATEDIFF(ss, @d1, @d2) / 86400)) ELSE Convert(varchar(2), (DATEDIFF(ss, @d1, @d2) / 86400)) END 
 + ':' +
 CASE WHEN LEN((DATEDIFF(ss, @d1, @d2) % 86400) / 3600) = 1 THEN '0' + Convert(varchar(2), (DATEDIFF(ss, @d1, @d2) % 86400) / 3600) ELSE Convert(varchar(2), (DATEDIFF(ss, @d1, @d2) % 86400) / 3600) END  
 + ':' +
 CASE WHEN LEN((DATEDIFF(ss, @d1, @d2) % 3600) / 60) = 1 THEN '0' + Convert(varchar(2), (DATEDIFF(ss, @d1, @d2) % 3600) / 60) ELSE Convert(varchar(2), (DATEDIFF(ss, @d1, @d2) % 3600) / 60) END 
 + ':' +
 CASE WHEN LEN(DATEDIFF(ss, @d1, @d2) % 60) = 1 THEN '0' + Convert(varchar(2), (DATEDIFF(ss, @d1, @d2) % 60)) ELSE Convert(varchar(2), (DATEDIFF(ss, @d1, @d2) % 60)) END 

Here are some examples used with above code;


Friday, December 23, 2016

Delete All Azure SQL Server Firewall Rules using TSQL

In order to access Azure SQL Server databases, firewall rules have to be set at either server level or database level by adding client IP addresses. Server level rules can be configured using the Azure Portal but database level rules have to be done using TSQL. If you have many added many rules and you need to delete all or some, and if you try to use the portal for deleting, it will take long time because portal allows you to delete one at a time.

Assume that you have many number of server level rules configured as below;


I was asked about this and here is the script I wrote to delete selected server level firewall rules.

DECLARE @name nvarchar(200)
WHILE EXISTS (SELECT name FROM sys.firewall_rules WHERE name LIKE 'clientIPAddress_%')
BEGIN

 SELECT TOP (1) @name = name FROM sys.firewall_rules WHERE name LIKE 'clientIPAddress_%'
 EXEC sp_delete_firewall_rule @name;
END

It is a simple one but you can use it without using the portal. Make sure you have written the WHERE Condition properly otherwise it might delete rules you may need.

Thursday, December 22, 2016

Azure SQL Database - Enable TDE - Does it encrypt the bacpac file?

We use Transparent Data Encryption (TDE) for protecting our databases, making sure that no one can get our databases added to a different instance even though they manage to get either data files (.mdf) or backup files (.bak). TDE makes sure that data in data files is encrypted and it is called as encrypting data at rest. The standard way of enabling this is;
  1. Create a master key in master database.
  2. Create (or add an existing one from a copy) a certificate protected by the master key.
  3. Create a database encryption key protected by the certificate, in the database needs to be protected.
  4. Enable encryption in the database.

This is different with Azure SQL Database. Azure allows us to enable TDE with Azure SQL Database. It does not require steps like above, it can be simply enabled using the portal.


Although we do not create the certificate and the database encryption key manually, the storage of the database is encrypted using a symmetric key that is protected by a built-in server certificate in the SQL Server
.
Not only that, the main exception comparing with TDE-Enabled On-Premises database is, copying this database from the portal to local environment. If the database is not an Azure SQL Database and if you take a backup of it, you will not be able to restore it in another instance without certificate created for TDE. But if the database is an Azure SQL Database, when you export it to a bacpac file, it can be loaded to any instance without the Azure SQL Server level Certificate used to protect it. See below images;

1. Exporting the bacpac to classic storage.


2. Loading the database to on-premises server using Import Data-tier application... wizard.


3. Getting the database successfully added.


The reason for this is, when exporting a TDE-Enabled Azure SQL Database, the bacpac file is not getting encrypted, hence we need to make sure that it is secured.

Wednesday, December 21, 2016

Get SQL Server Trace automatically started at service startup

Although SQL Trace and SQL Server Profiler have been marked as deprecated and Microsoft recommends to use Extended Events instead, many of us still use SQL Profiler. You may run the Profiler for small traces or long traces but but if you need to make sure that it runs continuously even at the server restart, you need to consider following points;
  • SQL Server Profiler is not recommended for long-term monitoring and large traces.
  • Profiler cannot be automatically started when the server is restarted.
If you still need to implement it, you can consider;
  • Use SQL Trace instead.
  • Use sp_procoption to start the trace at the SQL Server Service start.
This makes sure that the trace configured is continuously running even when the server is restarted and the output is saved and queried anytime.

In order to implement this, you need to follow the steps below;
  1. Start with SQL Server Profile and select all events you need with columns and filters for trace.
  2. Get the definition of the created using the Profiler and use it for creating the SQL Trace.
  3. Include the code of SQL Trace with a stored procedure and add the stored procedure as a startup procedure.
Here is an sample implementation with details.

First let's make a Trace using the Profiler. The following Trace is created with TSQL_Duration Template and All Columns is selected for both Events.


Let's click on Run and then immediately stop. In order to get the code generated for SQL Trace, click File -> Export -> Script Trace Definition -> For SQL Server 2005 - 2016... menu item.


Save it as Trace01.sql. Then open the saved script in Query Window for modification. This code has a place to modify which sets the trace output file path. Since we need to make sure that this code can be executed at each server restart, a unique output file name is required. Therefore, let's add a variable called @FilePath and set with sp_trace_create statement. This is how the first part of the code is changed now;

/****************************************************/
/* Created by: SQL Server 2016 Profiler          */
/* Date: 12/21/2016  10:28:14 PM         */
/****************************************************/


-- Create a Queue
declare @rc int
declare @TraceID int
declare @maxfilesize bigint
set @maxfilesize = 5 

-- Please replace the text InsertFileNameHere, with an appropriate
-- filename prefixed by a path, e.g., c:\MyFolder\MyTrace. The .trc extension
-- will be appended to the filename automatically. If you are writing from
-- remote server to local drive, please use UNC path and make sure server has
-- write access to your network share

DECLARE @FilePath nvarchar(200);
SET @FilePath = N'E:\TraceOutput\SQLDurationTrace_' 
 + CONVERT(nvarchar(20), GetDate(), 112) + N'_' + REPLACE(CONVERT(nvarchar(20), GetDate(), 108), ':', N'')

exec @rc = sp_trace_create @TraceID output, 0, @FilePath, @maxfilesize, NULL 
if (@rc != 0) goto error

Note that, this creates a file named as SQLDurationTrace_YYYYMMDD_HHMMSS.

It is better to record the TraceID generated from this because it is required to stop and close the trace if required. Since this is going start automatically, the generated TraceID cannot be taken out as it is written. Therefore we need to change it as well. Let's create a table for holding generated trace ids. Let's create this table in master database.

CREATE TABLE dbo.TraceID
(
 ServerStartDateTime datetime NOT NULL 
  PRIMARY KEY DEFAULT(GetDate())
 , TraceID int  NULL
);
GO


Scroll down the Trace code generated and comment the select TraceID=@TraceID statement and add the following instead.

-- display trace id for future references
--select TraceID=@TraceID
INSERT INTO dbo.TraceID
 (ServerStartDateTime, TraceID)
VALUES
 (DEFAULT, @TraceID);

goto finish


We have done the necessary changes to the Trace code. Let's place the entire code into a stored procedure and name it as StartTrace. Here is the entire code now;

USE master;
GO

CREATE OR ALTER PROC dbo.StartTrace
AS
BEGIN

 -- Create a Queue
 declare @rc int
 declare @TraceID int
 declare @maxfilesize bigint
 set @maxfilesize = 5 

 DECLARE @FilePath nvarchar(200);
 SET @FilePath = N'E:\TraceOutput\SQLDurationTrace_' 
  + CONVERT(nvarchar(20), GetDate(), 112) + N'_' + REPLACE(CONVERT(nvarchar(20), GetDate(), 108), ':', N'')

 exec @rc = sp_trace_create @TraceID output, 0, @FilePath, @maxfilesize, NULL 
 if (@rc != 0) goto error

 -- Client side File and Table cannot be scripted

 -- Set the events
 declare @on bit
 set @on = 1
 exec sp_trace_setevent @TraceID, 10, 1, @on
 exec sp_trace_setevent @TraceID, 10, 9, @on
 exec sp_trace_setevent @TraceID, 10, 2, @on
 exec sp_trace_setevent @TraceID, 10, 66, @on
 exec sp_trace_setevent @TraceID, 10, 10, @on
 exec sp_trace_setevent @TraceID, 10, 3, @on
 exec sp_trace_setevent @TraceID, 10, 4, @on
 exec sp_trace_setevent @TraceID, 10, 6, @on
 exec sp_trace_setevent @TraceID, 10, 7, @on
 exec sp_trace_setevent @TraceID, 10, 8, @on
 exec sp_trace_setevent @TraceID, 10, 11, @on
 exec sp_trace_setevent @TraceID, 10, 12, @on
 exec sp_trace_setevent @TraceID, 10, 13, @on
 exec sp_trace_setevent @TraceID, 10, 14, @on
 exec sp_trace_setevent @TraceID, 10, 15, @on
 exec sp_trace_setevent @TraceID, 10, 16, @on
 exec sp_trace_setevent @TraceID, 10, 17, @on
 exec sp_trace_setevent @TraceID, 10, 18, @on
 exec sp_trace_setevent @TraceID, 10, 25, @on
 exec sp_trace_setevent @TraceID, 10, 26, @on
 exec sp_trace_setevent @TraceID, 10, 31, @on
 exec sp_trace_setevent @TraceID, 10, 34, @on
 exec sp_trace_setevent @TraceID, 10, 35, @on
 exec sp_trace_setevent @TraceID, 10, 41, @on
 exec sp_trace_setevent @TraceID, 10, 48, @on
 exec sp_trace_setevent @TraceID, 10, 49, @on
 exec sp_trace_setevent @TraceID, 10, 50, @on
 exec sp_trace_setevent @TraceID, 10, 51, @on
 exec sp_trace_setevent @TraceID, 10, 60, @on
 exec sp_trace_setevent @TraceID, 10, 64, @on
 exec sp_trace_setevent @TraceID, 12, 1, @on
 exec sp_trace_setevent @TraceID, 12, 9, @on
 exec sp_trace_setevent @TraceID, 12, 3, @on
 exec sp_trace_setevent @TraceID, 12, 11, @on
 exec sp_trace_setevent @TraceID, 12, 4, @on
 exec sp_trace_setevent @TraceID, 12, 6, @on
 exec sp_trace_setevent @TraceID, 12, 7, @on
 exec sp_trace_setevent @TraceID, 12, 8, @on
 exec sp_trace_setevent @TraceID, 12, 10, @on
 exec sp_trace_setevent @TraceID, 12, 12, @on
 exec sp_trace_setevent @TraceID, 12, 13, @on
 exec sp_trace_setevent @TraceID, 12, 14, @on
 exec sp_trace_setevent @TraceID, 12, 15, @on
 exec sp_trace_setevent @TraceID, 12, 16, @on
 exec sp_trace_setevent @TraceID, 12, 17, @on
 exec sp_trace_setevent @TraceID, 12, 18, @on
 exec sp_trace_setevent @TraceID, 12, 26, @on
 exec sp_trace_setevent @TraceID, 12, 31, @on
 exec sp_trace_setevent @TraceID, 12, 35, @on
 exec sp_trace_setevent @TraceID, 12, 41, @on
 exec sp_trace_setevent @TraceID, 12, 48, @on
 exec sp_trace_setevent @TraceID, 12, 49, @on
 exec sp_trace_setevent @TraceID, 12, 50, @on
 exec sp_trace_setevent @TraceID, 12, 51, @on
 exec sp_trace_setevent @TraceID, 12, 60, @on
 exec sp_trace_setevent @TraceID, 12, 64, @on
 exec sp_trace_setevent @TraceID, 12, 66, @on


 -- Set the Filters
 declare @intfilter int
 declare @bigintfilter bigint

 exec sp_trace_setfilter @TraceID, 35, 0, 6, N'AdventureWorks2014'
 -- Set the trace status to start
 exec sp_trace_setstatus @TraceID, 1

 -- display trace id for future references
 --select TraceID=@TraceID
 INSERT INTO dbo.TraceID
  (ServerStartDateTime, TraceID)
 VALUES
  (DEFAULT, @TraceID);

 goto finish

 error: 
 select ErrorCode=@rc

 finish: 
END
GO


Now the last step. We need to add this stored procedure as a startup procedure. Use the following code to add StartTrace as a Startup procedure;

USE master;
GO

EXEC sp_procoption StartTrace, 'STARTUP', 'ON';
GO


Note that, in order get this work, we need to make sure scan for startup procs server setting is enabled. Generally, when the sp_procoption is execute, this is getting enabled but it is always better to get it enabled before using sp_configure. Done. Let's restart the SQL Server Service and check the dbo.TraceID table.


As you see, a record is inserted with an ID. This means that trace has been started. Let's check the folder.


File is created. For testing purposes, let's run some queries in AdventureWorks2014 database and restarted the service.

USE AdventureWorks2014;
GO

SELECT * FROM Production.Product;
SELECT * FROM Sales.Customer;


Once restarted, we should see a new record in the table and new file in the folder.


This means that our Trace is getting automatically started when the service is started and trace continues. You can query the trace, current or older ones using fn_trace_gettable function and if you need, you can stop the current Trace using value 1 and lose the current Trace using value 2 with sp_trace_setstatus stored procedure.


Tuesday, December 20, 2016

Finding SQL Server Startup Stored Procedures

When I was discussing about getting Stored Procedures automatically executed at service start, a question raised; How can we find Stored Procedure added as Startup Procedures. This is simple, all we have to do is, query the sys.procedure system view and filter the result for ExecIsStartup Property.

Here is the code;

USE master;
GO

SELECT *
FROM sys.procedures
WHERE OBJECTPROPERTY(OBJECT_ID, 'ExecIsStartup') = 1;

For more info on how to add procedures as startup procedures using sp_procoption, read this: https://msdn.microsoft.com/en-us/library/ms181720.aspx

Monday, December 19, 2016

Reading SQL Server Error Log using XP_READERRORLOG

We use sp_readerrorlog for reading the content of the error log of SQL Server and it actually uses xp_readerrorlog extended stored procedure. Since I had to do some troubleshoot with one of servers, I use this for finding some info, and thought share it.

Here are some ways of reading the error log;


In case of you need the code;

USE master;
GO

-- without parameters, load the current log
EXEC xp_readerrorlog;

-- Load the specific error log 
-- 0 is current one and by default there are 6 more old logs
EXEC xp_readerrorlog 0;

-- Second parameter is for log type
-- 1 is for engine and 2 is agent
EXEC xp_readerrorlog 0, 1;

-- Two more additional parameters can be passed 
-- for searching, 1st one is for searching
-- and second one for filter the search - or further searchin within the result
EXEC xp_readerrorlog 0, 1, N'Server', N'Listening';

-- And this can take three more parameters
-- for setting the date range and sorting order
EXEC xp_readerrorlog 0, 1, N'Database', N'resource'
 , '2016-12-21 23:00:18.860', '2016-12-21 23:00:18.930', N'DESC';

Sunday, December 18, 2016

Moving a table with millions of records to another within a second - SQL Server Brain Basher of the Week #061

This is a very common Interview Question and many come with different solutions but most forget some easy ways of doing it. Sometime we need to move data from one table to another (Note that not copying) but depend on the method we use and the number of records, it will take few seconds to many hours. 

However if the structure of the second table is same as first and need to move all records, then what is the best way?

Here is the solution. I have a table called dbo.InternetSales and it has 6 millions records. Let's see how long it takes to move the entire record set from this table to a table called dbo.InternetSales2 that has the same structure.

See the below code;

SELECT COUNT(*) InternetSalesCount FROM dbo.InternetSales;
SELECT COUNT(*) InternetSales2Count FROM dbo.InternetSales2;

ALTER TABLE dbo.InternetSales SWITCH TO dbo.InternetSales2;

SELECT COUNT(*) InternetSalesCount FROM dbo.InternetSales;
SELECT COUNT(*) InternetSales2Count FROM dbo.InternetSales2;


As you see, all records have been transferred from first table to second table within a second :).

How do we do it? This is actually called as Partition Switching. Read more on this with post: Fact Loading: Switching a loaded temporary table into an empty partition of the fact table

Saturday, December 17, 2016

Locking selected records until the transaction is completed

SQL Server handles locks efficiently and it places relevant locks based on the way we access records. If you perform an action such as INSERT, UPDATE, DELETE against records, SQL Server makes sure that records for the operation are exclusively locked and no one can access them. However, what if you need to make sure that no one can modify your selected records until you complete the transaction?

Generally, SQL Server obtains shared locks when we retrieve records using SELECT statement but it does not keep them. The obtained locks are immediately released once all records are sent to the client.

We can use REPEATABLE READ Isolation Level for handling this. This Isolation Level makes sure that records selected during the transaction cannot be modified by other users until we complete the transaction.

There is another easy way of handling this. We can use UPDLOCK Hint with the SELECT statement, locking the records exclusively. This hint takes Update Locks for Read Operation only at the row level or page level. See the underlined words, Page Level, means you might see that few number of records are locked even though you have selected only one record, because if SQL Server takes a page lock, then all records in the page will be locked.

However, for most cased, this helps to protect the record until we complete the process on selected records. Here is the way of doing it.

Execute this with a new Connection
USE AdventureWorks2014
GO

-- Starting a transaction
BEGIN TRAN

-- Selecting a record
SELECT * FROM Production.Product
WITH (UPDLOCK)
WHERE ProductID = 4

Now execute this with another connection and see.
USE AdventureWorks2014;
GO

-- This is possible, can get the record
SELECT * FROM Production.Product
WHERE ProductID = 4;

-- This is not possible until the 
-- first tranaction is completed
UPDATE Production.Product
 SET Color = 'Black'
WHERE ProductID = 4;


Friday, December 16, 2016

Understanding SQL Server Media Set, Media Family and Backup Set

I am sure that you have been taking backups of SQL Server databases and you know that backups can be taken either to a disk or a Windows Azure Blob Storage service. However, many of us are unaware about some terms used with backup operations, such as Media Set, Media Family and Backup Set. Let's try to understand these with an example.

Media Set
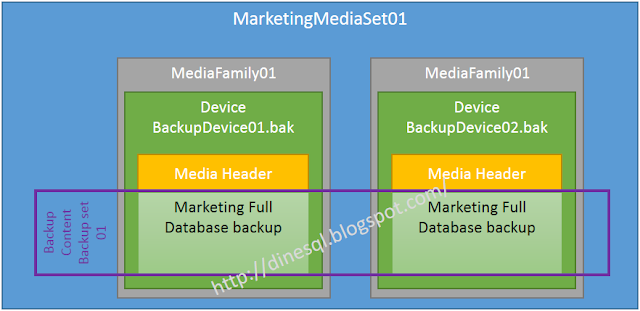
This is the main container that holds backup sets using backup devices. Generally we take a backup of the database without mentioning the name of Media Set, hence the device we used is attached to a media set that has no name. Remember, Media Name is optional There is no harm of not mentioning the name for Media Set but it is always advisable to name it because it helps us to identify the correct backup sets.

Media Family
This refers the device (single non-mirrored device or set of mirrored devices) used for holding the backup in the Media Set. If Media Set has one device, then Media Set contains one Media Family. If Media Set has two devices (say that you take a backup to two disk files), then it contains two Media Families. Each Media Family in the Media Set is assigned with a number called Media Sequence Number.

Backup Set
Backup Set is the content of the database backup we take to the Media Set. If you take a backup of your Sales Database, then it is the Backup Set in the Media Set. If Media Set contains one Media Family (means one device), content is written to it. If it contains two Media Families (or more), content is distributed among families (devices), working similar to stripe set.

Media Header
Each and every Media Family in the Media Set has a header that holds information such as Name, Unique identification, Sequence number, etc. This header remains until the Media is reformatted.

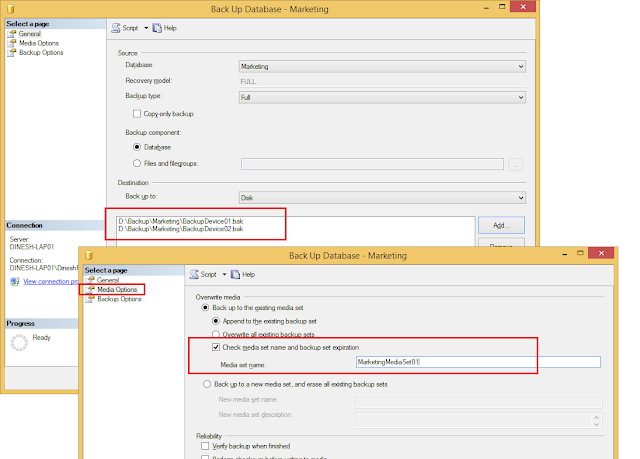
Let's take a backup of a database and see how this works. I have a database called Marketing and I am taking a backup of my database to two files. Note that I have mentioned the Media Name which is the Media Set Name. As mentioned above, it is not a must but it is always better to name it.

Here the TSQL code for backing up;

USE master;
GO

BACKUP DATABASE Marketing 
TO DISK = N'D:\Backup\Marketing\BackupDevice01.bak'
 ,  DISK = N'D:\Backup\Marketing\BackupDevice02.bak' 
WITH NOFORMAT, NOINIT,  MEDIANAME = N'MarketingMediaSet01'
GO

Here is the way of doing the same with GUI.


Just like the way described above, you can click on the OK button and take the backup of one of your databases. Since I have used two files, my backup is distributed (approximately 50% per each) among two files. Let's query some tables in the msdb database to see how Media Set, Media Families and Backup Sets have been created.

USE msdb;
GO

SELECT * FROM dbo.backupmediaset WHERE name = 'MarketingMediaSet01';
SELECT * FROM dbo.backupmediafamily WHERE media_set_id = 35;
SELECT * FROM dbo.backupset WHERE media_set_id = 35;


If I did not mentioned the name for Media Set, I will see blank for name of the Media Set. As you see, Media Set named MarketingMediaSet01 is created and two Media Families have been created for each device I used. I took only one backup, hence there is only one Backup Set for this media set.

This is what I used for explaining the same in my workshops;


If I take another backup of Marketing Database again to the same without overwriting (WITH NOINIT), I will see an additional Backup Set under same Media Set.


I can illustrate the Media Set now as below;


Let's take one more backup to the same Media Set. This time, I am going to take a backup of different database, which is Adventure Works.

USE master;
GO

BACKUP DATABASE AdventureWorks2014 
TO DISK = N'D:\Backup\Marketing\BackupDevice01.bak'
 ,  DISK = N'D:\Backup\Marketing\BackupDevice02.bak' 
WITH NOFORMAT, NOINIT,  MEDIANAME = N'MarketingMediaSet01'
GO

I can take it without any issue and I can see another Backup Set added to my Media Set.


Here is the illustration for it now;


You may ask that it is possible to take a backup of another database (or same) without mentioning the Media Name. Yes, it is possible, you can take a backup to same devices without adding the Media Set name but it will be added to the same Media Set.

However, if you try to use the same devices with a new Media Name, you will get the following error because it is not possible to attach these devices to another Media Set.

Msg 4037, Level 16, State 1, Line 1
The user-specified MEDIANAME "NewMediaSet" does not match the MEDIANAME 
"MarketingMediaSet01" of the device "D:\Backup\Marketing\BackupDevice01.bak".
Msg 3013, Level 16, State 1, Line 1
BACKUP DATABASE is terminating abnormally.


Thursday, December 15, 2016

Moving SQL Server System Databases

I wrote a post on the same, specifically on User-Defined databases: Moving User-Defined SQL Server Databases files - within the instance. However, the procedure for moving system databases is bit different from that, hence here is the way of doing it.

Let's see how we can move system databases such as msdb, model and tempdb. If you have read the above-mentioned post, you know that we need to make our database offline in order to move files. But for these system database, we cannot make the databases offline, we need to stop the SQL Server Service.

Here are the steps. Let's see how we can move tempdb files as it is same for both model and msdb.

1. Alter the location of its files with new the new location.

USE master;
 GO

 ALTER DATABASE TempDB MODIFY FILE
 (NAME = 'tempdev', FILENAME = 'E:\New Location\tempdb.mdf')
 GO

 ALTER DATABASE TempDB MODIFY FILE
 (NAME = 'templog', FILENAME = 'E:\New Location\templog.ldf') 
GO

2. Make sure you have done the above for all files. Once done, stop the SQL Server Service.

3. Now you can move files as you need. Move mdf and ldf files to the new location.

4. Restart the service. You should see that it starts without any issue.

If you need to move the master database, process is not same. You cannot alter the master database, hence you need to do a small change for startup parameters.

1. Get the properties of SQL Server Service using SQL Server Configuration Manager.

2. Change -d parameter, setting the mdf  file to the new location and -l parameter, setting the ldf file to the new location.


3. Stop the SQL Server Service.

4. Move files to the new location.

5. Restart the service. Now your master database files in new location and SQL Server must work with them without any issue.

Wednesday, December 14, 2016

Management Studio Error: The Visual Studio component cache is out of date. Please restart Visual Studio.

I experienced this error when opening Management Studio just after the installation of Windows update.


Not sure about the reason but I got a similar error when opening Visual Studio as well. I could not find the exact reason for this and closing and re-opening did not help either. I just tried with killing all Visual Studio related tasks using Task Manager and then tried, yes, it worked.

Not sure whether you faced this with Management Studio before. If someone has more details on this specifically to SQL Server, please share.

Tuesday, December 13, 2016

Moving User-Defined SQL Server Databases files - within the instance

Sometime we need to move database files created for our databases from existing location to a new location. The reason could be; 1. Not enough space in the existing volume. 2. For performance improvement. Whatever the reason, methods for moving files are different based on the database type, whether it is system or user-defined and the scope, whether it is within the instance or not. Note that this post talks about moving files of a user-defined database within the instance.

What are the steps for doing it. First of all, you need to cancel all transactions that are being run. Then you need to bring the database offline. It can be done using one statement.

USE master;
GO

ALTER DATABASE AdventureWorks SET OFFLINE
WITH ROLLBACK IMMEDIATE;

Once it is done, move files manually and modify the database, changing the file path of its files.

-- You need to execute this for each and every file you need to move
-- Name is logical name, Filename is physical name.
-- If you do not know the logical name
-- execute sp_helpfile against your database.
ALTER DATABASE AdventureWorks MODIFY FILE 
(Name = AWDataFile, Filename = '\AWDataFile.mdf');
ALTER DATABASE AdventureWorks MODIFY FILE 
(Name = AWLogFile, Filename = '\AWLogFile.ldf');

Then all you have to do is, bring the database online.

ALTER DATABASE AdventureWorks SET ONLINE;

You may need to take a copy of these file without taking the database offline and then attach them to another instance. As you know, database files cannot be copied while they are being used but you can use something like HoboCopy for taking the copy. Read more at http://dinesql.blogspot.com/2015/05/how-to-take-copy-of-database-files.html.

Monday, December 12, 2016

Inserting NULL to cells when editing rows

This is not something new but many are unaware this. If you want to insert a NULL to one of the cells when editing records using Management Studio Edit, what is the short-cut key can be used?

If you need to set NULL to a cell, you can press CTRL+0 for adding NULL.


In addition to that, you can use following combinations during Edit-Mode for opening relevant windows.


Tuesday, December 6, 2016

Azure SQL Data Warehouse - Part I - Creating and Connecting

We have been implementing on-premises data warehouses for years and everyone is well aware on difficulties-faced at the first phase of the project, that is requesting hardware for the project. In most cases, either the project is stopped or postponed by the management or client saying that no-budget. But now we have a solution that addresses the initial issue we have. Not only that, this solution gives you many benefits in terms of performance as well. It is Azure  SQL Data Warehouse.

The Azure SQL Data Warehouse is a cloud-based SQL Data Warehouse which can be easily scaled with cloud-based-resources and pay as-it-grows. It is a fully managed service that that covers maintenance, software patches and backups. It can store and process both relational and non-relational data, and many Azure features such as Azure Blob Storage, Azure Data Factory can be used for implementing it.

Let's talk about some benefits in details;

Scalability and Cost
This is one of the major benefits. You can scale Azure Data Warehouse, increasing resources when required and cost will be calculated based on it. Since there is no upfront cost involved with this, you can simply start with less number of resources and adjust when you want. You will be charged on two resource usage types: Storage and Compute.

The storage configured for Azure SQL Data Warehouse is automatically re-scaled as you add and remove data, hence you pay for what you use.

The value set for Compute is the measurement for performance of execution in Azure SQL Data Warehouse. It is measured in Data Warehouse Units (DWU) and you can start with 100 DWU (USD 2 per hour) to 6000 DWU (USD 123 per hour) as per the requirements. This value can be anytime changed and cost of the usage will be calculated as per the value set.


Performance
Since this can be scaled out as you need, data and queries can be distributed, increasing the performance. This uses Massive Parallel Processing Architecture (MPP), hence workload can be spread across many nodes using complex statistics calculated, increasing the performance significantly.

This uses Columnstore Indexing that is 10 times faster than Rowstore Indexing. Since it supports 5 times more compression than standard Rowstore Indexes reducing IOs, it improves the performance more.

Hybrid Cloud
It is a hybrid cloud environment. It supports seamless integration with on-premises data, cloud data and of course unstructured data. With Polybase, different type of sources can be queried using TSQL as data is stored in local, making sure that everything required is shown in a single database.

Not only that, copying data from other sources can be easily done via Azure Data Factory.

Okay, now let's see how we can create one and star using it. First of all, you need an Azure Account. Once an account is created, you need to create a SQL Server which is a logical server for holding your data warehouse. If you have already created a SQL Sever, then it can be used, else follow the steps below for creating a logical server.

1. Login to the Azure Portal and open SQL Servers Blade.
2. Set Sever name, Server admin login, Password, Resource Group and Location. Note that you can add database specific logins later.


3. Click on Create button to get it created. If you want to see the server in Azure Dashboard, make sure that Pin to dashboard is checked.

Now the server is ready. Let's create a data warehouse.

3. Open the SQL Data Warehouses blade.
4. Enter the Database Name. With this test, we will be using AdventureWorks (we will be creating different databases later), hence set the name as AdventureWorksDW.
4. Select the appropriate Resource Group. Make sure that you select the same selected for the server.
5. Select Sample for Select source.
6. Select AdventureWorsDW as the sample database.
7. Select the server created with above steps and enter the admin account and its password.
8. Select DWU as you need. Let's initially set this as 200.


9. Select Pin to dashboard and click Create to get the data warehouse created.

Database is created. Remember, you cannot connect with the server configured until you are permitted to connect from your IP address. Initially you can configure your IP address to the server using the portal. Later, you can connect to the server using Management Studio and configure IP addresses for others using TSQL, either at server level or database level. Here are the steps.

1. Open the portal and open SQL Servers blade.
2. Click on the server created (or the one used for adding the data warehouse) to get its properties.
3. You can add your IP address by clicking Add client IP button and clicking Save button. Or else, you can manually set it using the given grid.


4. Add it and save.

Now firewall rule is configured for you. Let's connect and see.

1. Open Management Studio and connect with the server account as below.


2. Once connected, open a new Query Window and type below code for seeing firewall rules set.


3. If you need to add more rules for others, use sp_set_firewall_rule for server level rules and sp_set_database_firewall_rule for adding database level rules.

-- Adding server level rules
EXECUTE sp_set_firewall_rule @name = N'dinesqlserverAdminRule',
     @start_ip_address = '192.168.10.100', @end_ip_address = '192.168.10.100'

-- Use this for removing it
-- EXECUTE sp_delete_firewall_rule @name = N'dinesqlserverAdminRule'


-- Adding database level rules
-- *** Connect with database and execute
EXEC sp_set_database_firewall_rule @name = N'dinesqlserverDevelopersRule', 
     @start_ip_address = '192.168.10.220', @end_ip_address = '192.168.10.225'

EXEC sp_delete_database_firewall_rule @name = N'dinesqlserverDevelopersRule'

4. Query your database and see now. You should be able to query your table without any issue.


With the next post, let's see how we can use other tools like Visual Studio and Power BI for connecting with the data warehouse created.


Monday, December 5, 2016

Maintaining Sinhala (Unicode) characters with SQL Server Database

This is one of the questions I received last week on Unicode characters. I was asked the way of maintaining Sinhala characters in one of the tables because they have been trying with nvarchar data type but it has not worked as expected.

Let's try to understand the way of maintaining different characters such as Sinhala and Tamil. If we need to maintain such characters, usually with char or varchar, we should instruct to SQL Server to use specific code page and corresponding characters. The instructions can be passed using Collation. Not only it detects the code page and set relevant characters, it decides the sorting rules, case and ascent sensitivity of our data.

The COLLATE clause can be specified at Server Level, Database Level, Column Level or in an Expression (example, with ORDER BY). SQL Server supports Windows Collations, Binary Collations, and SQL Server Collations.

Note that not all collations related your language are available with SQL Server Collation set. If the required one is not available, then you can use Windows Collation set. However, some of Windows Collations cannot be set at Server Level or Database Level.

Collations for languages like Sinhala and Tamil are not exist with SQL Server Collation Set. Therefore, we have to use Windows Collation and no way of setting it at Database Level.

To see all Windows Collation, here is the page: https://msdn.microsoft.com/en-us/library/ms188046.aspx

As per the above page, we have to use Indic_General_100_ for Sinhala characters. We can find out all collations related to it using below query;

SELECT * FROM sys.fn_helpcollations();


Let's apply this to a table and see. The following code creates a table with a nvarchar data type for holding Sinhala characters. Note the the collation set for the column. When insert records, we need to make sure that N is used for specifying the the value is Unicode.

DROP TABLE dbo.Test;

CREATE TABLE dbo.Test
(
 Id int identity (1,1) primary key
 , Message nvarchar(4000)  collate Indic_General_100_BIN not null
);

INSERT INTO dbo.Test (Message) VALUES (N'Hello World!');
INSERT INTO dbo.Test (Message) VALUES (N'සුභ උදෑසනක්!');

Here is the result if you query the table now.