Sunday, May 29, 2016

SQL Server Brain Basher of the Week #045 - Stored Procedure or Function

A question related to Stored Procedure is very common during an interview and many get stuck with it when it has to be discussed in details. What everyone thinks is, Stored Procedure is a pre-compiled code just like and EXE (Of course it is not) and because of that it can execute the logic added fast. Yes, it is true that you get some performance benefits but it is not the right way to think about it. What if a scenario like below is given and a question is asked.......

Assume that you need to implement a business logic that suppose to do some calculation based on inputs given. The result is always a single integer value and the code of the implementation is very complex. Logic requires few tables to be read and do some complex calculations. Should I use a Stored Procedure for this or a Function?

Generally, If I am the interviewer, I do not expect just an answer saying "Stored Procedure" or "Function". I prefer a lengthy answer explaining why we should go for either Stored Procedure or Function.

Let's see some key points for making the decision. Considering the return value and inputs, it looks like it is better to use a function than a stored procedure. Because the implementation is similar to a scalar function. You need to get more details on the logic that needs to be implemented. If it needs loading data into temporary containers, remember, function does not support temporary tables but table variables. And we need to know how it going to be used. Is it going to be used with SELECT statements? If so, you know that stored procedure cannot be used with SELECT statement, specifically with columns or WHERE clause. As per the requirement, it looks like it does not require to do INSERT, UPDATE or DELETE. Do not forget, these statements are not allowed inside functions.

Not only that, though you do not need to consider with the given scenario, remember, function does not support transactions and TRY/CATCH blocks.

This is what we expect from the interviewee. If interviewee can explain the answer with details, it forced the interviewer to think as He is smart. So be smart!

Saturday, May 28, 2016

Browsing internet inside SQL Server Management Studio

How often you google or bing on technical issues while developing modules with SQL Server? For me, it is quite often as I always do searches on codes I write. Now the question is, do you go out from your Management Studio for browsing internet?

Do you know that you can browse internet inside the SSMS? Yes, it is possible and it is not something newly added with SQL Server 2016. It was available even with SQL Server 2012 :).

This is really simple. You have been given an icon in the toolbar for opening an interface for browsing and then you can work with it as you want.


In addition to that, we have been given two shortcuts: Community Projects and Samples and Resource Center that help you to get more info on SQL Server whenever wanted.


Friday, May 27, 2016

SET ROWCOUNT overrides TOP?

While I was going through an implemented set of codes, I noticed that ROWCOUNT is heavily used (of course, it is an old implementations) and not only that, TOP is with newly added codes. There is an interesting behavior when these two are combined, which was one of the issues I was troubleshooting. Let me explain with an example.

First of all, remember, there is a Behavior Change with ROWCOUNT in SQL Server future release. There will be NO effect on INSERT, DELETE and UPDATE statement with ROWCOUNT in SQL Server future release. Therefore avoid ROWCOUNT with these action statements, instead use TOP.

Have a look on below query. It sets ROWCOUNT to 100, instructing that stop processing the query after 100 rows are returned. However, TOP is used with SELECT, limiting records to 10 records. Because of that we get only 10 records. This proves that TOP overrides ROWCOUNT.

USE AdventureWorks2016CTP3;
GO

SET ROWCOUNT 100;
SELECT TOP (10) *
FROM Sales.SalesOrderHeader;


Now let's change the query bit. Let's instruct SQL Server to process only 10 records using ROWCOUNT and have TOP 100 with SELECT statement.

USE AdventureWorks2016CTP3;
GO

SET ROWCOUNT 10;
SELECT TOP (100) *
FROM Sales.SalesOrderHeader;

What we expect is 100 records as we know that TOP overrides ROWCOUNT but it returns only 10.


What is the reason? This is how it works when ROWCOUNT and TOP are combined. ROWCOUNT overrides TOP keyword in the SELECT only if the set value for ROWCOUNT is smaller that value set with TOP. This is something you need to remember. Best is, try to use only TOP without using ROWCOUNT.

Wednesday, May 25, 2016

SQL Server SESSION_CONTEXT function - SQL Server 2016 Enhancements

If you are a web developer and have worked with Classic ASP or ASP.Net, then you know that how important it is for maintaining Session Variables for keeping various values throughout the session. Although similar capability was exist with SQL Server, it was not exactly functioning as Session Variables as it had many limitations. Now, with SQL Server 2016, a new function has been introduced, called SESSION_CONTEXT that accepts a key of key-value pair set with sp_set_session_context and returns the value of submitted key.

The previous versions before 2016, this was implemented via CONTEXT_INFO function. This holds only a single binary value, making it difficult to maintain multiple values. It is limited to 128 bytes per connection, which is not enough at all and cannot be secured because user can change it if want. With these limitations, it was not used with much implementations.

Values for sessions are set with sp_set_session_context that accepts two mandatory parameters and one optional. First parameter the key (or name) of the session variable which type is sysname. Second parameter is the value. It is accepted as sql_variant and value can be as large as 256KB. Third parameter which is optional that indicates whether the variable is read-only or not. The default is 0 which is not read-only.

Let's test this. The following code creates;

  1. Create a Login called Smith for testing
  2. Create a Database called Config. Assume that you maintain additional configuration details in this database for your applications.
  3. Add Smith as a User to the database. He will be a member of db_datareader role.
  4. Create a Table called EmployeeSecurityLevel and inserts two records.
  5. Create a Procedure called GetProducts for testing. This procedure checks the set Security Level and displays. In addition to that, Smith is added to the database.
  6. Create a Logon Trigger to capture user and set Security Level as a Session Variable. It assigned the relevant Security Level taken from Config database to a variable called CompanySecurityLevel.
-- ******** 1 ********
-- Create login for Smith
USE master;
GO
CREATE LOGIN Smith WITH PASSWORD = 'Pa$$w0rd';
GO

-- ******** 2 ********
-- Create a Config database
CREATE DATABASE Config;
GO

USE Config;
GO

-- ******** 3 ********
-- Add Smith to Config
CREATE USER Smith FOR LOGIN Smith;
EXEC sp_addrolemember 'db_datareader', 'Smith';

-- ******** 4 ********
-- Create a table for holding security levels
CREATE TABLE dbo.EmployeeSecurityLevel
(
 Id int Identity(1,1) PRIMARY KEY
 , UserId nvarchar(200) NOT NULL INDEX IX_EmployeeSecurityLevel_UserId NONCLUSTERED
 , SecurityLevel tinyint NOT NULL
);

-- Add two users
INSERT INTO dbo.EmployeeSecurityLevel
 (UserId, SecurityLevel)
VALUES
 (N'Dinesh', 1)
 , (N'Smith', 3);


-- ******** 5 ********
USE AdventureWorks2016CTP3;
GO

-- Add SP for getting products
DROP PROC IF EXISTS dbo.GetProducts;
GO
CREATE PROC dbo.GetProducts
AS
BEGIN

 DECLARE @SecurityLevel tinyint
 SELECT @SecurityLevel = Convert(tinyint, SESSION_CONTEXT(N'CompanySecurityLevel'));

 PRINT 'Displaying products as per security level.....'
 PRINT 'Security level: ' + Convert(varchar(3), @SecurityLevel);
END;

-- Add Smith and set relevant permission
CREATE USER Smith FOR LOGIN Smith;
EXEC sp_addrolemember 'db_datareader', 'Smith';
GRANT EXECUTE ON dbo.GetProducts TO Smith;

-- ******** 6 ********
USE master;
GO

-- Creating Logon trigger to set the session variable
CREATE TRIGGER SetSessionVariables
ON ALL SERVER 
AFTER LOGON
AS
BEGIN
 DECLARE @SecurityLevel tinyint

 -- Query Config database and get the value
 SELECT @SecurityLevel = SecurityLevel
 FROM Config.dbo.EmployeeSecurityLevel
 WHERE UserId = CURRENT_USER;

 -- Set the value, note that it is set as read-only
 EXEC sp_set_session_context N'CompanySecurityLevel', @SecurityLevel, 1; 
END;

Once everything is set, when Smith logs in, his Security Level is captured via the trigger and set with session_context. This value can be read in any database within his session. Below code shows that Smith executes the procedure and result is based on his Security Level.

-- Logged in as Smith
USE AdventureWorks2016CTP3;
GO
-- Smith executing the SP
EXEC dbo.GetProducts;


Monday, May 23, 2016

Creating HDInsight Hadoop Cluster using SSIS and processing unstructured data using Hive Task - Azure Feature Pack - Part II

With my previous post Creating HDInsight Hadoop Cluster using SSIS and processing unstructured data using Hive Task - Azure Feature Pack - Part I, I discussed how to prepare the environment for processing unstructured data using SSIS. With that, I explained the key requirements for this;
  • Integration Services Feature Pack for Azure
  • Microsoft Hive ODBC Driver
  • Self-Signed certificate for adding Azure
Now let's see how we can create a SSIS package for handling the process. Assumption we made with part I is, you have a file that contains unstructured data. Let's say it is something like below;


Let's talk about a simple process for testing this. The above file is the famous file called davinci.txt, that is created with Project Gutenberg and used to demonstrate famous word count big data demo. So the assumption is, you have this file and you need to achieve word count from this file as part of your ETL process. In order to achieve this using SSIS with the help of HDInsight, following have to be done;
  • Upload the file to Azure Storage
  • Create the Hadoop Cluster on-demand (you can have it created if you are continuously using it)
  • Process the file using HiveQL for getting the word counts
  • Finallay, read the result into local database.
Let's start working on it. For uploading a file to Azure Storage, Azure Blob Upload Task that comes with Integration Services Feature Pack for Azure can be used. All it needs is a connection for the storage.

Create a SSIS project and have a package with a proper name. Drag Azure Blob Upload Task and drop on to Control Flow. Open its editor and create a new connection. New connection dialog box requires Storage account name and Account key. If you have a storage created in your Azure subscription, then access it and get the name and key1. If you do not have a storage, create it and then get them.


This is how you need to set the connection with SSIS.


In addition to the connection, you need to set following items with it;
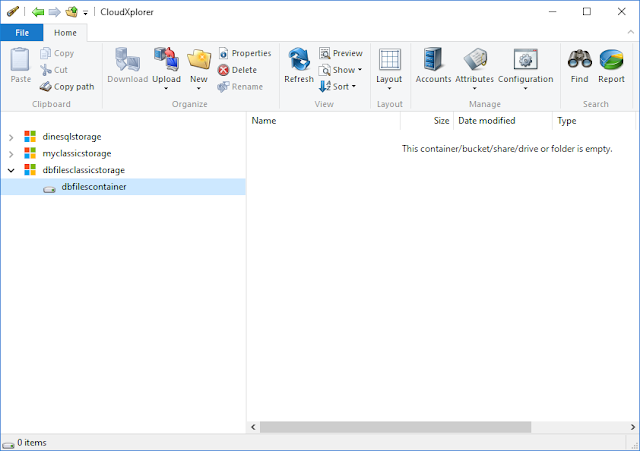
  • Blob container - make sure you have a Container created in your storage. I use CloudXplorer for accessing my Azure storage and I can easily create containers and folders using it. You can do it with PowerShell, Visual Studio or any other third-party tool.
  • Blob directory - Destination. A folder inside the container. This folder is used for storing your file in Azure Storage.
  • Local directory - Source. Location of the file you keep davinci.txt file.
Once all set, task is ready for uploading files.


Next step is, adding Azure HDInsight Create Cluster task on to Control Flow. Drag it and drop and open the editor for configuring it. This requires Azure Subscription Connection which has to be created with following items;
  • Azure subscription ID - this can be easily seen with Settings when accessing the subscription via Classic Portal (see Part 1)
  • The Management certificate thumbprint - this is what we created with Part I and uploaded to Azure. This should be browsed in Local Machine location and My store.

Once the connection is created, you need to set other properties;
  • Azure Storage Connection - Use the same connection created for upload task.
  • Location - Use the same location used for the storage
  • Cluster name - Set a unique name for this. This is your HDI name
  • Cluster size - set number of nodes you want for your cluster
  • User name - set the user name of administrator of your HDI.
  • Password - set a complex password for the user.


Second task in the control flow is ready. Next task is for executing HiveQL query for processing data. I have some posts written on Hive: What is Hive, What is Hive Database, What is Hive Table?, How to create a Hive table and execute queries using HDInsight. Have a look on it if you are new to Hive. Azure HDInsight Hive Task is the one we have to use for processing data using HiveQL. Drag and drop it, and configure like below.
  • Azure subscription connection - Use the same connection created for above task.
  • HDInsight cluster name - Use the same name given with previous task.
  • Local log folder - Set a local folder for saving log files. This is really important for troubleshooting.
  • Script - You can either set  HiveQL as an in-line script or you can have you script in a file saved in a storage, and refer it. I have added the query as an in-line script that does;
    • Create an external table called Words with one column called text.
    • Execute a query that aggregates data in Words and insert the result to WordCount table.
DROP TABLE IF EXISTS Words;
CREATE EXTERNAL TABLE Words
(
 text string
) row format delimited 
fields terminated by '\n' 
stored as textfile
location '/inputfiles/';
DROP TABLE IF EXISTS WordCount;
CREATE TABLE WordCount AS
SELECT word, COUNT(*) FROM Words LATERAL VIEW explode(split(text, ' ')) lTable as word GROUP BY word;  


We have added a task for uploading the file (you can upload many files into the same folder), a task for creating the cluster and a task for processing data in added files. Next step is, accessing the table WordCount and get the result into local environment. For this, you need a DataFlow task. Inside the DataFlow, have an ODBC data source for accessing Hive table and a destination as you prefer.

Let's configure ODBC source. Drag and drop and set properties as below.

  • ODBC connection manager - Create a new connection using Hive ODBC connection created with Part I.
  • Data access mode - Select Table Name as HiveQL stores the resultset into a table called WordCount.
  • Name of the table or view - Select WordCount table from the drop-down.
  • Columns - Make sure it detects columns like below. Rename them as you want.


Note that you cannot configure the source if you have not created and populated Hive table. Therefore, before adding the DataFlow task, execute first three control flow tasks that upload the file, create the cluster, process data and save data into the table. Then configure the DataFlow task as above.

Add a Data Reader destination for testing this. You can add any type of transformations if you need to transform data further and send to any type of destination. Enable Data Viewer for seeing data.


Now you need to go back to Control Flow and add one more task for deleting the cluster you added. For that, drag and drop Azure HDInsight Delete Cluster Task and configure just like the way you configure other Azure tasks.


That is all. Now if you run the package, it will upload the file, create the cluster, process the file , get data into local environment, and delete the cluster as the final task.


This is how you use SSIS for processing unstructured data with the support of HDI. You need to know that creating HDI on-demand takes long time (than I expected, already checked with experts, waiting for a solution). Therefore you may create the cluster and keep it in Azure if the cost is not an issue.

Sunday, May 22, 2016

SQL Server Brain Basher of the Week #044 - Reporting Services

Let's talk about something related to Reporting Services. You are asked to install and configure Reporting Services in one of the servers given. It is a new server, no instances of SQL Server has been installed. You are asked not to configure anything manually, install it with default configurations. You start the installation and select Reporting Services - Native in Feature Selection page and continue the wizard. You want to make sure that wizard configure your reporting services but you notice that the option Install and configure is disable.


What is the reason for this?

If you ask wizard to install files and configure reporting services for you, it needs to create two database for you. Now the issue is, it cannot find SQL Server database engine in the same instance as you are installing a new instance and you have not selected Database Engine Services in Feature Selection page. Therefor wizard cannot create database required for configuring Reporting Services. If you have already installed SQL Server with database engine services and you are updating the same instance by adding Reporting Services, or if you have selected Database engine services in the Feature Selection page, then you will see this option is enable and you can continue with the wizard. 

Saturday, May 21, 2016

Creating HDInsight Hadoop Cluster using SSIS and processing unstructured data using Hive Task - Azure Feature Pack - Part I

A fully-fledged Business Intelligence system never ignore unstructured data. The reason is, you can never get the true insight without considering, consuming and processing all types of data available in an organization. If you design a BI solution and if you have both structured and unstructured data, how do you plan to process them?

Generally, processing unstructured data is still belong to Hadoop ecosystem. It is designed for that, and it is always better to handover the responsibility to Hadoop. We do BI using Microsoft SQL Server product suite, and SQL Server Integration Services (SSIS) is the component we use for handling ETLing. If there is an unstructured data set that needs to be processed as a part of ETL process, how can you get the support from Hadoop via SSIS for processing unstructured data and getting them back as structured data? The solution is given with Integration Services Feature Pack for Azure.

The Integration Services Feature Pack for Azure (download from here) provides us functionalities for connecting with Azure Storage and HDInsight for transferring data between Azure Storage and On-Premise data sources, and processing data using HDInsight. Once installed, you see newly added tasks in both Control Flow and Data Flow as below;


Assume that you have a file which is unstructured and it needs to be processed. And once processed you need to get the result back to your data warehouse. For implementing this using SSIS, you need to do following;
  1. Install Integration Services Feature Pack for Azure (download from here
  2. Install Microsoft Hive ODBC Driver (download from here)
  3. Generate a Self-Signed Certificate and upload to Azure Subscription.
Why we need Microsoft Hive ODBC Driver? We need this for connecting with Hive using ODBC. There are two drivers; one for 32-bit applications and other is for 64-bit applications. In order to use it with Visual Studio, you need 32-bit driver. It is always better to have both installed and when creating DSN, create the same DSN in both 32-bit and 64-bit System DSN. This is how you have to configure DSN for Hive in Azure HDInsight.

Open ODBC Source Administrator (32-bit) application and click Add button in System DSN tab.


Select the driver as Microsoft Hive ODBC Driver and configure it as below;


You can click on Test button for testing the connection. If you have not configured the cluster yet (in my case, it is not, we will be creating using SSIS), you will get an error. But still you can save it keep it. Note that it is always better to create another DSN using 64-bit ODBC Data Source Administrator with the same name.


Next step is, generating the certificate and add it Azure subscription. This is required for connecting to Azure using Visual Studio. Easiest way of doing this is, creating the certificate using Internet Information Services (IIS), export it using certmgr and upload it using Azure Classic Portal. Let's do it.

Open IIS Manager and go for Server Certificates. Click on Create Self-Signed Certificate for generating a certificate.


Once created, open Manage Computer Certificates and start Export Wizard.


The wizard starts with welcome page and then open Export Private Key  page. Select No, do not export private key option and continue.


Select Base-64 Encoded X.509 (.CER) option in Export File Format and continue.


Next page asks you the file name for the certificate. Type the same name with the location you need to save it and complete the wizard.


Certificate is exported with the required format. Now you need to upload it to Azure Subscription. Open Azure New Portal and then open Azure Classic Portal. Scroll down the items and fins Settings, and click on it.


Settings page has Manage Certificate section. Click on it for opening it and upload the certificate created.


Everything needs by SSIS for working with Azure Storage and HDI is done. Now let's make the SSIS package to upload an unstructured data, create a HDI cluster on-demand, process uploaded file using Hive, download the result, and then finally remove the cluster because you do not need to pay extra to Microsoft.

Since the post it bit lengthy, let me make the next part as a new post. Read it from below link:
Creating HDInsight Hadoop Cluster using SSIS and processing unstructured data using Hive Task - Azure Feature Pack - Part II

Friday, May 20, 2016

SQL Server SERVERPROPERTY - SQL Server 2016 TSQL Enhancements

SQL Server SERVERPROPERTY function was introduced with SQL Server 2008 and it was very useful for getting property information about the server instance. With SQL Server 2016, few new properties have been introduced for getting more information.

SELECT SERVERPROPERTY('ProductBuild') ProductBuild
 , SERVERPROPERTY('ProductBuildType') ProductBuildType
 , SERVERPROPERTY('ProductMajorVersion') ProductMajorVersion
 , SERVERPROPERTY('ProductMinorVersion') ProductMinorVersion
 , SERVERPROPERTY('ProductUpdateLevel') ProductUpdateLevel
 , SERVERPROPERTY('ProductUpdateReference') ProductUpdateReference
 , SERVERPROPERTY('IsPolybaseInstalled') IsPolybaseInstalled;


Note that ProductBuildType returns OD (On-demand - release for a specific customer, GDR (General Distribution Release - release with Windows Update) or NULL if not applicable.

ProductUpdateLevel returns CU (Cumulative Update) or NULL if not applicable.

ProductUpdateReference returns KB article for the release.

Thursday, May 19, 2016

Truncating Partitions - SQL Server 2016 TSQL Enhancements

For a speedy delete or cleaning the table and resetting some of the properties of the table, we use TRUNCATE TABLE statement. This was really useful specifically with large data table because it saves both resources and time. However this was limited to the entire table, truncating a partition was not possible with it.

SQL Server 2016 has extended this functionality by allowing us to truncate individual partitions or set of partitions. This is really useful if a partition needs to be cleaned up for refreshing data. Here is a sample code on it;

This code creates a database, table in it and inserts set of records;

-- creating database
CREATE DATABASE [Sales] ON  PRIMARY 
( NAME = N'Sales', FILENAME = N'C:\Program Files\Microsoft SQL Server\MSSQL13.SQL2016_M\MSSQL\DATA\Sales.mdf' , SIZE = 3048KB , FILEGROWTH = 1024KB ), -- default FG
 FILEGROUP [CurrentFileGroup] 
( NAME = N'Sales Current', FILENAME = N'C:\Program Files\Microsoft SQL Server\MSSQL13.SQL2016_M\MSSQL\DATA\Sales Current.ndf' , SIZE = 2048KB , FILEGROWTH = 1024KB ), 
 FILEGROUP [HistoryFileGroup] 
( NAME = N'Sales Histoty', FILENAME = N'C:\Program Files\Microsoft SQL Server\MSSQL13.SQL2016_M\MSSQL\DATA\Sales Histoty.ndf' , SIZE = 2048KB , FILEGROWTH = 1024KB )
 LOG ON 
( NAME = N'Sales_log', FILENAME = N'C:\Program Files\Microsoft SQL Server\MSSQL13.SQL2016_M\MSSQL\DATA\Sales_log.ldf' , SIZE = 1024KB , FILEGROWTH = 10%)
GO

USE Sales
GO

-- creating the partition
CREATE PARTITION FUNCTION pf_SalesDate (datetime)
AS RANGE RIGHT
FOR VALUES ('1/1/2003', '1/1/2004', '1/1/2005', '1/1/2006')
GO


-- creating the scheme
CREATE PARTITION SCHEME ps_SalesDate
AS PARTITION pf_SalesDate
TO (HistoryFileGroup, HistoryFileGroup, HistoryFileGroup, HistoryFileGroup, CurrentFileGroup)
GO

-- creating the partitioned table
CREATE TABLE SalesOrders
(
 ID int IDENTITY(1,1) NOT NULL,
 [Date] datetime NOT NULL,
 CustomerID int NOT NULL,
 CONSTRAINT PK_SalesOrders PRIMARY KEY (ID, [Date])
)
ON ps_SalesDate ([Date])
GO

INSERT INTO SalesOrders ([Date], CustomerID) VALUES ('01/01/2003', 1)
INSERT INTO SalesOrders ([Date], CustomerID) VALUES ('02/01/2003', 2)
INSERT INTO SalesOrders ([Date], CustomerID) VALUES ('01/01/2004', 5)
INSERT INTO SalesOrders ([Date], CustomerID) VALUES ('02/01/2004', 7)
INSERT INTO SalesOrders ([Date], CustomerID) VALUES ('05/01/2004', 15)
INSERT INTO SalesOrders ([Date], CustomerID) VALUES ('01/01/2005', 20)
INSERT INTO SalesOrders ([Date], CustomerID) VALUES ('03/01/2005', 34)
INSERT INTO SalesOrders ([Date], CustomerID) VALUES ('01/01/2006', 56)
GO 1000000 -- You can change this as you want

-- checking partitions and number of rows
SELECT p.partition_number, rows
FROM sys.partitions p
 INNER JOIN sys.objects o
  ON o.object_id = p.object_id
WHERE o.type = 'U' AND o.name = 'SalesOrders';


Let's try to clean a partition by using DELETE statement.


As you see, it takes 6 seconds for deleting. Since truncating partitions is possible now, it can be used for deleting, saving time and resources.


Truncating is possible with one partition, multiple partitions and ranges;

-- One partition
TRUNCATE TABLE dbo.SalesOrders WITH (PARTITIONS (2));

-- Multiple partitions
TRUNCATE TABLE dbo.SalesOrders WITH (PARTITIONS (2, 3, 4));

-- Range
TRUNCATE TABLE dbo.SalesOrders WITH (PARTITIONS (2 TO 4));

-- Combining range and multiple partitions
TRUNCATE TABLE dbo.SalesOrders WITH (PARTITIONS (1, 2, 4 TO 6));

Monday, May 16, 2016

DROP IF EXISTS- SQL Server 2016 TSQL Enhancements

Though there are couple of additions with SQL Server 2016 on TSQL, had no chance to test them and see. While I was going through the list, the one I found, which is simple but very useful is, DROP IF EXISTS. This allows us to stop writing a lengthy and ugly statement that was used for checking whether the object is exist and then dropping. It basically simplifies the statement.

This can be used against many different objects such as DATABASE, TABLE, VIEW, INDEX, PROCEDURE, TRIGGER, etc

Here are some sample codes;

-- creating a database
USE master;
GO

-- Using with database
DROP DATABASE IF EXISTS Sales;
GO

CREATE DATABASE Sales;
GO

USE Sales;
GO

CREATE TABLE dbo.Customer (Id int PRIMARY KEY, Name varchar(100));
CREATE TABLE dbo.Employee (Id int PRIMARY KEY, Name varchar(100));
CREATE TABLE dbo.Product (Id int PRIMARY KEY, Name varchar(100));
CREATE TABLE dbo.Region (Id int PRIMARY KEY, Name varchar(100));

-- Dropping customer table
-- Old method I
--IF EXISTS (SELECT * FROM sys.tables WHERE name = 'Customer')
-- DROP TABLE dbo.Customer;

---- Old method II
--IF OBJECT_ID('dbo.Customer') IS NOT NULL
-- DROP TABLE dbo.Customer;

-- New method
DROP TABLE IF EXISTS dbo.Customer;

-- This will remove Name column if it exist
-- Note that this code can be run without errors
-- even after removing the column
ALTER TABLE dbo.Employee DROP COLUMN IF EXISTS Name;

-- We can drop multiple items like this
DROP TABLE dbo.Product, dbo.Region;

-- Recreating them
CREATE TABLE dbo.Product (Id int PRIMARY KEY, Name varchar(100));
CREATE TABLE dbo.Region (Id int PRIMARY KEY, Name varchar(100));

-- And same can be done with new way too
DROP TABLE IF EXISTS dbo.Product, dbo.Region;

Sunday, May 15, 2016

SQL Server Brain Basher of the Week #043 - Semicolon

Let's talk about some practices we follow when writing codes. You may have noticed that some use semicolon at the end of the statement. Some do not use it at all. So the question is;

What is the purpose of having a semicolon at the end of the statement?

As per ANSI SQL-92, semicolon should be used at the end of the statement, indicating that "this is the end of the statement". Basically, it is the statement terminator. However many developers do not follow it and in many cases, SQL Server does expect it too. Because SQL Server or Management Studio does not force us to use it, we have naturally ignored it.

SQL Server requires this with some cases. This has to be used when you are using CTEs or working with Service Broker

Once this was announced as a deprecated but hardly believable because statements like mentioned above still require it.

Now the question is, should we use it for all or just use when it is required. In my case, I always try to use it for making the statement clearer, following standards and avoid mistakes. See a funny mistake in below code. However, whether it is required or not, it is always better to stick with standards.


Saturday, May 14, 2016

Creating SSIS packages for 2016, 2014 or 2012

Do you know that you can create SSIS packages now targeting the version to be run? Yes, it is possible with SQL Server Data Tools that has been release for SQL Server 2016. This works with Visual Studio 2015 and you can download the latest SQL Server Data Tools from here.

You can set the target version via Project Properties.


Once selected, you will be able to design your package suitable for the selected version.

Friday, May 13, 2016

SQL Server On-Premise Database files maintained in Azure

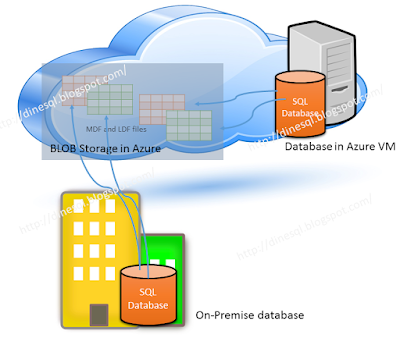
This is not about databases completely maintained in cloud, this is about databases created and maintain on-premises but data and log files are maintained in Microsoft Cloud: Azure.


Microsoft Windows Azure allows us to store database files store in Azure storage while maintaining the database in an on-premise SQL Server instance. This offers many benefits, not only performance and maintenance wise, cost-wise as well. This facility was introduced with SQL Server 2014 and it has been enhanced with SQL Server 2016. Except some restrictions, we can simply work with the database as if it is fully maintained in the server though files are in Azure storage.

What sort of benefits we get from this? 
Main thing is, support on disaster recovery. If something happen to the server or VM hosted in Azure, we do not need to worry because there will be no harm to data files, and we can set up a new database in a new server connecting to files in Azure storage. Another is, more security with TDE. We can enable TDE for the database while keeping all keys in local master database. This allows us to encrypt data in data files and do not need to worry even someone has stolen credentials related to the storage.

In addition to that, it gives some benefits on the cost as we do not need to maintain infrastructure specifically on storage. Not only that, a new feature called Snapshot backup is available with this, which allows us to take instantaneous backups or restore based on files.

How to set up the environment?
Main requirement for this is, an Azure Storage Account. You need a classic storage for this. Once the storage is created, then you need to create a Policy on the Storage Container and Shared Access Signature (SAS) key. After that, you need to create a Credential using SAS in local instance. Then only you can create the database, placing files in the Azure Storage. Let's do all step by step.

Creating Policy and Shared Access Signature in Azure Storage
This has to be done with PowerShell. For that we need Azure PowerShell that provides cmdlets for managing Azure. Open Windows PowerShell ISE and type following. It will install Azure Resource Manager modules.

Install-Module AzureRM

You will be promoted with various windows based on components you have already installed.


And finally you should see a screen like this;


Next we need to install Azure Service Management module. For that, type the following and continue just like previous step.

Install-Module Azure


Let's login to Azure account manager for continuing.

You should get the login dialog box. Provide userid and password to continue.


Type the following cmdlet for getting Azure Subscription information and then open a window for Scripting.


Get-AzureRmSubscription

And place the following code into the Script Window. I have taken this code from Lesson 1: Create a stored access policy and a shared access signature on an Azure container and modified as I want. If you need the entire code, please refer the link. Note that I have already created a Classic Storage called dbfilesclassicstorage and a Container called dbfilescontainer. This script uses the storage and container if exist, else it creates them.

<# 
This script uses the Azure Resource model and creates a new ARM storage account.
Modify this script to use an existing ARM or classic storage account 
using the instructions in comments within this script
#>
# Define global variables for the script
$prefixName = 'dbfiles'  # used as the prefix for the name for various objects
$subscriptionName='Visual Studio Ultimate with MSDN'   # the name  of subscription name you will use
$locationName = 'East Asia'  # the data center region you will use
$storageAccountName= $prefixName + 'classicstorage'  # the storage account name you will create or use
$containerName= $prefixName + 'container'  # the storage container name to which you will attach the SAS policy with its SAS token
$policyName = $prefixName + 'policy' # the name of the SAS policy


<#
Using the Classic deployment model
Use the following four lines to use an existing classic storage account
#>
#Classic storage account name
Add-AzureAccount
Select-AzureSubscription -SubscriptionName $subscriptionName #provide an existing classic storage account
$accountKeys = Get-AzureStorageKey -StorageAccountName $storageAccountName
$storageContext = New-AzureStorageContext -StorageAccountName $storageAccountName -StorageAccountKey $accountKeys.Primary

# The remainder of this script works with either the ARM or classic sections of code above

# Creates a new container in blob storage
$container = New-AzureStorageContainer -Context $storageContext -Name $containerName
$cbc = $container.CloudBlobContainer

# Sets up a Stored Access Policy and a Shared Access Signature for the new container
$permissions = $cbc.GetPermissions();
$policyName = $policyName
$policy = new-object 'Microsoft.WindowsAzure.Storage.Blob.SharedAccessBlobPolicy'
$policy.SharedAccessStartTime = $(Get-Date).ToUniversalTime().AddMinutes(-5)
$policy.SharedAccessExpiryTime = $(Get-Date).ToUniversalTime().AddYears(10)
$policy.Permissions = "Read,Write,List,Delete"
$permissions.SharedAccessPolicies.Add($policyName, $policy)
$cbc.SetPermissions($permissions);

# Gets the Shared Access Signature for the policy
$policy = new-object 'Microsoft.WindowsAzure.Storage.Blob.SharedAccessBlobPolicy'
$sas = $cbc.GetSharedAccessSignature($policy, $policyName)
Write-Host 'Shared Access Signature= '$($sas.Substring(1))''

# Outputs the Transact SQL to the clipboard and to the screen to create the credential using the Shared Access Signature
Write-Host 'Credential T-SQL'
$tSql = "CREATE CREDENTIAL [{0}] WITH IDENTITY='Shared Access Signature', SECRET='{1}'" -f $cbc.Uri,$sas.Substring(1) 
$tSql | clip
Write-Host $tSql
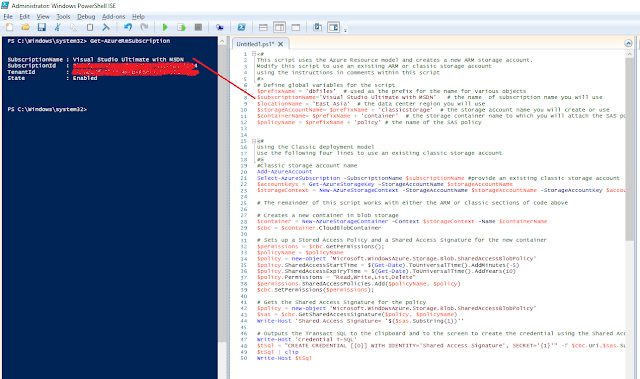


This script outputs the CREATE CREDENTIAL TQL statement we need. Get it copied and use it for creating the Credential in local SQL Server instance.


Creating Credentials in SQL Server
We have done all required from Azure end. Now we need to create a Credential for accessing the storage using the key created. Open the Management Studio and place the copied code from PowerShell, and run it.


Let's create the database now
Now we can create the database. Make sure you use the Azure storage path for placing the files.

CREATE DATABASE Sales 
ON
( NAME = Sales_Data,
    FILENAME = 'https://dbfilesclassicstorage.blob.core.windows.net/dbfilescontainer/SalesData.mdf' )
 LOG ON
( NAME = Sales_Log,
    FILENAME =  'https://dbfilesclassicstorage.blob.core.windows.net/dbfilescontainer/SalesLog.ldf');


Once the database is created, you should see files in your storage like below;


Everything is done. Now the database is maintained locally and files are managed by Azure. For testing purposes, let's create a table and see;


Read more on this with following links;
SQL Server Data Files in Microsoft Azure
How to install and configure Azure PowerShell