Showing posts with label data files. Show all posts

Wednesday, May 31, 2017

SQL Server AUTOGROW_ALL_FILES Option

Few days back, I wrote an article on SQL Server default behavior when it expands files with AutoGrowth enabled. Where there are multiple files in the file group and all files are fully filled, SQL Server expands only one file at a time, making the data distribution inconsistence. Read more on it: SQL Server does not always write data to files, proportional to the amount of free space in each file

There is a facility to change this behavior with SQL Server 2016. By default File Group is set to AUTOGROW_SINGLE_FILE but if we set it to AUTOGROW_ALL_FILES, then it changes the default behavior and grows all files when required.

Let me take the same code used with my previous code and show you.

Let's create a database with an additional file group that contains two file. Let's set the new file group as the default and create a table on it. The below code does it and inserts 900 records to the table. And it checks the spaced used;


USE master;
GO

DROP DATABASE TestDatabase;
GO

-- Two additional data files are added under FG1
CREATE DATABASE [TestDatabase]
 ON  PRIMARY 
( NAME = N'TestDatabase'
 , FILENAME = N'D:\Program Files\Microsoft SQL Server\MSSQL13.MSSQLSERVER\MSSQL\DATA\TestDatabase.mdf' 
 , SIZE = 4MB , MAXSIZE = UNLIMITED, FILEGROWTH = 2MB), 
FILEGROUP [FG1]  DEFAULT
( NAME = N'TestDatabase_Data1'
 , FILENAME = N'D:\Program Files\Microsoft SQL Server\MSSQL13.MSSQLSERVER\MSSQL\DATA\TestDatabase_Data1.ndf' 
 , SIZE = 4MB , MAXSIZE = UNLIMITED, FILEGROWTH = 2MB),
( NAME = N'TestDatabase_Data2'
 , FILENAME = N'D:\Program Files\Microsoft SQL Server\MSSQL13.MSSQLSERVER\MSSQL\DATA\TestDatabase_Data2.ndf' 
 , SIZE = 4MB , MAXSIZE = UNLIMITED, FILEGROWTH = 2MB)
 LOG ON 
( NAME = N'TestDatabase_log'
 , FILENAME = N'D:\Program Files\Microsoft SQL Server\MSSQL13.MSSQLSERVER\MSSQL\DATA\TestDatabase_log.ldf' 
 , SIZE = 10MB , FILEGROWTH = 5MB )
GO


USE TestDatabase;
GO

-- Create a table
-- This will be created on FG1 as it is the default
CREATE TABLE dbo.TestTable
(
 Id int identity(1,1) Primary Key
 , Name char(8000) not null
);
GO

-- Inserting 900 records
INSERT INTO dbo.TestTable
 (Name) VALUES (Replicate('a', 8000));
GO 900

SELECT 
 file_id, name, physical_name
 , Convert(Decimal(12,2),Round(size/128.000,2)) AS [FILE_SIZE_MB]
 , Convert(Decimal(12,2),Round(FileProperty(name,'SpaceUsed')/128.000,2)) AS [SPACE_USED_MB]
 , Convert(Decimal(12,2),Round((size-FileProperty(name,'SpaceUsed'))/128.000,2)) AS [FREE_SPACE_MB]
 , Convert(Decimal(12,2),Round((size-FileProperty(name,'SpaceUsed'))/128.000/(size/128.000),2)) AS [FREE_PCT_MB]
FROM sys.database_files;


As you see, both files are almost filled. Let's change the default setting of the file group and insert some additional records.

ALTER DATABASE TestDatabase MODIFY FILEGROUP FG1 AUTOGROW_ALL_FILES;

Done. Now let's see whether only one file or both files have been grown.

SELECT 
 file_id, name, physical_name
 , Convert(Decimal(12,2),Round(size/128.000,2)) AS [FILE_SIZE_MB]
 , Convert(Decimal(12,2),Round(FileProperty(name,'SpaceUsed')/128.000,2)) AS [SPACE_USED_MB]
 , Convert(Decimal(12,2),Round((size-FileProperty(name,'SpaceUsed'))/128.000,2)) AS [FREE_SPACE_MB]
 , Convert(Decimal(12,2),Round((size-FileProperty(name,'SpaceUsed'))/128.000/(size/128.000),2)) AS [FREE_PCT_MB]
FROM sys.database_files;


Both files have been grown. This makes sure that data is getting distributed properly and I believe that this should be the standard setting for our databases.

Monday, May 22, 2017

SQL Server does not always write data to files, proportional to the amount of free space in each file

We add multiple data files to file groups to get data distributed (it is always better to get them distributed among multiple physical volumes) for improving the performance. But does it guarantee that it always distributes data among files?

This is something every DBA should know. There are certain situations that SQL Server does not write data to all files allocated to the file group though there are multiple files in the same file group. Generally, SQL Server uses round-robin proportional fill algorithm to allocate extents. This means, when there are two data files allocated to one file group and there is a table created on that file group, allocations are made in each data file proportional to the amount of free space in each file. Example, if the first file has 60MB free space and second file has 40MB free space, when 10MB is written to the table, 6MB is written to first file and 4MB is written to the second file. This makes sure that data is distributed properly for improving the performance.

This behavior gets changed when data files are expanded automatically. Files are expanded when the space of them are exhausted and AutoGrowth is enabled. This expansion happens one at a time, again in round-robin way. Continuing with above example, if space of files are exhausted, SQL Server expands the first file based on the AutoGrowth setting, without expanding the second file. When the first file is exhausted, it expands the second file without expanding the first file. This makes data distribution uneven. When only first file is expanded, data is written only to the first file, means data is not getting stripped across all files. This is where you see the issue.

See this code. It creates a database with three data files; one file under Primary File Group and two files under FG1 File Group. Then it creates a table on FG1 and inserts set of records.

USE master;
GO

DROP DATABASE TestDatabase;
GO

-- Two additional data files are added under FG1
CREATE DATABASE [TestDatabase]
 ON  PRIMARY 
( NAME = N'TestDatabase'
 , FILENAME = N'D:\Program Files\Microsoft SQL Server\MSSQL13.MSSQLSERVER\MSSQL\DATA\TestDatabase.mdf' 
 , SIZE = 4MB , MAXSIZE = UNLIMITED, FILEGROWTH = 2MB), 
FILEGROUP [FG1]  DEFAULT
( NAME = N'TestDatabase_Data1'
 , FILENAME = N'D:\Program Files\Microsoft SQL Server\MSSQL13.MSSQLSERVER\MSSQL\DATA\TestDatabase_Data1.ndf' 
 , SIZE = 4MB , MAXSIZE = UNLIMITED, FILEGROWTH = 2MB),
( NAME = N'TestDatabase_Data2'
 , FILENAME = N'D:\Program Files\Microsoft SQL Server\MSSQL13.MSSQLSERVER\MSSQL\DATA\TestDatabase_Data2.ndf' 
 , SIZE = 4MB , MAXSIZE = UNLIMITED, FILEGROWTH = 2MB)
 LOG ON 
( NAME = N'TestDatabase_log'
 , FILENAME = N'D:\Program Files\Microsoft SQL Server\MSSQL13.MSSQLSERVER\MSSQL\DATA\TestDatabase_log.ldf' 
 , SIZE = 10MB , FILEGROWTH = 5MB )
GO


USE TestDatabase;
GO

-- Create a table
-- This will be created on FG1 as it is the default
CREATE TABLE dbo.TestTable
(
 Id int identity(1,1) Primary Key
 , Name char(8000) not null
);
GO

-- Inserting 900 records
INSERT INTO dbo.TestTable
 (Name) VALUES (Replicate('a', 8000));
GO 900

SELECT 
 file_id, name, physical_name
 , Convert(Decimal(12,2),Round(size/128.000,2)) AS [FILE_SIZE_MB]
 , Convert(Decimal(12,2),Round(FileProperty(name,'SpaceUsed')/128.000,2)) AS [SPACE_USED_MB]
 , Convert(Decimal(12,2),Round((size-FileProperty(name,'SpaceUsed'))/128.000,2)) AS [FREE_SPACE_MB]
 , Convert(Decimal(12,2),Round((size-FileProperty(name,'SpaceUsed'))/128.000/(size/128.000),2)) AS [FREE_PCT_MB]
FROM sys.database_files;

See the result when we check the file sizes. Focus on TestDatabase_Data1 and TestDatabase_Data2 files. They are exhausted.


Since we have enabled AutoGrowth, files will be expanded if we enter more data. Let's enter some more data and see whether both files are getting expanded.

-- Inserting 100 more records
INSERT INTO dbo.TestTable
 (Name) VALUES (REPLICATE('a', 8000));
GO 100

SELECT 
 file_id, name, physical_name
 , Convert(Decimal(12,2),Round(size/128.000,2)) AS [FILE_SIZE_MB]
 , Convert(Decimal(12,2),Round(FileProperty(name,'SpaceUsed')/128.000,2)) AS [SPACE_USED_MB]
 , Convert(Decimal(12,2),Round((size-FileProperty(name,'SpaceUsed'))/128.000,2)) AS [FREE_SPACE_MB]
 , Convert(Decimal(12,2),Round((size-FileProperty(name,'SpaceUsed'))/128.000/(size/128.000),2)) AS [FREE_PCT_MB]
FROM sys.database_files;


See, only first file has been expanded.


How to avoid this behavior?

This can be overcome by either expanding manually or enabling Trace Flag 1117. For expanding file manually, it is better to disable AutoGrowth for stopping automatic expansion.

Wednesday, April 12, 2017

How to find the related file and the page numbers of records in SQL Server data table

Sometime, for some administration works, we need to know which file has been used for holding our records and the related page numbers. How can we easily find these information?

Generally we use DBCC IND and DBCC PAGE but there are two more great functions that can be used for finding the same.

The first function is %%PHYSLOC%%. This returns the RID (Record Identifier) as a hexadecimal value. The RID consists file number, page number and, record number. The second function is a table-valued function which is fn_PhysLocCracker. It accepts the RID returning from %%PHYSLOC%% and returns three-columned table for file number, page number and, record number. Combing these two, we can get the information as we want. Here is an example;

SELECT p.BusinessEntityID, p.Title
    , p.FirstName, p.LastName
    , ph.*
FROM [Person].[Person] p
CROSS APPLY fn_PhysLocCracker(%%PHYSLOC%%) ph


Tuesday, September 27, 2016

How many times my SQL Server files have grown?

If you have not changed the default Growth Rate settings in SQL Server files, then the default will be applied. SQL Server 2016 is smart, it configures the Growth Rate as 64MB but old versions set this to very low value, resulting too many smaller growth. This slows down the system because the cost of growing a file is very expensive.

How do you check whether the your SQL Server experience too many growths? It is simple with standard reports given. The report Disk Usage shows all occurring of file growth if SQL Server has grown the files since last service restart.


This is what you see.


If you see many growth within a shorter period, you need to change the Growth Rate immediately.

Friday, May 13, 2016

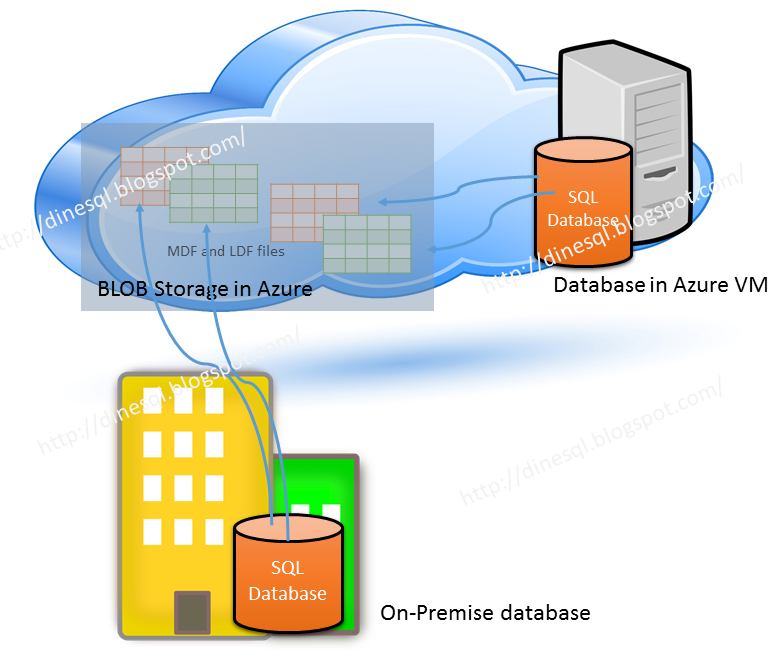
SQL Server On-Premise Database files maintained in Azure

This is not about databases completely maintained in cloud, this is about databases created and maintain on-premises but data and log files are maintained in Microsoft Cloud: Azure.


Microsoft Windows Azure allows us to store database files store in Azure storage while maintaining the database in an on-premise SQL Server instance. This offers many benefits, not only performance and maintenance wise, cost-wise as well. This facility was introduced with SQL Server 2014 and it has been enhanced with SQL Server 2016. Except some restrictions, we can simply work with the database as if it is fully maintained in the server though files are in Azure storage.

What sort of benefits we get from this? 
Main thing is, support on disaster recovery. If something happen to the server or VM hosted in Azure, we do not need to worry because there will be no harm to data files, and we can set up a new database in a new server connecting to files in Azure storage. Another is, more security with TDE. We can enable TDE for the database while keeping all keys in local master database. This allows us to encrypt data in data files and do not need to worry even someone has stolen credentials related to the storage.

In addition to that, it gives some benefits on the cost as we do not need to maintain infrastructure specifically on storage. Not only that, a new feature called Snapshot backup is available with this, which allows us to take instantaneous backups or restore based on files.

How to set up the environment?
Main requirement for this is, an Azure Storage Account. You need a classic storage for this. Once the storage is created, then you need to create a Policy on the Storage Container and Shared Access Signature (SAS) key. After that, you need to create a Credential using SAS in local instance. Then only you can create the database, placing files in the Azure Storage. Let's do all step by step.

Creating Policy and Shared Access Signature in Azure Storage
This has to be done with PowerShell. For that we need Azure PowerShell that provides cmdlets for managing Azure. Open Windows PowerShell ISE and type following. It will install Azure Resource Manager modules.

Install-Module AzureRM

You will be promoted with various windows based on components you have already installed.


And finally you should see a screen like this;


Next we need to install Azure Service Management module. For that, type the following and continue just like previous step.

Install-Module Azure


Let's login to Azure account manager for continuing.

You should get the login dialog box. Provide userid and password to continue.


Type the following cmdlet for getting Azure Subscription information and then open a window for Scripting.


Get-AzureRmSubscription

And place the following code into the Script Window. I have taken this code from Lesson 1: Create a stored access policy and a shared access signature on an Azure container and modified as I want. If you need the entire code, please refer the link. Note that I have already created a Classic Storage called dbfilesclassicstorage and a Container called dbfilescontainer. This script uses the storage and container if exist, else it creates them.

<# 
This script uses the Azure Resource model and creates a new ARM storage account.
Modify this script to use an existing ARM or classic storage account 
using the instructions in comments within this script
#>
# Define global variables for the script
$prefixName = 'dbfiles'  # used as the prefix for the name for various objects
$subscriptionName='Visual Studio Ultimate with MSDN'   # the name  of subscription name you will use
$locationName = 'East Asia'  # the data center region you will use
$storageAccountName= $prefixName + 'classicstorage'  # the storage account name you will create or use
$containerName= $prefixName + 'container'  # the storage container name to which you will attach the SAS policy with its SAS token
$policyName = $prefixName + 'policy' # the name of the SAS policy


<#
Using the Classic deployment model
Use the following four lines to use an existing classic storage account
#>
#Classic storage account name
Add-AzureAccount
Select-AzureSubscription -SubscriptionName $subscriptionName #provide an existing classic storage account
$accountKeys = Get-AzureStorageKey -StorageAccountName $storageAccountName
$storageContext = New-AzureStorageContext -StorageAccountName $storageAccountName -StorageAccountKey $accountKeys.Primary

# The remainder of this script works with either the ARM or classic sections of code above

# Creates a new container in blob storage
$container = New-AzureStorageContainer -Context $storageContext -Name $containerName
$cbc = $container.CloudBlobContainer

# Sets up a Stored Access Policy and a Shared Access Signature for the new container
$permissions = $cbc.GetPermissions();
$policyName = $policyName
$policy = new-object 'Microsoft.WindowsAzure.Storage.Blob.SharedAccessBlobPolicy'
$policy.SharedAccessStartTime = $(Get-Date).ToUniversalTime().AddMinutes(-5)
$policy.SharedAccessExpiryTime = $(Get-Date).ToUniversalTime().AddYears(10)
$policy.Permissions = "Read,Write,List,Delete"
$permissions.SharedAccessPolicies.Add($policyName, $policy)
$cbc.SetPermissions($permissions);

# Gets the Shared Access Signature for the policy
$policy = new-object 'Microsoft.WindowsAzure.Storage.Blob.SharedAccessBlobPolicy'
$sas = $cbc.GetSharedAccessSignature($policy, $policyName)
Write-Host 'Shared Access Signature= '$($sas.Substring(1))''

# Outputs the Transact SQL to the clipboard and to the screen to create the credential using the Shared Access Signature
Write-Host 'Credential T-SQL'
$tSql = "CREATE CREDENTIAL [{0}] WITH IDENTITY='Shared Access Signature', SECRET='{1}'" -f $cbc.Uri,$sas.Substring(1) 
$tSql | clip
Write-Host $tSql


This script outputs the CREATE CREDENTIAL TQL statement we need. Get it copied and use it for creating the Credential in local SQL Server instance.


Creating Credentials in SQL Server
We have done all required from Azure end. Now we need to create a Credential for accessing the storage using the key created. Open the Management Studio and place the copied code from PowerShell, and run it.


Let's create the database now
Now we can create the database. Make sure you use the Azure storage path for placing the files.

CREATE DATABASE Sales 
ON
( NAME = Sales_Data,
    FILENAME = 'https://dbfilesclassicstorage.blob.core.windows.net/dbfilescontainer/SalesData.mdf' )
 LOG ON
( NAME = Sales_Log,
    FILENAME =  'https://dbfilesclassicstorage.blob.core.windows.net/dbfilescontainer/SalesLog.ldf');


Once the database is created, you should see files in your storage like below;


Everything is done. Now the database is maintained locally and files are managed by Azure. For testing purposes, let's create a table and see;


Read more on this with following links;
SQL Server Data Files in Microsoft Azure
How to install and configure Azure PowerShell

Saturday, May 23, 2015

How to decide the number of data files required for tempdb?

If your tempdb is used heavily and experiences some slow performance with it, adding multiple data files might help to improve the overall performance of tempdb. Having multiple data files addresses issues related IO restrictions and avoids latch contention during Page Free Space (PFS) scans when temporary objects are created and dropped. But how do we decide the number of files should be added to the tempdb?

There is no specific formula to calculate it but a recommendation. Too much of files are not recommended at all as it might degrade performance rather improving performance. General rule is;

1 file per core or 0.25 file per core if as number of core increases. 

Optimal configuration can only be identified by doing some tests during peak hours but better to follow below guidelines for configuring your tempdb;

If the system has <= 8 cores, then number of data files = number of cores
If the system has > 8 cores, then number of data files = 8.


Tuesday, June 17, 2014

What are the advantages of a SQL Server database with multiple files located on one physical drive ?

This is a common question I always get from my classes/workshops. Do we really get some benefits out of a database with multiple data files on one physical drive? Obviously, no performance benefits, but in certain situation, it gives you some benefits;

  1. Taking partial backups, file backups, file group backups
    Although the files have not been distributed on multiple physical drives, still partial backups, files backups and file-groups backups are possible. Assume that your database is very large and some tables are infrequently updated, then you can separate tables into two file groups, using multiple data files, one group for tables that are frequently updated and other for tables that are infrequently updated (or read-only tables). This allows you to have a time-saving and efficient backup strategy, setting different backup plans on two file groups.
  2. Restoration into smaller multiple physical drives
    Assume that you maintain a database with single 100GB size data file. What if the exiting drive crashes and you get two 50GB physical drives for restoring the database from one of the backups? As you know, it is not possible, but, if the database is maintained with multiple data files even with a single physical drive, scenario like this can be easily addressed.
  3. Moving files into another drive
    For various reasons, either the entire database or part of the database is required to be moved to a different physical drives. Some of the reasons could be, moving from test environment to production environment, moving some file-groups to optimized physical drives, moving entire database to a different location. If the database is constructed with multiple files, moving files for above scenario can be easily done with less effort.