Showing posts with label SQL Server 2016. Show all posts

Monday, October 16, 2017

SQL Server Always Encrypted - Serving applications using Azure Key Vault and Certificate Store

Here is my second video related to Always Encrypted. This video discusses the way of configuring CMK for serving multiple applications hosted in multiple places, using Local Key Store - Certificate Store and Centralized Key Store - Azure Key Vault.


Here are the codes related to the video. I create a table in my Azure SQL Database, this is the code for it;

CREATE TABLE dbo.Message
(
 MessageId int identity(1,1) primary key
 , MessageCode char(5) COLLATE Latin1_General_BIN2 not null 
 , Message varchar(4000)  COLLATE Latin1_General_BIN2 not null
);
GO

INSERT INTO dbo.Message (MessageCode, Message)
 VALUES ('AA56B', 'This is a test message');
GO

CREATE OR ALTER PROCEDURE dbo.AddMessage @MessageCode char(5)
  , @Message varchar(4000)
AS
BEGIN

 INSERT INTO dbo.Message
  (MessageCode, Message)
 VALUES
  (@MessageCode, @Message);
END
GO


CREATE OR ALTER PROCEDURE dbo.GetMessage @MessageCode char(5)
   , @Message varchar(4000) OUTPUT
AS
BEGIN

 SELECT @Message = Message 
 FROM dbo.Message
 WHERE @MessageCode = MessageCode;
END
GO

And then, I have a .Net Application that accesses Azure Key Vault for taking the CMK and inserting and updating records. Here is the code of it. 

private static ClientCredential _clientCredential;

static void InitializeAzureKeyVaultProvider()
{
    _clientCredential = new ClientCredential("9e67ee1f-50ef-49d1-8ee0-0c48eaf4457b", "HjRqkx7BKLP7Lu+UYgTa5D/zCKAdxx3YITQ6fRrsQTQ=");

    SqlColumnEncryptionAzureKeyVaultProvider azureKeyVaultProvider =
        new SqlColumnEncryptionAzureKeyVaultProvider(GetToken);

    Dictionary providers =
        new Dictionary();

    providers.Add(SqlColumnEncryptionAzureKeyVaultProvider.ProviderName, azureKeyVaultProvider);
    SqlConnection.RegisterColumnEncryptionKeyStoreProviders(providers);
}

public async static Task GetToken(string authority, string resource, string scope)
{
    var authContext = new AuthenticationContext(authority);
    AuthenticationResult result = await authContext.AcquireTokenAsync(resource, _clientCredential);

    if (result == null)
        throw new InvalidOperationException("Failed to obtain the access token");
    return result.AccessToken;
}

public Form1()
{
    InitializeComponent();
    InitializeAzureKeyVaultProvider();

}

private void buttonSubmit_Click(object sender, EventArgs e)
{
    SqlConnection connection = new SqlConnection("Password=Pa$$w0rd;Persist Security Info=True;User ID=Dinesh;Initial Catalog=Marketing;Data Source=dinesqlserver.database.windows.net;Column Encryption Setting = Enabled");
    SqlCommand command = new SqlCommand("AddMessage", connection);
    command.CommandType = CommandType.StoredProcedure;

    SqlParameter parameterMessageCode = new SqlParameter("MessageCode", SqlDbType.Char, 5);
    parameterMessageCode.Value = textBoxMessageCode.Text;

    SqlParameter parameterMessage = new SqlParameter("Message", SqlDbType.VarChar, 4000);
    parameterMessage.Value = textBoxMessage.Text;

    command.Parameters.Add(parameterMessageCode);
    command.Parameters.Add(parameterMessage);

    connection.Open();
    command.ExecuteScalar();
    connection.Close();

}

private void buttonGet_Click(object sender, EventArgs e)
{
    SqlConnection connection = new SqlConnection("Password=Pa$$w0rd;Persist Security Info=True;User ID=Dinesh;Initial Catalog=Marketing;Data Source=dinesqlserver.database.windows.net; Column Encryption Setting = Enabled");
    SqlCommand command = new SqlCommand("GetMessage", connection);
    command.CommandType = CommandType.StoredProcedure;

    SqlParameter parameterMessageCode = new SqlParameter("MessageCode", SqlDbType.Char, 5);
    parameterMessageCode.Value = textBoxMessageCode.Text;

    SqlParameter parameterMessage = new SqlParameter("Message", SqlDbType.VarChar, 4000);
    parameterMessage.Direction = ParameterDirection.Output;

    command.Parameters.Add(parameterMessageCode);
    command.Parameters.Add(parameterMessage);

    connection.Open();
    command.ExecuteScalar();
    connection.Close();

    MessageBox.Show(parameterMessage.Value.ToString());
}

You can find more information and standard codes related to Azure Key Vault usage with Always Encrypted at: https://docs.microsoft.com/en-us/azure/sql-database/sql-database-always-encrypted-azure-key-vault


Thursday, October 12, 2017

Introduction to Always Encrypted

Here is my second video that speaks about Always Encrypted feature. This video shows How Always Encrypted works, how it should be configured and how we can access and update date using a .Net application.


Thursday, January 12, 2017

Incorrect syntax near 'TRIPLE_DES'. - SQL Server throws an error when try to use algorithms

Assume that you use SQL Server 2016 and trying to create a Symmetric Key or Asymmetric Key for encrypting data. If you try use an algorithm like TRIPLE_DES, you will get the mentioned error;

Msg 102, Level 15, State 1, Line 20
Incorrect syntax near 'TRIPLE_DES'.

Here is a sample code for seeing this error;

-- Create a database
CREATE DATABASE Sales;
GO

-- Connect with newly cerated database
USE Sales;
GO

-- Create a master key
CREATE MASTER KEY ENCRYPTION BY PASSWORD = 'Pa$$w0rd';
GO 

-- Create a certificate for protecting the our key 
CREATE CERTIFICATE SalesCertificate WITH SUBJECT = 'Sales Certificate';
GO

-- Create the key for encrypting data
-- Note that the created certificate protects it.
-- However, this will throw an error
CREATE SYMMETRIC KEY SalesKey
WITH ALGORITHM = TRIPLE_DES  
ENCRYPTION BY CERTIFICATE SalesCertificate;
GO

Now, what is the reason for this. The reason for this is, this algorithm is deprecated in SQL Server 2016. Not only that, All Algorithms except AES_128, AES_192, and AES_256 are deprecated in SQL Server 2016

What if you still need one of these deprecated algorithms? Yes, it is possible, but you need to downgrade the database by changing the Compatibility Level 120 or below.

This code shows the way of doing it.


USE master;
GO

-- Change the compatibility level to 120
ALTER DATABASE Sales
SET COMPATIBILITY_LEVEL = 120;

-- And check again
USE Sales;
GO

-- This will work now without any error
CREATE SYMMETRIC KEY SalesKey
WITH ALGORITHM = TRIPLE_DES  
ENCRYPTION BY CERTIFICATE SalesCertificate;
GO

Even though you can use the algorithm after changing the Compatibility Level, remember lower Compatibility Level might not let you to use all functionalities available with SQL Server 2016. Therefore, if possible, use allowed algorithms only.

Thursday, December 1, 2016

SQL Server 2016 Reporting Services Cookbook - Published!


I am happy to announce that SQL Server 2016 Reporting Services Cookbook is published and available for all SQL Server enthusiasts. It is my first book as a co-author.

It was not an easy task but with the great help from Amrita Noronha (Packt), Robert C. Cain (co-author) and Vinay Argekar (Packt), the dream came true, hence my sincere thank to all of them.

This book covers new features related to SQL Server 2016 as well as some important topics for report solution implementations. This is what you get from this book;

  • Key capabilities, architecture, and components of Reporting Services
  • New features that have been added to Reporting Services
  • Design the architecture for reporting solutions
  • Design the architecture for BI solutions
  • Implement reporting solutions using Reporting Services
  • Improve the performance, availability, and scalability of the reporting solution
  • Enhance reporting solutions with custom programming and improved security
Here is the link for more info and if you like to read;

Saturday, November 19, 2016

Now SQL Server supports CREATE OR ALTER statement

Another great enhancement with SQL Server 2016 SP1 is the support of CREATE OR ALTER statement with Stored Procedures, Views, Triggers and User-Defined functions. Now you do not need to have a statement for checking whether the object is exist before modifying and then start with either CREATE or ALTER. You can straightaway start the statement as CREATE OR ALTER and SQL Server will handle the rest.

The following example shows the way of using it;

USE AdventureWorks2014;
GO

CREATE OR ALTER VIEW Sales.GetSales
AS
SELECT h.SalesOrderNumber, h.CustomerID, SUM(d.LineTotal) TotalAmount
FROM Sales.SalesOrderHeader h
 INNER JOIN Sales.SalesOrderDetail d
  ON h.SalesOrderID = d.SalesOrderID
GROUP BY h.SalesOrderNumber, h.CustomerID;


Thursday, November 17, 2016

DBCC CLONEDATABASE is now working with SQL Server 2016

You might have used this command before or you might be unaware of this command. This was introduced with SQL Server 2014 SP2 and it allowed as to clone a database easily without getting data but with statistics. This is very useful when you have to troubleshoot a production database but you cannot do much with it because;
  1. You should not use it for troubleshooting during peak hours. 
  2. You cannot do all testing as you want because of some policies and security implementations.
Since this command allows you to take a copy of database without taking data, it is fast and useful for checking various things.

Here is the way of creating a clone:

DBCC CLONEDATABASE(AdventureWorks2014, CloneAdventureWorks2014);

This is the result you get when you execute against SQL Server 2016 (Note that this requires SP1, this does not run in RTM)


This what you see if you execute in RTM


Since this does not have data, you cannot perform all activities performed for troubleshooting.

For example, this is possible and it produces the required result:

USE CloneAdventureWorks2014;
GO

DBCC SHOW_STATISTICS ('Sales.SalesOrderHeader', 'PK_SalesOrderHeader_SalesOrderID')  


But this is does not provide the output as we need:

USE CloneAdventureWorks2014;
GO

SET STATISTICS IO ON
SELECT * FROM Sales.SalesOrderHeader;


Wednesday, November 16, 2016

SQL Server 2016 Service Pack 1 (SP1) released

Do not expect another standard service pack that contains all hot-fixes and updates done on the previous version, this has something else, it has a major change.

Yes, in addition to fixes and new features, Microsoft makes some of previously-unavailable-features (or Enterprise-only-features) available for Standard, Web, Express and LocalDB editions. This is amazing, specially, those who run large and heavy OLTP databases and who have data warehouses implemented in Standard Edition.

Whenever I do training and consultancy on data warehousing, this biggest hit I get is client is using Standard Edition and no partitioning can be done. Not only that, unavailability of Columnstore Indexing, In-Memory OLTP are few more. This sometime discourrages the client on BI implementation as they see many limitation with the Edition they have bought and unfortunaltely they cannot go for Enterprise because of the cost. This what Microsoft has addressed with SQL Server 2016 SP1 release.


Here are the features available now with Standard, Web and Express which were not available before;


Sunday, August 21, 2016

SQL Server Brain Basher of the Week #051 - SQL Server 2016

SQL Server 2016 is released and many have started using it. Here is a simple question on SQL Server 2016;

True or False: SQL Server 2016 is available for both x32 and x64 architectures.

Although earlier versions of SQL Server supported both x32 and x64 architectures, SQL Server 2016 is supported on x64 processor only. It is no longer supported x86 processors (x32 architecture).

Sunday, July 10, 2016

SQL Server Brain Basher of the Week #046 - Default Database Size

You may or may not have noticed the initial size of the database at creation but there is a fixed size for both data and log files. Most of the time, developers just create the database by supplying the name without considering other properties unless some properties need an attention and a change. Same goes to the size too. Let's talk about the initial size today;

What is the default size of SQL Server database?

Before discussing the answer, let's see how a database is created with our CREATE DATABASE command. When SQL Server has to create a database, it actually takes a copy of Model database as it is considered as the standard template for databases. Therefore default size of the database is based on the size set with Model database.

Until SQL Server 2014, the default size of the data file is 3MB and log file is 1MB. However this has been changed from SQL Server 2016. Now it is 8MB for both files. Not only that, File Growth setting has been changed as well.


Friday, July 1, 2016

SQL Server 2016 Sample Database - Wide World Importers- Restoring and adding more records

We have been using Adventure Works database with almost all versions of SQL Server and no questions, it can be used with SQL Server 2016 as well. Everyone likes Adventure Works but when a complex testing over functionalities is required, Adventure Works is considered as a simple database and many tend to use some other databases instead of Adventure Works. One popular database was Contoso database which was available but for most of cases, the size was not enough.

For SQL Server 2016, Microsoft introduces a new database called Wide World Importers. This database covers many new features of SQL Server and it allows you to load data to current date. Not only that, you decide how many Customer Orders you need per day to increase the volume.

Here is the way of adding Wide World Importers databases.

WideWorldImporters Database
Go to this link and download WideWorldImporters-Full.bak file. Restore it either using TSQL or GUI.

USE master
RESTORE DATABASE WideWorldImporters
FROM  DISK = N'D:\Software\SQL Server 2016\WideWorldImporters-Full.bak' 
WITH  FILE = 1,  
MOVE N'WWI_Primary' TO N'C:\Program Files\Microsoft SQL Server\MSSQL13.MSSQLSERVER\MSSQL\DATA\WideWorldImporters.mdf',  
MOVE N'WWI_UserData' TO N'C:\Program Files\Microsoft SQL Server\MSSQL13.MSSQLSERVER\MSSQL\DATA\WideWorldImporters_UserData.ndf',  
MOVE N'WWI_Log' TO N'C:\Program Files\Microsoft SQL Server\MSSQL13.MSSQLSERVER\MSSQL\DATA\WideWorldImporters.ldf',  
MOVE N'WWI_InMemory_Data_1' TO N'C:\Program Files\Microsoft SQL Server\MSSQL13.MSSQLSERVER\MSSQL\DATA\WideWorldImporters_InMemory_Data_1',  
NOUNLOAD,  STATS = 5
GO

Once restored, you should see the database in your instance. If you query Sales.Orders table, you should see 73,595 records. These orders are populated till 2016-05-31.


If you want to add more data to the current data, you can call DataLoadSimulation.PopulateDataToCurrentDate stored procedure with relevant parameter values as below.

DECLARE @return_value int

EXEC @return_value = [DataLoadSimulation].[PopulateDataToCurrentDate]
  @AverageNumberOfCustomerOrdersPerDay = 80,
  @SaturdayPercentageOfNormalWorkDay = 30,
  @SundayPercentageOfNormalWorkDay = 5,
  @IsSilentMode = 0,
  @AreDatesPrinted = 0

SELECT 'Return Value' = @return_value

You can simply have a larger number of @AverageNumberOfCustomerOrdersPerDay if you need more records.

WideWorldImportersDW database
If you need the relational data warehouse related to Wide World Importers, then you need to download the WideWorldImportersDW-Full.bak from same page. Restore it just like the previous database using following script;

USE master
GO

RESTORE DATABASE WideWorldImportersDW
FROM  DISK = N'D:\Software\SQL Server 2016\WideWorldImportersDW-Full.bak' 
WITH  FILE = 1,  
MOVE N'WWI_Primary' TO N'C:\Program Files\Microsoft SQL Server\MSSQL13.MSSQLSERVER\MSSQL\DATA\WideWorldImportersDW.mdf',  
MOVE N'WWI_UserData' TO N'C:\Program Files\Microsoft SQL Server\MSSQL13.MSSQLSERVER\MSSQL\DATA\WideWorldImportersDW_UserData.ndf',  
MOVE N'WWI_Log' TO N'C:\Program Files\Microsoft SQL Server\MSSQL13.MSSQLSERVER\MSSQL\DATA\WideWorldImportersDW.ldf', 
MOVE N'WWIDW_InMemory_Data_1' TO N'C:\Program Files\Microsoft SQL Server\MSSQL13.MSSQLSERVER\MSSQL\DATA\WideWorldImportersDW_InMemory_Data_1',  
NOUNLOAD,  STATS = 5
GO

If you have repopulated WideWorldImporters database using PopulateDataToCurrentDate, then you need to transfer new data to the data warehouse. You do not need to manually load it, you can use a given package for populating the data warehouse.

Download Daily.ETL.ispac from the same page and add it to Integration Services catalog by running the file. Once it is added, you should see the package;


Right-click on the package and execute it for updating the data warehouse. Make sure connection string set are correct as per your environment. If not, change it and execute it.


Once executed, your data warehouse is updated based on new data added to WideWorldImporters database.


Wednesday, May 25, 2016

SQL Server SESSION_CONTEXT function - SQL Server 2016 Enhancements

If you are a web developer and have worked with Classic ASP or ASP.Net, then you know that how important it is for maintaining Session Variables for keeping various values throughout the session. Although similar capability was exist with SQL Server, it was not exactly functioning as Session Variables as it had many limitations. Now, with SQL Server 2016, a new function has been introduced, called SESSION_CONTEXT that accepts a key of key-value pair set with sp_set_session_context and returns the value of submitted key.

The previous versions before 2016, this was implemented via CONTEXT_INFO function. This holds only a single binary value, making it difficult to maintain multiple values. It is limited to 128 bytes per connection, which is not enough at all and cannot be secured because user can change it if want. With these limitations, it was not used with much implementations.

Values for sessions are set with sp_set_session_context that accepts two mandatory parameters and one optional. First parameter the key (or name) of the session variable which type is sysname. Second parameter is the value. It is accepted as sql_variant and value can be as large as 256KB. Third parameter which is optional that indicates whether the variable is read-only or not. The default is 0 which is not read-only.

Let's test this. The following code creates;

  1. Create a Login called Smith for testing
  2. Create a Database called Config. Assume that you maintain additional configuration details in this database for your applications.
  3. Add Smith as a User to the database. He will be a member of db_datareader role.
  4. Create a Table called EmployeeSecurityLevel and inserts two records.
  5. Create a Procedure called GetProducts for testing. This procedure checks the set Security Level and displays. In addition to that, Smith is added to the database.
  6. Create a Logon Trigger to capture user and set Security Level as a Session Variable. It assigned the relevant Security Level taken from Config database to a variable called CompanySecurityLevel.
-- ******** 1 ********
-- Create login for Smith
USE master;
GO
CREATE LOGIN Smith WITH PASSWORD = 'Pa$$w0rd';
GO

-- ******** 2 ********
-- Create a Config database
CREATE DATABASE Config;
GO

USE Config;
GO

-- ******** 3 ********
-- Add Smith to Config
CREATE USER Smith FOR LOGIN Smith;
EXEC sp_addrolemember 'db_datareader', 'Smith';

-- ******** 4 ********
-- Create a table for holding security levels
CREATE TABLE dbo.EmployeeSecurityLevel
(
 Id int Identity(1,1) PRIMARY KEY
 , UserId nvarchar(200) NOT NULL INDEX IX_EmployeeSecurityLevel_UserId NONCLUSTERED
 , SecurityLevel tinyint NOT NULL
);

-- Add two users
INSERT INTO dbo.EmployeeSecurityLevel
 (UserId, SecurityLevel)
VALUES
 (N'Dinesh', 1)
 , (N'Smith', 3);


-- ******** 5 ********
USE AdventureWorks2016CTP3;
GO

-- Add SP for getting products
DROP PROC IF EXISTS dbo.GetProducts;
GO
CREATE PROC dbo.GetProducts
AS
BEGIN

 DECLARE @SecurityLevel tinyint
 SELECT @SecurityLevel = Convert(tinyint, SESSION_CONTEXT(N'CompanySecurityLevel'));

 PRINT 'Displaying products as per security level.....'
 PRINT 'Security level: ' + Convert(varchar(3), @SecurityLevel);
END;

-- Add Smith and set relevant permission
CREATE USER Smith FOR LOGIN Smith;
EXEC sp_addrolemember 'db_datareader', 'Smith';
GRANT EXECUTE ON dbo.GetProducts TO Smith;

-- ******** 6 ********
USE master;
GO

-- Creating Logon trigger to set the session variable
CREATE TRIGGER SetSessionVariables
ON ALL SERVER 
AFTER LOGON
AS
BEGIN
 DECLARE @SecurityLevel tinyint

 -- Query Config database and get the value
 SELECT @SecurityLevel = SecurityLevel
 FROM Config.dbo.EmployeeSecurityLevel
 WHERE UserId = CURRENT_USER;

 -- Set the value, note that it is set as read-only
 EXEC sp_set_session_context N'CompanySecurityLevel', @SecurityLevel, 1; 
END;

Once everything is set, when Smith logs in, his Security Level is captured via the trigger and set with session_context. This value can be read in any database within his session. Below code shows that Smith executes the procedure and result is based on his Security Level.

-- Logged in as Smith
USE AdventureWorks2016CTP3;
GO
-- Smith executing the SP
EXEC dbo.GetProducts;


Friday, May 20, 2016

SQL Server SERVERPROPERTY - SQL Server 2016 TSQL Enhancements

SQL Server SERVERPROPERTY function was introduced with SQL Server 2008 and it was very useful for getting property information about the server instance. With SQL Server 2016, few new properties have been introduced for getting more information.

SELECT SERVERPROPERTY('ProductBuild') ProductBuild
 , SERVERPROPERTY('ProductBuildType') ProductBuildType
 , SERVERPROPERTY('ProductMajorVersion') ProductMajorVersion
 , SERVERPROPERTY('ProductMinorVersion') ProductMinorVersion
 , SERVERPROPERTY('ProductUpdateLevel') ProductUpdateLevel
 , SERVERPROPERTY('ProductUpdateReference') ProductUpdateReference
 , SERVERPROPERTY('IsPolybaseInstalled') IsPolybaseInstalled;


Note that ProductBuildType returns OD (On-demand - release for a specific customer, GDR (General Distribution Release - release with Windows Update) or NULL if not applicable.

ProductUpdateLevel returns CU (Cumulative Update) or NULL if not applicable.

ProductUpdateReference returns KB article for the release.

Thursday, May 19, 2016

Truncating Partitions - SQL Server 2016 TSQL Enhancements

For a speedy delete or cleaning the table and resetting some of the properties of the table, we use TRUNCATE TABLE statement. This was really useful specifically with large data table because it saves both resources and time. However this was limited to the entire table, truncating a partition was not possible with it.

SQL Server 2016 has extended this functionality by allowing us to truncate individual partitions or set of partitions. This is really useful if a partition needs to be cleaned up for refreshing data. Here is a sample code on it;

This code creates a database, table in it and inserts set of records;

-- creating database
CREATE DATABASE [Sales] ON  PRIMARY 
( NAME = N'Sales', FILENAME = N'C:\Program Files\Microsoft SQL Server\MSSQL13.SQL2016_M\MSSQL\DATA\Sales.mdf' , SIZE = 3048KB , FILEGROWTH = 1024KB ), -- default FG
 FILEGROUP [CurrentFileGroup] 
( NAME = N'Sales Current', FILENAME = N'C:\Program Files\Microsoft SQL Server\MSSQL13.SQL2016_M\MSSQL\DATA\Sales Current.ndf' , SIZE = 2048KB , FILEGROWTH = 1024KB ), 
 FILEGROUP [HistoryFileGroup] 
( NAME = N'Sales Histoty', FILENAME = N'C:\Program Files\Microsoft SQL Server\MSSQL13.SQL2016_M\MSSQL\DATA\Sales Histoty.ndf' , SIZE = 2048KB , FILEGROWTH = 1024KB )
 LOG ON 
( NAME = N'Sales_log', FILENAME = N'C:\Program Files\Microsoft SQL Server\MSSQL13.SQL2016_M\MSSQL\DATA\Sales_log.ldf' , SIZE = 1024KB , FILEGROWTH = 10%)
GO

USE Sales
GO

-- creating the partition
CREATE PARTITION FUNCTION pf_SalesDate (datetime)
AS RANGE RIGHT
FOR VALUES ('1/1/2003', '1/1/2004', '1/1/2005', '1/1/2006')
GO


-- creating the scheme
CREATE PARTITION SCHEME ps_SalesDate
AS PARTITION pf_SalesDate
TO (HistoryFileGroup, HistoryFileGroup, HistoryFileGroup, HistoryFileGroup, CurrentFileGroup)
GO

-- creating the partitioned table
CREATE TABLE SalesOrders
(
 ID int IDENTITY(1,1) NOT NULL,
 [Date] datetime NOT NULL,
 CustomerID int NOT NULL,
 CONSTRAINT PK_SalesOrders PRIMARY KEY (ID, [Date])
)
ON ps_SalesDate ([Date])
GO

INSERT INTO SalesOrders ([Date], CustomerID) VALUES ('01/01/2003', 1)
INSERT INTO SalesOrders ([Date], CustomerID) VALUES ('02/01/2003', 2)
INSERT INTO SalesOrders ([Date], CustomerID) VALUES ('01/01/2004', 5)
INSERT INTO SalesOrders ([Date], CustomerID) VALUES ('02/01/2004', 7)
INSERT INTO SalesOrders ([Date], CustomerID) VALUES ('05/01/2004', 15)
INSERT INTO SalesOrders ([Date], CustomerID) VALUES ('01/01/2005', 20)
INSERT INTO SalesOrders ([Date], CustomerID) VALUES ('03/01/2005', 34)
INSERT INTO SalesOrders ([Date], CustomerID) VALUES ('01/01/2006', 56)
GO 1000000 -- You can change this as you want

-- checking partitions and number of rows
SELECT p.partition_number, rows
FROM sys.partitions p
 INNER JOIN sys.objects o
  ON o.object_id = p.object_id
WHERE o.type = 'U' AND o.name = 'SalesOrders';


Let's try to clean a partition by using DELETE statement.


As you see, it takes 6 seconds for deleting. Since truncating partitions is possible now, it can be used for deleting, saving time and resources.


Truncating is possible with one partition, multiple partitions and ranges;

-- One partition
TRUNCATE TABLE dbo.SalesOrders WITH (PARTITIONS (2));

-- Multiple partitions
TRUNCATE TABLE dbo.SalesOrders WITH (PARTITIONS (2, 3, 4));

-- Range
TRUNCATE TABLE dbo.SalesOrders WITH (PARTITIONS (2 TO 4));

-- Combining range and multiple partitions
TRUNCATE TABLE dbo.SalesOrders WITH (PARTITIONS (1, 2, 4 TO 6));

Monday, May 16, 2016

DROP IF EXISTS- SQL Server 2016 TSQL Enhancements

Though there are couple of additions with SQL Server 2016 on TSQL, had no chance to test them and see. While I was going through the list, the one I found, which is simple but very useful is, DROP IF EXISTS. This allows us to stop writing a lengthy and ugly statement that was used for checking whether the object is exist and then dropping. It basically simplifies the statement.

This can be used against many different objects such as DATABASE, TABLE, VIEW, INDEX, PROCEDURE, TRIGGER, etc

Here are some sample codes;

-- creating a database
USE master;
GO

-- Using with database
DROP DATABASE IF EXISTS Sales;
GO

CREATE DATABASE Sales;
GO

USE Sales;
GO

CREATE TABLE dbo.Customer (Id int PRIMARY KEY, Name varchar(100));
CREATE TABLE dbo.Employee (Id int PRIMARY KEY, Name varchar(100));
CREATE TABLE dbo.Product (Id int PRIMARY KEY, Name varchar(100));
CREATE TABLE dbo.Region (Id int PRIMARY KEY, Name varchar(100));

-- Dropping customer table
-- Old method I
--IF EXISTS (SELECT * FROM sys.tables WHERE name = 'Customer')
-- DROP TABLE dbo.Customer;

---- Old method II
--IF OBJECT_ID('dbo.Customer') IS NOT NULL
-- DROP TABLE dbo.Customer;

-- New method
DROP TABLE IF EXISTS dbo.Customer;

-- This will remove Name column if it exist
-- Note that this code can be run without errors
-- even after removing the column
ALTER TABLE dbo.Employee DROP COLUMN IF EXISTS Name;

-- We can drop multiple items like this
DROP TABLE dbo.Product, dbo.Region;

-- Recreating them
CREATE TABLE dbo.Product (Id int PRIMARY KEY, Name varchar(100));
CREATE TABLE dbo.Region (Id int PRIMARY KEY, Name varchar(100));

-- And same can be done with new way too
DROP TABLE IF EXISTS dbo.Product, dbo.Region;

Saturday, May 7, 2016

How to check tables and stored procedures for in-memory migration

SQL Server introduced In-memory optimized tables with 2014 and it has been enhanced with SQL Server 2016. This improves the performance significantly and it is not that difficult to implement too. If we create a new database for new set of requirements, then it is easy to determine whether tables and stored procedures can be created using in-memory OTLP but it is bit difficult to check and see whether tables and stored procedures in existing databases are compatible for it.

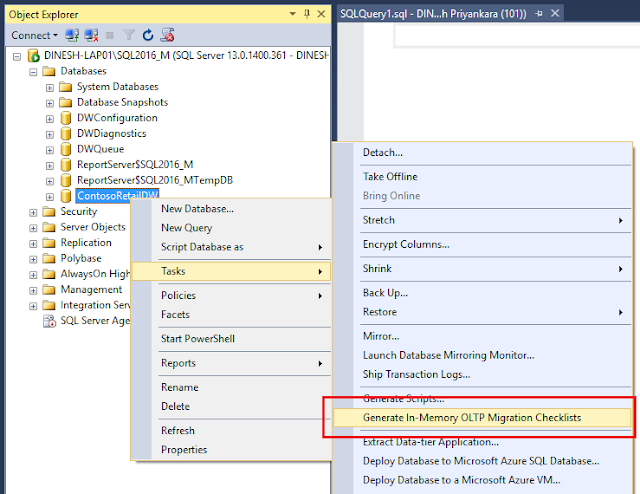
We have been given a user-friendly wizard by SQL Server 2016 for determining the compatibility. This wizard helps us to go through tables and stored procedures we have in our database and check whether they can be converted. Not only that, if it is not possible, what are the possible reasons and solutions for converting them.

Let's try with one database. I have restored ContosoRetailDW database in my 2016 instance. I can find the wizard called Generate In-Memory OLTP migration checklist as below;


When click, Welcome Screen appears and the next page is for selecting objects to be checked. I can
get checked all or I can select individual items too. Remember the path set to Save checklist to. That is the place to be checked after completion of the wizard.


Last page allows to get the Powershell script generated too. If you need, you can get the code. At the end of the wizard, you see whether it has gone through all objects or not.


Now we can go through the checklist. Open the folder used, you should see three folders for; tables, stored procedures, and user defined functions.


Let's take one checklist and see. Lets open the checklist generated for DimDate table: MigrationAdvisorChecklistReport_DimDate_20160509.html file.


As you see, it clears says whether table is supported and what are the possible reasons if unsupported including possible solutions.

Thursday, May 5, 2016

How to create a large database in seconds - SQL Server 2016 - Perform Volume Maintenance Task

In most cases, we do not set the database file large, initial size is always less than 1GB, unless a decision is taken to make it suitable for next few months. If the database has to be created with a larger file, then of course, we need to set the file size with database creation, and it takes long time for creation. Why it takes long time? We dont have data, and it is just an allocation from the space in the disk. But it takes time if the size is in GBs.

It takes long time for initializing the space required, by filling the file with zeros. This makes sure that previously deleted files cannot be accessed and no security violation. This Zeroing Process applies to;
  • Create a database
  • Add files to an existing database
  • Increase the size of the file
  • Restore a database
If required, this process can be stopped for SQL Server and reduce the time it takes. SQL Server 2014 and before, it has to be done by adding the SQL Server service account to a policy group called Perform Volume Maintenance Task. However SQL Server 2016 allows us to set this at installation itself.


If you select this checkbox during the installation, it will not take long time for peforming above mentioned operations. Here is a comparison I just did.

This code is based on SQL Server 2014 with default setting. Its service account has not been added to policy task and as you see, it has taken more than 2 minutes for creating a database with 10GB size file.


This shows the same code execution with SQL Server 2016. Note that I have enabled the option during the installation. As you see, it has taken only 14 seconds.


Note that this does not applicable for log files. You should consider this option if you frequently perform these operations against your SQL Server.

Monday, May 2, 2016

SQL Server 2016 will be available on 1st of June 2016


Microsoft SQL Server team has announced that SQL Server 2016 will be available on June 1, 2016. SQL Server 2016 comes with end-to-end data management including best way of managing business intelligence on our data on any device.

If you need to have a quick look on What's New, get this PDF.

If you need to know why you should go for Microsoft SQL Server, refer below images;

Gartner Magic Quadrant for Operational Database Management System


Gartner Magic Quadrant for Data Warehouse and Data Management Solutions for Analytics


Gartner Magic Quadrant for Advanced Analytics Platform.


Sunday, May 1, 2016

SQL Server Brain Basher of the Week #041 - SQL Server 2016 - Editions

SQL Server 2016 will be available soon and will be surely seen more and more advanced features that will help us to continue with both operational and strategic level activities. Here is the question of this week based on SQL Server Editions.

As we know, generally we have two Premium Editions, two Core Editions and few additional editions;


Considering the main editions, one edition has been removed from SQL Server 2016. Which one has been removed from SQL Server 2016?

As per the current announcements, Business Intelligence edition is not included with SQL Server 2016. There can be changes with official announcements but currently, it is not available.

Thursday, April 21, 2016

SQL Server 2016 - Manipulating data in Azure Storage using PolyBase

When PolyBase is opened with SQL Server editions other than APS or PDW, I tested it with SQL Server 2016 CTP 2.1. It had some issues but was able to get it worked with some workaround. Thought to do the same with RC3 since there are many enhancements, and it works fine now. If you are interested in Polybase, have a look on the post I have written in June 2015; SQL Server 2016 features: Polybase: SQL Server connector to Hadoop.

What is PolyBase? It is a feature that is available with SQL Server 2016. It facilitates us to use TSQL against data stored in Hadoop or Azure Blob Storage, allowing us to combine structured data with semi-structured data. Data warehousing benefits a lot from this as it reduces the time spending on ETLing and supports real-time analysis. Other than that it can be used with OLTP databases and can be used for archiving data as well.

Currently this feature is available with SQL Server 2016 RC3, I did not come across Edition Comparison related to 2016, hence no idea which Edition will support with final release. Note that there are few prerequisites like .Net framework 4.5 or later, Oracle Java SE runtime. Make sure you have installed all required before installing SQL Server and enabling Polybase. You can read a post I wrote on installation SQL Server RC3: Installing SQL Server 2016 RC1 - Sharing issues.

Generally, we should install PolyBase feature as Standard-alone Polybase. If you want to make a collection of SQL Server instances as a PolyBase Scale-Out Group, then select PolyBase Scale-Out Group during the installation.

PolyBase support two Hadoop providers: Hortonwork’s Data Platform (HDP) and Cloudera’s CDH either on Linux or Windows. In addition to that it can connect with Azure Blob Storage too.

Let's start with a simple one. I have uploaded a file to my Azure Storage. This file holds small number of CDR records and let's see how we can read these records using TSQL.


In order to access this file, we need to make sure PolyBase is configured properly. Make sure two new services: SQL Server PolyBase Data Movement and SQL Server PolyBase Engine are running. In addition to that, make sure that it is enabled and connectivity is set as below.


For understanding the value that needs to be set with Hadoop Connectivity, read this.

Let's create a database and configure Data Source. Note that, we need to create a Database Credential first for using it with the Data Source.

CREATE DATABASE Telco;
GO

USE Telco;
GO

-- Create a master key to encrypt credential secret.
CREATE MASTER KEY ENCRYPTION BY PASSWORD = 'Pa$$w0rd';

-- Create a database scoped credential (Azure Storage).
-- Enter your azure storage primary key as the secret.
CREATE DATABASE SCOPED CREDENTIAL AzureStorageCredential WITH 
        IDENTITY = 'AzureStorageUser'
  , Secret = 'primary key';

-- create the external data source
CREATE EXTERNAL DATA SOURCE DinesqlStorage
WITH
(
 TYPE = HADOOP,
 LOCATION = 'wasbs://cdrcontainer@dinesqlstorage.blob.core.windows.net/'
 , CREDENTIAL = AzureStorageCredential
);


Next step is creating a File Format for the file we gonna read. PolyBase supports Delimited Text, Hive RCFile, Hive ORC, and Parquet. Let's create the File Format for our file.

-- Create an external file format (delimited text file).
CREATE EXTERNAL FILE FORMAT CDRFileFormat WITH (
        FORMAT_TYPE = DELIMITEDTEXT, 
        FORMAT_OPTIONS (FIELD_TERMINATOR =';', 
                USE_TYPE_DEFAULT = False)
);


Last step is creating an External Table matching with the file uploaded combining the File Format. Read more on it with CREATE EXTERNAL TABLE. Here is the code I used.

-- create the table using file format created
-- and for the file uploaded
CREATE EXTERNAL TABLE CDRData
(
 MSIDN nvarchar(100)
 , IMSI nvarchar(100)
 , IMEI nvarchar(100)
 , [Plan] nvarchar(10)
 , CALL_TYPE nvarchar(20)
 , CORRESP_TYPE nvarchar(10)
 , CORRESP_ISDN nvarchar(100)
 , Duration int
 , [Time] nvarchar(20)
 , [Date] nvarchar(20)
 )
WITH
(
 LOCATION = '/cdrfiles'
 , DATA_SOURCE = DinesqlStorage
 , FILE_FORMAT = CDRFileFormat
);

Now I can simply query data in my Azure Storage using the table I created. Not only that I can join this dataset with my other tables and do more analysis. I will add more complex examples with next set of posts.


Wednesday, April 20, 2016

SQL Server 2016 - Connecting to Azure SQL Server using SSMS - RC3

Please note that there is an issue with connecting to Azure SQL Server using latest RC3 build. If you are experiencing the following error, note that it is an issue related your system.

An error occurred while creating a new firewall rule. (ConnectionDlg)...


There is no other options, if you need to connect with your Azure SQL Server, you need to open the portal and add your IP address using Firewall Settings.