Saturday, May 14, 2016

Creating SSIS packages for 2016, 2014 or 2012

Do you know that you can create SSIS packages now targeting the version to be run? Yes, it is possible with SQL Server Data Tools that has been release for SQL Server 2016. This works with Visual Studio 2015 and you can download the latest SQL Server Data Tools from here.

You can set the target version via Project Properties.


Once selected, you will be able to design your package suitable for the selected version.

Friday, May 13, 2016

SQL Server On-Premise Database files maintained in Azure

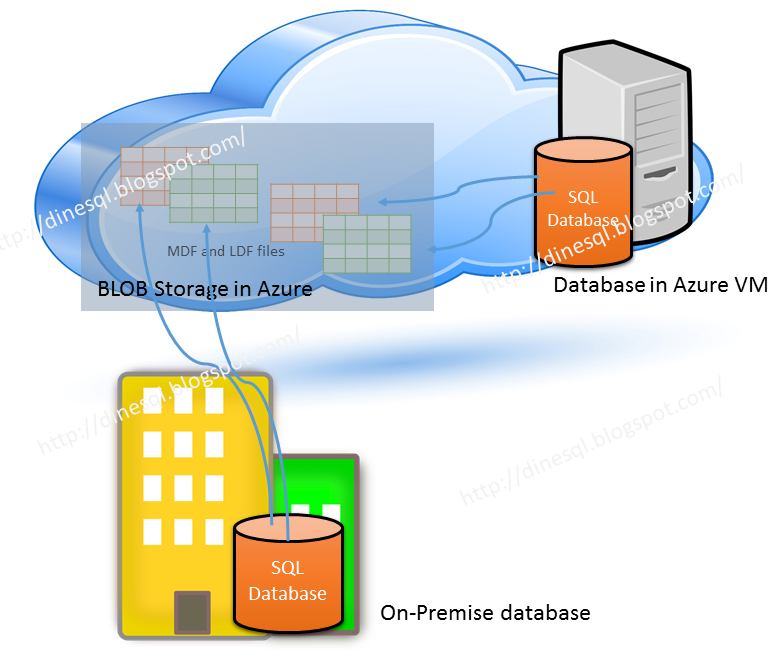
This is not about databases completely maintained in cloud, this is about databases created and maintain on-premises but data and log files are maintained in Microsoft Cloud: Azure.


Microsoft Windows Azure allows us to store database files store in Azure storage while maintaining the database in an on-premise SQL Server instance. This offers many benefits, not only performance and maintenance wise, cost-wise as well. This facility was introduced with SQL Server 2014 and it has been enhanced with SQL Server 2016. Except some restrictions, we can simply work with the database as if it is fully maintained in the server though files are in Azure storage.

What sort of benefits we get from this? 
Main thing is, support on disaster recovery. If something happen to the server or VM hosted in Azure, we do not need to worry because there will be no harm to data files, and we can set up a new database in a new server connecting to files in Azure storage. Another is, more security with TDE. We can enable TDE for the database while keeping all keys in local master database. This allows us to encrypt data in data files and do not need to worry even someone has stolen credentials related to the storage.

In addition to that, it gives some benefits on the cost as we do not need to maintain infrastructure specifically on storage. Not only that, a new feature called Snapshot backup is available with this, which allows us to take instantaneous backups or restore based on files.

How to set up the environment?
Main requirement for this is, an Azure Storage Account. You need a classic storage for this. Once the storage is created, then you need to create a Policy on the Storage Container and Shared Access Signature (SAS) key. After that, you need to create a Credential using SAS in local instance. Then only you can create the database, placing files in the Azure Storage. Let's do all step by step.

Creating Policy and Shared Access Signature in Azure Storage
This has to be done with PowerShell. For that we need Azure PowerShell that provides cmdlets for managing Azure. Open Windows PowerShell ISE and type following. It will install Azure Resource Manager modules.

Install-Module AzureRM

You will be promoted with various windows based on components you have already installed.


And finally you should see a screen like this;


Next we need to install Azure Service Management module. For that, type the following and continue just like previous step.

Install-Module Azure


Let's login to Azure account manager for continuing.

You should get the login dialog box. Provide userid and password to continue.


Type the following cmdlet for getting Azure Subscription information and then open a window for Scripting.


Get-AzureRmSubscription

And place the following code into the Script Window. I have taken this code from Lesson 1: Create a stored access policy and a shared access signature on an Azure container and modified as I want. If you need the entire code, please refer the link. Note that I have already created a Classic Storage called dbfilesclassicstorage and a Container called dbfilescontainer. This script uses the storage and container if exist, else it creates them.

<# 
This script uses the Azure Resource model and creates a new ARM storage account.
Modify this script to use an existing ARM or classic storage account 
using the instructions in comments within this script
#>
# Define global variables for the script
$prefixName = 'dbfiles'  # used as the prefix for the name for various objects
$subscriptionName='Visual Studio Ultimate with MSDN'   # the name  of subscription name you will use
$locationName = 'East Asia'  # the data center region you will use
$storageAccountName= $prefixName + 'classicstorage'  # the storage account name you will create or use
$containerName= $prefixName + 'container'  # the storage container name to which you will attach the SAS policy with its SAS token
$policyName = $prefixName + 'policy' # the name of the SAS policy


<#
Using the Classic deployment model
Use the following four lines to use an existing classic storage account
#>
#Classic storage account name
Add-AzureAccount
Select-AzureSubscription -SubscriptionName $subscriptionName #provide an existing classic storage account
$accountKeys = Get-AzureStorageKey -StorageAccountName $storageAccountName
$storageContext = New-AzureStorageContext -StorageAccountName $storageAccountName -StorageAccountKey $accountKeys.Primary

# The remainder of this script works with either the ARM or classic sections of code above

# Creates a new container in blob storage
$container = New-AzureStorageContainer -Context $storageContext -Name $containerName
$cbc = $container.CloudBlobContainer

# Sets up a Stored Access Policy and a Shared Access Signature for the new container
$permissions = $cbc.GetPermissions();
$policyName = $policyName
$policy = new-object 'Microsoft.WindowsAzure.Storage.Blob.SharedAccessBlobPolicy'
$policy.SharedAccessStartTime = $(Get-Date).ToUniversalTime().AddMinutes(-5)
$policy.SharedAccessExpiryTime = $(Get-Date).ToUniversalTime().AddYears(10)
$policy.Permissions = "Read,Write,List,Delete"
$permissions.SharedAccessPolicies.Add($policyName, $policy)
$cbc.SetPermissions($permissions);

# Gets the Shared Access Signature for the policy
$policy = new-object 'Microsoft.WindowsAzure.Storage.Blob.SharedAccessBlobPolicy'
$sas = $cbc.GetSharedAccessSignature($policy, $policyName)
Write-Host 'Shared Access Signature= '$($sas.Substring(1))''

# Outputs the Transact SQL to the clipboard and to the screen to create the credential using the Shared Access Signature
Write-Host 'Credential T-SQL'
$tSql = "CREATE CREDENTIAL [{0}] WITH IDENTITY='Shared Access Signature', SECRET='{1}'" -f $cbc.Uri,$sas.Substring(1) 
$tSql | clip
Write-Host $tSql
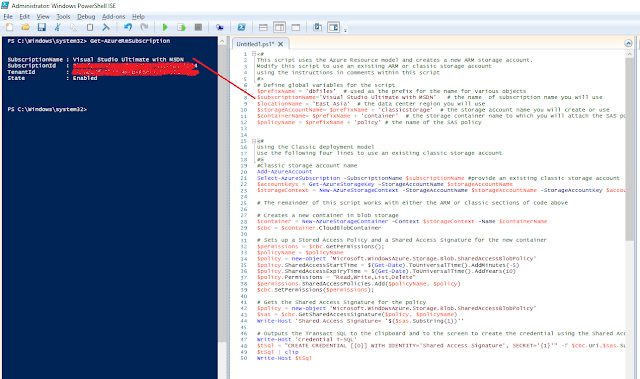


This script outputs the CREATE CREDENTIAL TQL statement we need. Get it copied and use it for creating the Credential in local SQL Server instance.


Creating Credentials in SQL Server
We have done all required from Azure end. Now we need to create a Credential for accessing the storage using the key created. Open the Management Studio and place the copied code from PowerShell, and run it.


Let's create the database now
Now we can create the database. Make sure you use the Azure storage path for placing the files.

CREATE DATABASE Sales 
ON
( NAME = Sales_Data,
    FILENAME = 'https://dbfilesclassicstorage.blob.core.windows.net/dbfilescontainer/SalesData.mdf' )
 LOG ON
( NAME = Sales_Log,
    FILENAME =  'https://dbfilesclassicstorage.blob.core.windows.net/dbfilescontainer/SalesLog.ldf');


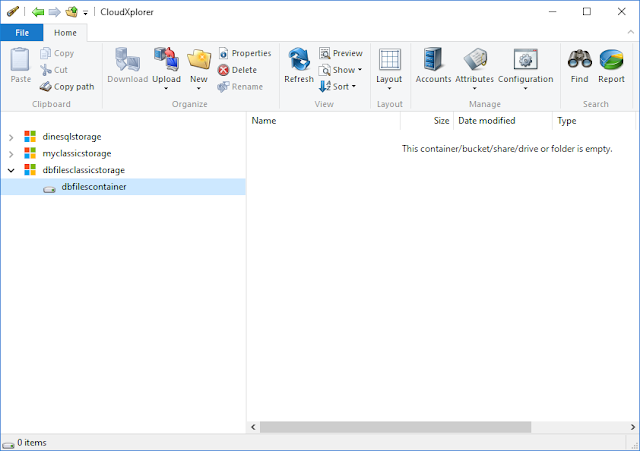
Once the database is created, you should see files in your storage like below;


Everything is done. Now the database is maintained locally and files are managed by Azure. For testing purposes, let's create a table and see;


Read more on this with following links;
SQL Server Data Files in Microsoft Azure
How to install and configure Azure PowerShell

Wednesday, May 11, 2016

A nonrecoverable I/O error occurred on file Backup to URL received an exception

My previous post discussed SQL Server Backup to URL, this is an error related to it.

​A nonrecoverable I/O error occurred on file "https://dinesqlclassicstorage.blob.core.windows.net/classisstroagecontainer/Sales_20160512.bak:" Backup to URL received an exception from the remote endpoint. Exception Message: The remote server returned an error: (404) Not Found..
Msg 3013, Level 16, State 1, Line 1
BACKUP DATABASE is terminating abnormally.


As usual, did a search but did not find a good solution but figured out a possible reason for this. The reason could be, using a Azure Classic Storage. If we try to use the newest storage, this error does not occur. However, I cannot exactly say that this is the only reason for this error. There can be many other reasons but try with new storage and see if you experience the same.

Tuesday, May 10, 2016

SQL Server Backup to URL

Although this was introduced with SQL Server 2012, as per my experience, the usage of it is very low because it is unknown to many or do not use this facility to have a good backup strategy. When maintaining an important database, an implementation of a backup strategy is a must and it should be based on RPO (Recovery Point Objective) and RTO (Recovery Time Objective).

Backup strategy is a part of Disaster Recovery solution. If you worry about the space for holding the backup, protecting backups from disasters, and securing your backups, one of the best options that can be used is Backup to URL.

Setting it up is very simple. You need to make sure that you or your company has an account with Azure and you have a storage created. Make sure a container is created in your storage for holding backups.

First, you need to create a Credential in your SQL Server instance for connecting with your Azure Storage. You can either use TSQL or GUI given under Security section.


Once the credential is created, it can be used for backing up your database to Azure Storage. Again you can use either TSQL or GUI.

BACKUP DATABASE Sales
TO URL = 'https://dinesqlstorage.blob.core.windows.net/sqlbackups/Sales_20160512.bak' 
      WITH CREDENTIAL = 'AzureCredential' 
     ,COMPRESSION
     ,STATS = 5;​


Once backed up, if you check your storage, you should see the file;


Note that most of the options that are available with general backup statement are available with backup to URL too. However some of the significant differences are;
  • Appending to an existing backup file is not possible (INT | NOINT is ignored)
  • MIRROR TO option is not supported
  • Generally backup device name is allowed with 259 characters. This option needs 36 characters for azure URL and leaving 223 characters to specify name of the account, container and backup name.

Monday, May 9, 2016

Master Nodes, NameNode, Slave nodes, DataNode - understanding Hadoop cluster components

Everyone knows about Hadoop and everyone knows that it is mainly used for Big Data processing, or distributed processing. However, terms used with its components sometime make us confused, specifically items mentioned with the title. Here are some notes made on a discussion we had on Hadoop clusters.

Generally, Hadoop cluster comprises two main components; Master nodes and Slave nodes.


Master node
This node manages all services and operations. One Master node is enough for a cluster but having the secondary one increases scalability and high availability. The main operation Master node does is, running NameNode process that cordinates Hadoop storage operations.

Slave node
This node provides required infrastructure such as CPU, memory and local disk for storing and processing data. This does all slave processes; the main is running DataNode process. Generally cluster comprises at least three Slave nodes but cluster can be easily scaled up by adding many number of Salve nodes.

Namenode
This node is a part of Master node and responsible for coordinating HDFS functions. For an example, when a location of a file block is requested, Master node gets the location from the Namenode process.

Datanode
Datanode is a process that handles actual reading and writing of data blocks from/to storage. This is under Slave node and it is a slave for Namenode.

In addition to these, there are so many other components such as Job Tracker, Task Tracker, HDFC, etc. There are many articles on it, refer following if you need more details;


Sunday, May 8, 2016

SQL Server Brain Basher of the Week #042 - Identity property

Let's talk about an important property we always use; Identity property. This property has been used for generating Ids automatically, and most of the cases, this has been used as the surrogate key. Usage is very simple, all you have to do is, set it with CREATE TABLE statement, assigning the seed (starting value) and increment value. SQL Server will automatically generate a value for this when an insert is performed.

Since the value is not based on an application, we have no clue on the value generated. If we need the newly generated identity value for performing the next step of the process we have written, we used to call either @@identity or Scope_Identity function. Here is this week question based on it;

What is the different between @@identity and Scope_Identity function? Which one should be used for getting the last generated value within the scope?

Let's try to understand the purpose of these two. @@identity is a function that returns the last generated identity value regardless of the scope but for the current session. But Scope_Identity function returns the last generated value within the scope for the current session. That is the different between these two functions. For most cases, Scope_Identity is the best unless you have an unique requirement for getting the value via @@identity.

See this example, it shows how these two functions works.

-- Creating Customer table
-- Id is an identity, starting number is 1
CREATE TABLE dbo.Customer
(
 Id int identity(1,1) Primary key
 , Name varchar(100) not null
);

-- Creating Customer Log table
-- Id is and identity, starting number is 100
CREATE TABLE dbo.CustomerLog
(
 Id int identity(100,1) Primary key
 , Info varchar(100) not null
);
GO

-- This stored procedure accepts a name
-- and insert a record
CREATE PROC dbo.InsertCustomer @Name varchar(100)
AS 
BEGIN

 INSERT INTO dbo.Customer
 (Name) VALUES (@Name);

 -- Getting CustomerId value via @@identity
 SELECT @@IDENTITY AS CustomerIdFromIdentityFunction;
 -- Getting Customer ID via Scope_identity
 SELECT SCOPE_IDENTITY() AS CustomerIdFromScopeIdentityFunction;
END
GO


-- This trigger will insert a record to
-- CustomerLog table
CREATE TRIGGER dbo.InsertTriggerForCustomer
ON dbo.Customer
FOR INSERT
AS
BEGIN

 INSERT INTO dbo.CustomerLog
  (Info) VALUES ('Record is inserted');
END

-- Executing the first procedure
EXEC dbo.InsertCustomer 'Dinesh';


As you see, @@identity returns 100 and Scope_Identity returns 1. The reason for showing 100 for @@identity is, the insert happened inside the trigger. Trigger inserted a record and its Id is 100. Since @@identity for the current session, not for the current scope, it returned the last generated identity regardless of the scope.

Saturday, May 7, 2016

How to check tables and stored procedures for in-memory migration

SQL Server introduced In-memory optimized tables with 2014 and it has been enhanced with SQL Server 2016. This improves the performance significantly and it is not that difficult to implement too. If we create a new database for new set of requirements, then it is easy to determine whether tables and stored procedures can be created using in-memory OTLP but it is bit difficult to check and see whether tables and stored procedures in existing databases are compatible for it.

We have been given a user-friendly wizard by SQL Server 2016 for determining the compatibility. This wizard helps us to go through tables and stored procedures we have in our database and check whether they can be converted. Not only that, if it is not possible, what are the possible reasons and solutions for converting them.

Let's try with one database. I have restored ContosoRetailDW database in my 2016 instance. I can find the wizard called Generate In-Memory OLTP migration checklist as below;


When click, Welcome Screen appears and the next page is for selecting objects to be checked. I can
get checked all or I can select individual items too. Remember the path set to Save checklist to. That is the place to be checked after completion of the wizard.


Last page allows to get the Powershell script generated too. If you need, you can get the code. At the end of the wizard, you see whether it has gone through all objects or not.


Now we can go through the checklist. Open the folder used, you should see three folders for; tables, stored procedures, and user defined functions.


Let's take one checklist and see. Lets open the checklist generated for DimDate table: MigrationAdvisorChecklistReport_DimDate_20160509.html file.


As you see, it clears says whether table is supported and what are the possible reasons if unsupported including possible solutions.

Thursday, May 5, 2016

How to create a large database in seconds - SQL Server 2016 - Perform Volume Maintenance Task

In most cases, we do not set the database file large, initial size is always less than 1GB, unless a decision is taken to make it suitable for next few months. If the database has to be created with a larger file, then of course, we need to set the file size with database creation, and it takes long time for creation. Why it takes long time? We dont have data, and it is just an allocation from the space in the disk. But it takes time if the size is in GBs.

It takes long time for initializing the space required, by filling the file with zeros. This makes sure that previously deleted files cannot be accessed and no security violation. This Zeroing Process applies to;
  • Create a database
  • Add files to an existing database
  • Increase the size of the file
  • Restore a database
If required, this process can be stopped for SQL Server and reduce the time it takes. SQL Server 2014 and before, it has to be done by adding the SQL Server service account to a policy group called Perform Volume Maintenance Task. However SQL Server 2016 allows us to set this at installation itself.


If you select this checkbox during the installation, it will not take long time for peforming above mentioned operations. Here is a comparison I just did.

This code is based on SQL Server 2014 with default setting. Its service account has not been added to policy task and as you see, it has taken more than 2 minutes for creating a database with 10GB size file.


This shows the same code execution with SQL Server 2016. Note that I have enabled the option during the installation. As you see, it has taken only 14 seconds.


Note that this does not applicable for log files. You should consider this option if you frequently perform these operations against your SQL Server.

Wednesday, May 4, 2016

Could not load schema model from package. (Microsoft.SqlServer.Dac)

Once I wrote a post on how to take a copy of Azure SQL Database into on-premise server: Taking backups of Azure SQL Database and restoring to on-premise server. It was a simple method, all we have to do is, export the database into a bacpac file and add to the server using Import Data-tier Application... 

With new operating system installation, I was trying to do the same but was hit by an error;

Could not load schema model from package. (Microsoft.SqlServer.Dac)
Internal Error. The database platform service with type
Microsoft.Data.Tools.Schema.Sql.SqlAzureV12DatabaseSchemaProvider is not valid.....


I immediately realized the issue, it was all about the version of Management Studio. I tried the same with Management Studio April Preview and I was able to add the database exported from Azure.


As per the reading I did, if you try with Management Studio that comes with SQL Server 2014, you need Service Pack 1 and CU 5 or above.

Tuesday, May 3, 2016

Methods to Fix SQL Server Error 4064 Login Failed For User [Guest Post]

This post is written by Andrew Jackson

Overview
SQL Server Database helps users to create their own databases where they can store or retrieve data whenever required. Sometimes, user may encounter error while connecting to the database and it displays an error “Cannot open user default database. Login failed. Login failed for user ‘UserName’. (Microsoft SQL Server, Error: 4064)” This SQL Server Error message appears when SQL Server Login is not able to connect to the default database. The post will be discussing about the SQL Server Error 4064 and the way to resolve it.

SQL Server Error 4064 Login Failed For User
Each user that has an account on the SQL Server belongs to a database by default. When user tries to connect to a PC running SQL Server without specifying login database, the default database is used. However, if the default database is unavailable at the time of connection, the SQL Server Error 4064 will be displayed. 


Possible Causes of the SQL Server Error 4064
Some of the causes for the unavailability of the database are as follows:
  • DB is in single user mode & only available connection is used already.
  • When your DB no longer exists 
  • Database is in suspect mode 
  • DB has been detached 
  • Database is offline
  • DB is set to emergency status
  • Does not have login account mapped to the user
  • User trying to login has denied access.
  • DB is part of a Database Mirror
How to Fix the Error 4064
One solution to avoid the error when the user’s default database is unavailable, is to logon as a user that can modify logins and change the user’s default database to a database that is currently available for a connection.

Steps for fixing the error 4064 are as follows:
- Before login to the user’s database, go to Options that is in right corner of the login window.


- Go to Connection Properties Tab of the login dialog box, enter the ‘master’ database in dropdown box changing default database to master, and click on Connect.


After successful login in the system, type the following TSQL command for your username and database.

User must make sure that they changes [test] with their own username and master with their database name. 

Alternative Method for Resolving Error Message 4064
  • In SQL Server 2000 & SQL Server 7

    OSQL Utility can be used to change the default’s database by following the steps:
    1. In the command prompt window, type the following ‘C :\> osql -E -d master’ and press Enter.
    2. Type ‘1>sp_defaultdb 'user's_login', 'master'’ at the osql prompt and press Enter
    3. Type ‘2>go’ at the second prompt and press Enter
  • In SQL Server 2005 & later versions

    SQLCMD utility is used to change the default database server by following the steps below:
    1. Go to Start -> Run. Type cmd and press ENTER.
    2. SQL Server Login can use either Windows authentication typing the following in command prompt ‘sqlcmd –E -S InstanceName –d master’ or SQL Server Authentication with ‘sqlcmd -S InstanceName -d master -U SQLLogin -P Password’
      {InstanceName =Name of SQL Server Instance to which user wish to connect
      SQL Login=Server Login whose database created by default has got dropped
      Password=SQL Server Login Password}
    3. Type ‘ALTER LOGIN SQLLogin WITH DEFAULT_DATABASE = AvailDBName’ at the sqlcmd prompt and press ENTER
    4. Now, Type ‘GO’ and press ENTER.
Conclusion
The post is aimed to guide users in resolving one of the most common errors faced by users while trying to connect to the database that is unavailable at the time of connection. The possible causes of the SQL Server Error 4064 login failed for user are discussed as well. It further defines solutions to change the unavailable database to any valid database on the server in order to resolve the 4064 Error.


Monday, May 2, 2016

SQL Server 2016 will be available on 1st of June 2016


Microsoft SQL Server team has announced that SQL Server 2016 will be available on June 1, 2016. SQL Server 2016 comes with end-to-end data management including best way of managing business intelligence on our data on any device.

If you need to have a quick look on What's New, get this PDF.

If you need to know why you should go for Microsoft SQL Server, refer below images;

Gartner Magic Quadrant for Operational Database Management System


Gartner Magic Quadrant for Data Warehouse and Data Management Solutions for Analytics


Gartner Magic Quadrant for Advanced Analytics Platform.


Sunday, May 1, 2016

SQL Server Brain Basher of the Week #041 - SQL Server 2016 - Editions

SQL Server 2016 will be available soon and will be surely seen more and more advanced features that will help us to continue with both operational and strategic level activities. Here is the question of this week based on SQL Server Editions.

As we know, generally we have two Premium Editions, two Core Editions and few additional editions;


Considering the main editions, one edition has been removed from SQL Server 2016. Which one has been removed from SQL Server 2016?

As per the current announcements, Business Intelligence edition is not included with SQL Server 2016. There can be changes with official announcements but currently, it is not available.

Saturday, April 23, 2016

How SQL Server handles our requests for modifications

This is not something new with latest Microsoft SQL Server but this is still being discussed and it is unknown or unclear to many of database developers. While I was discussing transaction log of SQL Server database with few, as a part of it, how SQL Server accepts our requests and modifies records was discussed. Thought it is useful to everyone, hence making a post on it;

What really happens when we send a request to SQL Server? It can be an update or a delete. Request might be related to one record or many records. Have a look on below image;


This starts with the request. Either using an application or connecting directly to SQL Server using something like SSMS, we send the request. Once SQL Server received the request, it checks data pages related to the records. If data pages required are not in the memory (or buffer cache), it loads relevant data pages from the disk to memory. Then, remember, it modifies records in pages that are in the memory, not pages in the disk. That is what 1st and 2nd steps in the image explains.

Third step is, updating the transaction log in the disk. Once the page (or pages) in the memory are modified, they become dirty pages. Then SQL Server writes redo and undo information to the log file. During this update, pages related are locked until the transaction log is completely updated.

Once the log is updated, the acknowledgement is sent to the application. Note that, even though the data files are not updated, we receive a message saying records are successfully updated. But we do not want worry, even something happen after we received the message, SQL Server can recover committed records, making sure durability which is one of the properties of the transaction, is satisfied with SQL Server.

Later, after one ore more transactions, a process called Checkpoint writes all dirty pages back to the disk, updating data files. This is how SQL Server handles our update requests.

Thursday, April 21, 2016

SQL Server 2016 - Manipulating data in Azure Storage using PolyBase

When PolyBase is opened with SQL Server editions other than APS or PDW, I tested it with SQL Server 2016 CTP 2.1. It had some issues but was able to get it worked with some workaround. Thought to do the same with RC3 since there are many enhancements, and it works fine now. If you are interested in Polybase, have a look on the post I have written in June 2015; SQL Server 2016 features: Polybase: SQL Server connector to Hadoop.

What is PolyBase? It is a feature that is available with SQL Server 2016. It facilitates us to use TSQL against data stored in Hadoop or Azure Blob Storage, allowing us to combine structured data with semi-structured data. Data warehousing benefits a lot from this as it reduces the time spending on ETLing and supports real-time analysis. Other than that it can be used with OLTP databases and can be used for archiving data as well.

Currently this feature is available with SQL Server 2016 RC3, I did not come across Edition Comparison related to 2016, hence no idea which Edition will support with final release. Note that there are few prerequisites like .Net framework 4.5 or later, Oracle Java SE runtime. Make sure you have installed all required before installing SQL Server and enabling Polybase. You can read a post I wrote on installation SQL Server RC3: Installing SQL Server 2016 RC1 - Sharing issues.

Generally, we should install PolyBase feature as Standard-alone Polybase. If you want to make a collection of SQL Server instances as a PolyBase Scale-Out Group, then select PolyBase Scale-Out Group during the installation.

PolyBase support two Hadoop providers: Hortonwork’s Data Platform (HDP) and Cloudera’s CDH either on Linux or Windows. In addition to that it can connect with Azure Blob Storage too.

Let's start with a simple one. I have uploaded a file to my Azure Storage. This file holds small number of CDR records and let's see how we can read these records using TSQL.


In order to access this file, we need to make sure PolyBase is configured properly. Make sure two new services: SQL Server PolyBase Data Movement and SQL Server PolyBase Engine are running. In addition to that, make sure that it is enabled and connectivity is set as below.


For understanding the value that needs to be set with Hadoop Connectivity, read this.

Let's create a database and configure Data Source. Note that, we need to create a Database Credential first for using it with the Data Source.

CREATE DATABASE Telco;
GO

USE Telco;
GO

-- Create a master key to encrypt credential secret.
CREATE MASTER KEY ENCRYPTION BY PASSWORD = 'Pa$$w0rd';

-- Create a database scoped credential (Azure Storage).
-- Enter your azure storage primary key as the secret.
CREATE DATABASE SCOPED CREDENTIAL AzureStorageCredential WITH 
        IDENTITY = 'AzureStorageUser'
  , Secret = 'primary key';

-- create the external data source
CREATE EXTERNAL DATA SOURCE DinesqlStorage
WITH
(
 TYPE = HADOOP,
 LOCATION = 'wasbs://cdrcontainer@dinesqlstorage.blob.core.windows.net/'
 , CREDENTIAL = AzureStorageCredential
);


Next step is creating a File Format for the file we gonna read. PolyBase supports Delimited Text, Hive RCFile, Hive ORC, and Parquet. Let's create the File Format for our file.

-- Create an external file format (delimited text file).
CREATE EXTERNAL FILE FORMAT CDRFileFormat WITH (
        FORMAT_TYPE = DELIMITEDTEXT, 
        FORMAT_OPTIONS (FIELD_TERMINATOR =';', 
                USE_TYPE_DEFAULT = False)
);


Last step is creating an External Table matching with the file uploaded combining the File Format. Read more on it with CREATE EXTERNAL TABLE. Here is the code I used.

-- create the table using file format created
-- and for the file uploaded
CREATE EXTERNAL TABLE CDRData
(
 MSIDN nvarchar(100)
 , IMSI nvarchar(100)
 , IMEI nvarchar(100)
 , [Plan] nvarchar(10)
 , CALL_TYPE nvarchar(20)
 , CORRESP_TYPE nvarchar(10)
 , CORRESP_ISDN nvarchar(100)
 , Duration int
 , [Time] nvarchar(20)
 , [Date] nvarchar(20)
 )
WITH
(
 LOCATION = '/cdrfiles'
 , DATA_SOURCE = DinesqlStorage
 , FILE_FORMAT = CDRFileFormat
);

Now I can simply query data in my Azure Storage using the table I created. Not only that I can join this dataset with my other tables and do more analysis. I will add more complex examples with next set of posts.


Wednesday, April 20, 2016

SQL Server 2016 - Connecting to Azure SQL Server using SSMS - RC3

Please note that there is an issue with connecting to Azure SQL Server using latest RC3 build. If you are experiencing the following error, note that it is an issue related your system.

An error occurred while creating a new firewall rule. (ConnectionDlg)...


There is no other options, if you need to connect with your Azure SQL Server, you need to open the portal and add your IP address using Firewall Settings.


Tuesday, April 19, 2016

SQL Server 2016 - System-Versioned Temporal Tables

Although the word "Versioning" was not used, we have been maintaining versions of records, or more precisely history of records using different techniques. SQL Server offers various ways of handling or maintaining history records, or changes that have been done to our records, using features like CDC, CT, Optimistic Isolation Levels. Most of these features do not support actual "versioning" of records but these features can be used for handling different scenarios.

SQL Server 2016 introduces a new feature called System-Versioned Temporal Tables that provides the entire history of our records related to the changes done. This feature records versions of the records based on  update and delete operations with the validity period of the version, allowing us to see not only the current record, state of the record during any given period, or allowing us to do point-in-time analysis. This feature is based on ANSI SQL 2011 standard but SQL Server current 2016 release does not support all the features that describes with it.

Let's write a code and see how it works. The following code creates a Database called Sales and a Table called Customer in Sales. Code creates Customer as a Temporal Table that requires few additional elements with the CREATE TABLE statement. It requires two datetime2 columns for maintaining the validity period. In addition to that, it needs SYSTEM_VERSIONING = ON and optionally a name for the history table. If the name is not mentioned, system will create one for us.

CREATE DATABASE Sales;
GO

USE Sales;
GO

CREATE TABLE dbo.Customer
(
 CustomerId int identity(1,1) Primary Key
 , FirstName varchar(100) null
 , LastName varchar(100) not null
 , CreditLimit money not null
 , ValidFrom datetime2(0) GENERATED ALWAYS AS ROW START -- datetime2(any precistion)
 , ValidTo datetime2(0) GENERATED ALWAYS AS ROW END -- datetime2(any precistion)
 , PERIOD FOR SYSTEM_TIME (ValidFrom, ValidTo)
)
WITH (SYSTEM_VERSIONING = ON (HISTORY_TABLE = dbo.CustomerHistory));

Let's insert three records and query both tables;

-- Inserting records
INSERT INTO dbo.Customer
 (FirstName, LastName, CreditLimit)
VALUES
 ('Dinesh', 'Priyankara', 10000)
 , ('Jack', 'Wilson', 15000)
 , ('John', 'Knight', 3500);

-- Checking records
SELECT * FROM dbo.Customer;
SELECT * FROM dbo.CustomerHistory;


As you see, history table does not show any records and last two datetime2 columns have been automatically filled. Now let's make some changes. Note that records have been inserted on 14/04/2016 and will be updating records on 16th, 17th and 19th.

-- Modifying a record - 2016-04-14 01:56:23
UPDATE dbo.Customer
 SET CreditLimit = 12000
WHERE CustomerId = 1;

-- Deleting a record - 2016-04-17 01:57:17
DELETE dbo.Customer
WHERE CustomerId = 3;

-- Modifying the same record - 2016-04-19 01:57:26
UPDATE dbo.Customer
 SET CreditLimit = 20000
WHERE CustomerId = 1;

-- Checking records
SELECT * FROM dbo.Customer;
SELECT * FROM dbo.CustomerHistory;


As you see, three records are in the history table; 2 records for the Customer Id 1 for two modifications made and 1 record for the Customer Id 2 for the deletion. This table exactly says how recorded are changed and when they have been changed, not only that it allows us to see the state of the record based on the validity period.

Let's see how we can retrieve records. There are multiple ways for querying records. We simply query the table without considering the history or we can go through the history using new clause given; FOR SYSTEM_TIME. Note the different between BETWEEN and FROM.

-- Retrieving the current record
SELECT *
FROM dbo.Customer
WHERE CustomerId = 1;

-- Retrieving for a date
-- Better include time too
SELECT *
FROM dbo.Customer
FOR SYSTEM_TIME
 AS OF '2016-04-17 00:00:00'
WHERE CustomerId = 1;

SELECT *
FROM dbo.Customer
FOR SYSTEM_TIME
 BETWEEN '2016-04-16 00:00:00' AND '2016-04-19 00:38:43'
WHERE CustomerId = 1
ORDER BY ValidFrom;

SELECT *
FROM dbo.Customer
FOR SYSTEM_TIME
 FROM '2016-04-16 00:00:00' TO '2016-04-19 00:38:43'
WHERE CustomerId = 1
ORDER BY ValidFrom;


You can read more on this at msdn.

Here is the cleaning code if required;

ALTER TABLE dbo.Customer SET ( SYSTEM_VERSIONING = OFF );
DROP TABLE dbo.Customer;
DROP TABLE [dbo].[CustomerHistory];
GO
USE master;
GO
DROP DATABASE Sales;


Saturday, April 16, 2016

SQL Server 2016 New Three Releases: SQL Server RC 3, Management Studio, SQL Server Data Tools

Microsoft SQL Server team has announced three new releases related to SQL Server product suite;

  1. SQL Server Release Candidate 3
    This is the last Release Candidate and it is available for downloading now.
    Click here to download it and click here to see the release note.
  2. SQL Server Management Studio April Preview
    New Preview is available with bug fixes and some enhancements. Click here to read more and click here to download it.
  3. SQL Server Data Tools Preview Update
    An update has been released for SQL Server Data Tools specifically for SQL Server Release Candidate 3. Click here to download the Preview.