Microsoft implementation of NoSQL database, documentDB is a cloud based, fully managed, massively scalable service for managing semi-structured data in Azure. Just like other NoSQL products, it supports schema-free JSON documents and unlike other NoSQL platforms, supports indexing automatically on all properties in the document as soon as it is added. Properties in added documents are easily query-able using SQL (Not exactly SQL for relational databases) and any property in the hierarchy is searchable.
This post speaks about creating documentDB in Azure with simple set of steps. If you are not familiar with NoSQL, read this post: What is NoSQL Document Database? What is Azure DocumentDB?
Let's create a documentDB. Login to Azure with new portal (https://portal.azure.com/) using your Azure account. Then Browse for DocumentDB Accounts and click on it for opening the blade related to DocumentDB creation.
Once it is opened, firth thing you need to do is, creating an account. Click on Add and enter a name that is globally unique for DocumentDB Account.
DocumentDB Account is created and it is available as .documents.azure.com . This still does not have a database (see image), for creating a database under the account created, click on Add Database button, and give a name for your database. As you see, I have named it as db01.
Once the database is created, you should see it in the Databases grid in the DocumentDB Account blade. Every component in documentDBs has a ResourceID and every documentDB needs at least one Collection.
What is a Collection?
Collection is 10GB of storage that can be created inside the database. It is not only for handling storage but it determines how much you pay for Microsoft. DocumentDB pricing is based on Collections and price is getting changed based on the Pricing Tier assigned to the collection. It is hourly-basis billing and scaling up and down is done by adding or removing collection assigned.
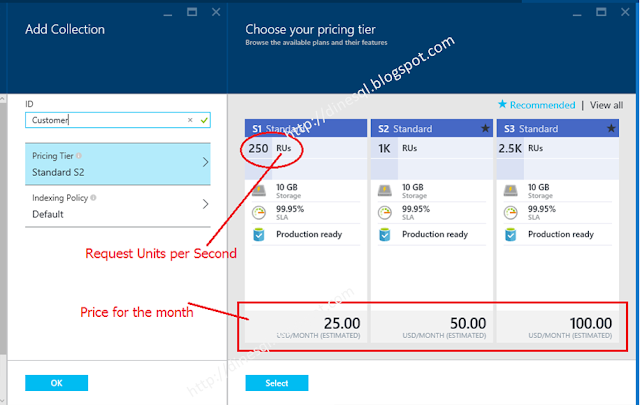
You can get the database blade opened by clicking the name of the database created and add Collection by clicking the Add Collection button. Add Collection blade allows you to enter the name of the collection, select the Pricing Tier, and select the Indexing Policy.
What is Request Units per Second?
As you see, Collection can be assigned to one Pricing Tier out of three; S1, S2, S3. Storage offered with each tier is same but RU different. RU, Request Units per Second simply means how many requests can be performed against the Collection per second. It can be reading requests, can be writing requests but the counting is not exactly the number of requests made but the throughput for the request considering usage of the resources such as CPU, memory and IO operations. As I read, generally a read-request lesser than 1KB requires one RU but a write-request with a same size of document requires more than RU as writing cost is higher than reading cost. A complex request that needs to update documents with many indexes may need more RUs. How do you determine the required RU? It is possible by looking at dashboards given with the blade, it shows all requests made and the RUs used for requests.
Here is an image explains model:
Image was taken from DocumentDB hierarchical resource model and concepts. Read it for more info.
You can start with the tier as you want for the Collection. Once the tier is selected, Indexing Policy has to be selected, it has two policies; Default and Range. The Default is good for properties with numbers and Range is best for both string and numbers but the storage cost is high. For this, let's create a Collection with S1 and Range policy.
Now we have a database with a collection. All Collections are appeared in the database blade with their ResourceID and can be opened by clicking on them. There are many ways of connecting with the database, adding documents and querying documents;
Once it is added, it can be viewed using Document Explorer in database blase as below.
Let's see how this can be done using other ways with next post related to DocumentDB.
- Using the portal itself - Manually add one by one or upload upto 100 documents at a time.
- Using DocumentDB migration tool
- Programmatically using REST API (difficult and complex), SDK (like .NET, flexible and can do almost all)
- Using Stored Procedures and Triggers added in the collection.
Once it is added, it can be viewed using Document Explorer in database blase as below.
Let's see how this can be done using other ways with next post related to DocumentDB.


No comments:
Post a Comment