Showing posts with label SQL Server. Show all posts

Sunday, September 17, 2017

SQL Server 2016 - CREATE/ALTER PROCEDURE must be the first statement in a query batch

Everyone knows that SQL Server started supporting CREATE OR ALTER statement with SQL Server 2016 and it can be used with few objects. However, with my new installation of SQL Server 2016, I noticed this error which was not supposed to see with 2016.


What could be the reason? I could not immediately realize the issue and was thinking that what went wrong. It should be working as this is SQL Server 2016.

After few minutes, I realized the issue;


It is all about the version I used. This feature was introduced with SQL Server 2016 - Service Pack I and I had not installed SP1 for my new instance. You may experience the same, hence made this post to note it :).

Sunday, January 1, 2017

Another new year for dinesql.blogsposts.com……… HAPPY NEW YEAR 2017


I have been blogging for years but I think that the most important and success year is 2016. I have made 171 posts in 2016 based on my experiences had with SQL Server, based on questions asked by many and based on some experiments I did. Comparing with 2015 that has 200 posts, I still think that 2016 is the best.

I can see more than 50,000 unique visits per month (excluding subscriptions), making it as over 600,000 unique visits per year. When comparing with other blogs by SQL Server experts, still the number is small but with the feedback and compliments received on my blog, I can see how significant and useful some of the posts I have made and it always encourages and makes me happy. 
Thank you very much for reading my posts and of course helping me to share something I know. Not only that, thank you very much for supporting me for improving my knowledge by giving feedback with your replies and solutions.

I wish my readers Very Happy New Year 2017! Let’s learn more on Microsoft SQL Server, Azure, Database Management System, Business Intelligence and Data Analytics with Big Data.


Friday, November 18, 2016

Microsoft SQL Server Backup to Windows Azure Tool

Earlier I made a post on SQL Server Backup to URL: SQL Server Backup to URL - Now easier than before that explains how to take a backup of SQL Server 2016 database using new Management Studio. However, backup to Azure was not something new with SQL Server 2016, it was started with SQL Server 2012 (without GUI support) and improved with GUI support with SQL Server 2014. Read this post for more information on it;

There is another way of backing up SQL Server databases to Azure which is based on a tool called Microsoft SQL Server Backup to Windows Azure. Good thing with this tool is, it is not limited to a specific version of SQL Server, it can be used with any version of SQL Server. Note that it is not a new tool, it is a quite old tool but the latest version is published in June 2016.

Let's see how we can use this tool for backing up databases and restoring from it;

First thing you need to do is, download and install this. You can download this either from:
If you do not need other related tool for SQL Server, use the second URL for downloading the tool. Once downloaded, you can see the installed tool as Microsoft SQL Server Backup to Windows Azure Tool Configuration, start it. This is what you see with its first screen;


This screen allows you to add Rule. Click on Add and continue. The rule is all about, which location this service needs to monitor and what files it should consider. Specify your backup location and file name pattern. Usually, pattern name is *.bak.


Click on Next to continue. Then you need to specify the storage. Make sure the storage you have created is Classis and it as a Blob Container for holding backups. Set the Storage Name, Access Key and Container.


Once you clicked Next, you can enable Encryption and Compression and click Finish button. You should see the rule you added, and it allows you to add more rules as well as modify existing rules.


Let's see this works with backing up operations. First let's backup WideWorldImporters database to a different folder and see the size of it. Make sure you have enabled Compression.


The size of the compressed backup is 165 MB:


Let's take the same to the folder which is configured with the tool. Do NOT enable compression. Note that it will take time more that the time took with previous step as it need to transfer data to Azure.


Check the folder after backup operation is completed. You will see a small file which is NOT your backup of the database. It is called as a stub file that contains some metadata which can be used for restore operation.


If you check the Azure Storage now, you will see two files have been created and placed. One is the same stub file and the second is the blob for the database backup. Since you have the same stub file in the Azure Storage, you can take a copy of it during the restoration operation if you have lost the local file.


If you open the Stub file using a Text Editor, you should see similar content;


If you need to restore the database, you can refer the stub file as the backup through standard restoration window and SQL Server will access the backup from Azure Storage for getting the backup.

As you see, this tool is very useful, specifically when you have multiple versions of SQL Servers. Best thing is, you do not need to write specific codes for transferring files from local environment to Azure as it is automatically done by the tool whenever a backup is placed.

As you see, the size of the backup file after getting it compressed by the tool is 130 MB which is lesser than the SQL Server compressed backup. Since it supports encryption as well, in a way it is better than SQL Server Backup to URL.


Friday, July 22, 2016

What is CATS, CRTAS and CETAS? - SQL Server CREATE TABLE AS SELECT

I am sure that everyone is well aware on SELECT INTO statement. This statement allows us to create a table using a SELECT statement just like below;

USE WideWorldImporters;
GO

SELECT o.OrderId, SUM(ol.UnitPrice * ol.Quantity) OrderAmount
INTO dbo.OrderAmount
FROM Sales.Orders o
 INNER JOIN Sales.OrderLines ol
  ON o.OrderID = ol.OrderID
GROUP BY o.OrderId;

SELECT * FROM dbo.OrderAmount;

However this has many limitations, specifically on the construction of the new table. We cannot add some elements such as constraints, indexes, when we get the table created using SELECT INTO.

SQL Server 2016 makes it possible to create the table with more control, introducing CREATE TABLE AS SELECT. But, unfortunately, this statement is available only with Azure SQL Data Warehouse and Parallel Data Warehouse. This statement is referred as CATS.

Here is an example;

CREATE TABLE myTable   
WITH   
  (   
    CLUSTERED COLUMNSTORE INDEX,  
    DISTRIBUTION = HASH (CustomerKey)  
  )  
AS SELECT * FROM dimCustomer; 


You can read more on this at: CREATE TABLE AS SELECT (Azure SQL Data Warehouse).

There are two more abbreviations like this: CRTAS and CETAS.

The CRTAS stands for CREATE REMOTE TABLE AS SELECT that allows to create a table in remote SMP SQL Server and populating data from a table in Parellel Data Warehouse.

Read more on this at: CREATE REMOTE TABLE AS SELECT (Parallel Data Warehouse).

The CETAS stands for CREATE EXTERNAL TABLE AS SELECT that allows to create an external table and export data into Hadoop or Azure Blob Storage. Again, this available only with Azure SQL Data Warehouse and Parellel Data Warehouse.

Read more on this at: CREATE EXTERNAL TABLE AS SELECT.

Friday, May 13, 2016

SQL Server On-Premise Database files maintained in Azure

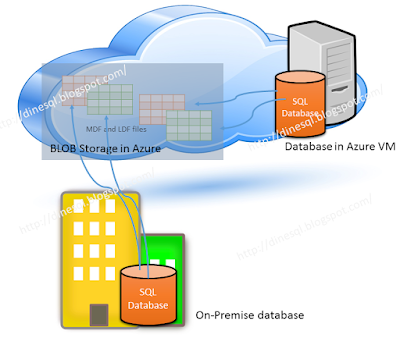
This is not about databases completely maintained in cloud, this is about databases created and maintain on-premises but data and log files are maintained in Microsoft Cloud: Azure.


Microsoft Windows Azure allows us to store database files store in Azure storage while maintaining the database in an on-premise SQL Server instance. This offers many benefits, not only performance and maintenance wise, cost-wise as well. This facility was introduced with SQL Server 2014 and it has been enhanced with SQL Server 2016. Except some restrictions, we can simply work with the database as if it is fully maintained in the server though files are in Azure storage.

What sort of benefits we get from this? 
Main thing is, support on disaster recovery. If something happen to the server or VM hosted in Azure, we do not need to worry because there will be no harm to data files, and we can set up a new database in a new server connecting to files in Azure storage. Another is, more security with TDE. We can enable TDE for the database while keeping all keys in local master database. This allows us to encrypt data in data files and do not need to worry even someone has stolen credentials related to the storage.

In addition to that, it gives some benefits on the cost as we do not need to maintain infrastructure specifically on storage. Not only that, a new feature called Snapshot backup is available with this, which allows us to take instantaneous backups or restore based on files.

How to set up the environment?
Main requirement for this is, an Azure Storage Account. You need a classic storage for this. Once the storage is created, then you need to create a Policy on the Storage Container and Shared Access Signature (SAS) key. After that, you need to create a Credential using SAS in local instance. Then only you can create the database, placing files in the Azure Storage. Let's do all step by step.

Creating Policy and Shared Access Signature in Azure Storage
This has to be done with PowerShell. For that we need Azure PowerShell that provides cmdlets for managing Azure. Open Windows PowerShell ISE and type following. It will install Azure Resource Manager modules.

Install-Module AzureRM

You will be promoted with various windows based on components you have already installed.


And finally you should see a screen like this;


Next we need to install Azure Service Management module. For that, type the following and continue just like previous step.

Install-Module Azure


Let's login to Azure account manager for continuing.

You should get the login dialog box. Provide userid and password to continue.


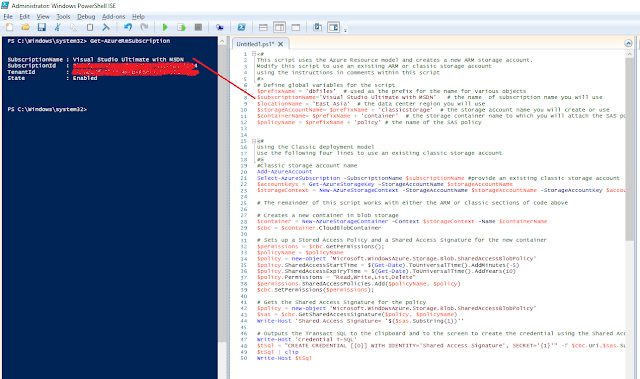
Type the following cmdlet for getting Azure Subscription information and then open a window for Scripting.


Get-AzureRmSubscription

And place the following code into the Script Window. I have taken this code from Lesson 1: Create a stored access policy and a shared access signature on an Azure container and modified as I want. If you need the entire code, please refer the link. Note that I have already created a Classic Storage called dbfilesclassicstorage and a Container called dbfilescontainer. This script uses the storage and container if exist, else it creates them.

<# 
This script uses the Azure Resource model and creates a new ARM storage account.
Modify this script to use an existing ARM or classic storage account 
using the instructions in comments within this script
#>
# Define global variables for the script
$prefixName = 'dbfiles'  # used as the prefix for the name for various objects
$subscriptionName='Visual Studio Ultimate with MSDN'   # the name  of subscription name you will use
$locationName = 'East Asia'  # the data center region you will use
$storageAccountName= $prefixName + 'classicstorage'  # the storage account name you will create or use
$containerName= $prefixName + 'container'  # the storage container name to which you will attach the SAS policy with its SAS token
$policyName = $prefixName + 'policy' # the name of the SAS policy


<#
Using the Classic deployment model
Use the following four lines to use an existing classic storage account
#>
#Classic storage account name
Add-AzureAccount
Select-AzureSubscription -SubscriptionName $subscriptionName #provide an existing classic storage account
$accountKeys = Get-AzureStorageKey -StorageAccountName $storageAccountName
$storageContext = New-AzureStorageContext -StorageAccountName $storageAccountName -StorageAccountKey $accountKeys.Primary

# The remainder of this script works with either the ARM or classic sections of code above

# Creates a new container in blob storage
$container = New-AzureStorageContainer -Context $storageContext -Name $containerName
$cbc = $container.CloudBlobContainer

# Sets up a Stored Access Policy and a Shared Access Signature for the new container
$permissions = $cbc.GetPermissions();
$policyName = $policyName
$policy = new-object 'Microsoft.WindowsAzure.Storage.Blob.SharedAccessBlobPolicy'
$policy.SharedAccessStartTime = $(Get-Date).ToUniversalTime().AddMinutes(-5)
$policy.SharedAccessExpiryTime = $(Get-Date).ToUniversalTime().AddYears(10)
$policy.Permissions = "Read,Write,List,Delete"
$permissions.SharedAccessPolicies.Add($policyName, $policy)
$cbc.SetPermissions($permissions);

# Gets the Shared Access Signature for the policy
$policy = new-object 'Microsoft.WindowsAzure.Storage.Blob.SharedAccessBlobPolicy'
$sas = $cbc.GetSharedAccessSignature($policy, $policyName)
Write-Host 'Shared Access Signature= '$($sas.Substring(1))''

# Outputs the Transact SQL to the clipboard and to the screen to create the credential using the Shared Access Signature
Write-Host 'Credential T-SQL'
$tSql = "CREATE CREDENTIAL [{0}] WITH IDENTITY='Shared Access Signature', SECRET='{1}'" -f $cbc.Uri,$sas.Substring(1) 
$tSql | clip
Write-Host $tSql


This script outputs the CREATE CREDENTIAL TQL statement we need. Get it copied and use it for creating the Credential in local SQL Server instance.


Creating Credentials in SQL Server
We have done all required from Azure end. Now we need to create a Credential for accessing the storage using the key created. Open the Management Studio and place the copied code from PowerShell, and run it.


Let's create the database now
Now we can create the database. Make sure you use the Azure storage path for placing the files.

CREATE DATABASE Sales 
ON
( NAME = Sales_Data,
    FILENAME = 'https://dbfilesclassicstorage.blob.core.windows.net/dbfilescontainer/SalesData.mdf' )
 LOG ON
( NAME = Sales_Log,
    FILENAME =  'https://dbfilesclassicstorage.blob.core.windows.net/dbfilescontainer/SalesLog.ldf');


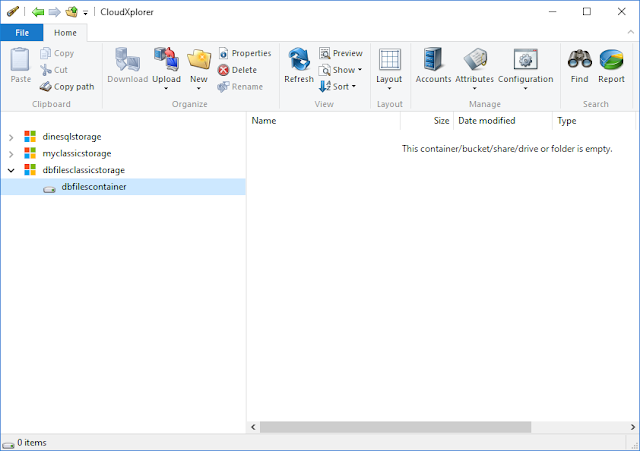
Once the database is created, you should see files in your storage like below;


Everything is done. Now the database is maintained locally and files are managed by Azure. For testing purposes, let's create a table and see;


Read more on this with following links;
SQL Server Data Files in Microsoft Azure
How to install and configure Azure PowerShell

Wednesday, May 11, 2016

A nonrecoverable I/O error occurred on file Backup to URL received an exception

My previous post discussed SQL Server Backup to URL, this is an error related to it.

​A nonrecoverable I/O error occurred on file "https://dinesqlclassicstorage.blob.core.windows.net/classisstroagecontainer/Sales_20160512.bak:" Backup to URL received an exception from the remote endpoint. Exception Message: The remote server returned an error: (404) Not Found..
Msg 3013, Level 16, State 1, Line 1
BACKUP DATABASE is terminating abnormally.


As usual, did a search but did not find a good solution but figured out a possible reason for this. The reason could be, using a Azure Classic Storage. If we try to use the newest storage, this error does not occur. However, I cannot exactly say that this is the only reason for this error. There can be many other reasons but try with new storage and see if you experience the same.

Tuesday, May 3, 2016

Methods to Fix SQL Server Error 4064 Login Failed For User [Guest Post]

This post is written by Andrew Jackson

Overview
SQL Server Database helps users to create their own databases where they can store or retrieve data whenever required. Sometimes, user may encounter error while connecting to the database and it displays an error “Cannot open user default database. Login failed. Login failed for user ‘UserName’. (Microsoft SQL Server, Error: 4064)” This SQL Server Error message appears when SQL Server Login is not able to connect to the default database. The post will be discussing about the SQL Server Error 4064 and the way to resolve it.

SQL Server Error 4064 Login Failed For User
Each user that has an account on the SQL Server belongs to a database by default. When user tries to connect to a PC running SQL Server without specifying login database, the default database is used. However, if the default database is unavailable at the time of connection, the SQL Server Error 4064 will be displayed. 


Possible Causes of the SQL Server Error 4064
Some of the causes for the unavailability of the database are as follows:
  • DB is in single user mode & only available connection is used already.
  • When your DB no longer exists 
  • Database is in suspect mode 
  • DB has been detached 
  • Database is offline
  • DB is set to emergency status
  • Does not have login account mapped to the user
  • User trying to login has denied access.
  • DB is part of a Database Mirror
How to Fix the Error 4064
One solution to avoid the error when the user’s default database is unavailable, is to logon as a user that can modify logins and change the user’s default database to a database that is currently available for a connection.

Steps for fixing the error 4064 are as follows:
- Before login to the user’s database, go to Options that is in right corner of the login window.


- Go to Connection Properties Tab of the login dialog box, enter the ‘master’ database in dropdown box changing default database to master, and click on Connect.


After successful login in the system, type the following TSQL command for your username and database.

User must make sure that they changes [test] with their own username and master with their database name. 

Alternative Method for Resolving Error Message 4064
  • In SQL Server 2000 & SQL Server 7

    OSQL Utility can be used to change the default’s database by following the steps:
    1. In the command prompt window, type the following ‘C :\> osql -E -d master’ and press Enter.
    2. Type ‘1>sp_defaultdb 'user's_login', 'master'’ at the osql prompt and press Enter
    3. Type ‘2>go’ at the second prompt and press Enter
  • In SQL Server 2005 & later versions

    SQLCMD utility is used to change the default database server by following the steps below:
    1. Go to Start -> Run. Type cmd and press ENTER.
    2. SQL Server Login can use either Windows authentication typing the following in command prompt ‘sqlcmd –E -S InstanceName –d master’ or SQL Server Authentication with ‘sqlcmd -S InstanceName -d master -U SQLLogin -P Password’
      {InstanceName =Name of SQL Server Instance to which user wish to connect
      SQL Login=Server Login whose database created by default has got dropped
      Password=SQL Server Login Password}
    3. Type ‘ALTER LOGIN SQLLogin WITH DEFAULT_DATABASE = AvailDBName’ at the sqlcmd prompt and press ENTER
    4. Now, Type ‘GO’ and press ENTER.
Conclusion
The post is aimed to guide users in resolving one of the most common errors faced by users while trying to connect to the database that is unavailable at the time of connection. The possible causes of the SQL Server Error 4064 login failed for user are discussed as well. It further defines solutions to change the unavailable database to any valid database on the server in order to resolve the 4064 Error.


Saturday, April 23, 2016

How SQL Server handles our requests for modifications

This is not something new with latest Microsoft SQL Server but this is still being discussed and it is unknown or unclear to many of database developers. While I was discussing transaction log of SQL Server database with few, as a part of it, how SQL Server accepts our requests and modifies records was discussed. Thought it is useful to everyone, hence making a post on it;

What really happens when we send a request to SQL Server? It can be an update or a delete. Request might be related to one record or many records. Have a look on below image;


This starts with the request. Either using an application or connecting directly to SQL Server using something like SSMS, we send the request. Once SQL Server received the request, it checks data pages related to the records. If data pages required are not in the memory (or buffer cache), it loads relevant data pages from the disk to memory. Then, remember, it modifies records in pages that are in the memory, not pages in the disk. That is what 1st and 2nd steps in the image explains.

Third step is, updating the transaction log in the disk. Once the page (or pages) in the memory are modified, they become dirty pages. Then SQL Server writes redo and undo information to the log file. During this update, pages related are locked until the transaction log is completely updated.

Once the log is updated, the acknowledgement is sent to the application. Note that, even though the data files are not updated, we receive a message saying records are successfully updated. But we do not want worry, even something happen after we received the message, SQL Server can recover committed records, making sure durability which is one of the properties of the transaction, is satisfied with SQL Server.

Later, after one ore more transactions, a process called Checkpoint writes all dirty pages back to the disk, updating data files. This is how SQL Server handles our update requests.

Wednesday, April 13, 2016

I renamed my computer, Will my SQL Server instance work? Should I do something on it?

This is something we always worry, what will happen if the name of the host machine is renamed? After renaming, can I connect with my SQL Server instance using new name set with the host, or I have to re-install SQL Server, or I have to do some setting changes? Let me share what I just did.

My computer name was initially set as DESKTOP-QOKBL3L because I forgot to set the name properly when installing the OS. And not only that, I installed an instance of SQL Server 2012 as a named instance too. After realizing that name of the computer is not as I want, I just changed it as DINESH-HM-LAP01. Now can I connect with my SQL Server instance?

I just tried with the old name as I used to;


As you see, it did not allow me to connect. Then I tried with my new computer name;


And I was able to connect with my instance, yes without doing anything. But, does it mean that I do not want to anything?

Let's check the server name using TSQL;


As you see, not all metadata is updated, means it needs some updates. For updating metadata, we need to drop the server and add again. After that, a service restart is required, once done, if the above query is run again, both will show the new name instead of old name.

sp_dropserver 'DESKTOP-QOKBL3L\SQL2012';
GO
sp_addserver 'DINESH-HM-LAP01\SQL2012', local;
GO

For more info on this, read this article in MSDN: https://msdn.microsoft.com/en-us/library/ms143799.aspx

Sunday, February 7, 2016

How to delete current SQL Server error log? My current log is in GBs.

In a continuous running SQL Server environment, it is not uncommon to see a large error log related to SQL Server that is continuously growing. Recently, a discussion happened on this as this particular environment had a very large error log which had consumed a lot of space in the partition, creating an issue related to space required to data files. Can we delete the error log?

By default, SQL Server maintains 7 error logs; current log and 6 backups of last files created. The current log has no extension and last backups have extensions starting from 1. This setting can be changed by clicking configure of SQL Server Logs folder in Object Explorer - Management if required. Files are located in standard SQL Server path: {partition}:\Program Files\Microsoft SQL Server\{Instance}\MSSQL\Log.


Now if you try to delete the current log, you will get an error because it is being used by SQL Server. Therefore, you need to create a new file as the current log and make the current one as the last backup. The log file cycles with every restart of the SQL Server instance, making the current one as the last backup with extension 1 and creating a new one with no extension. With default setting, all other files starting from 1 to 6, become 2 to 5 and 6th file is deleted. If you cannot restart the service (if it is Production Environment), then this recycling can be manually done by calling sp_cycle_errorlog. This SP closes the current one and creates a new one. Once it is done, you can delete the large one, which is the one with extension 1 now.

EXEC sys.sp_cycle_errorlog;

Saturday, April 18, 2015

SQL Server Brain Basher of the Week #008

When you talk with your database, you use a language that is understandable to the database component you access and specific to the vendor. There are multiple vendor-specific languages such as T-SQL, PL-SQL and SQL PL for Microsoft SQL Server, Oracle and IBM DB2 databases respectively. Although there are different vendor-specific implementations, general categorization of the database language, in terms of command types and operation type is as follows;

DML
DDL
DCL
TCL
DQL

Do you know all of these languages? Can you describe what these acronym stand for and the purpose of them? Yes, that is the Brain Basher of the week.

Here is the explanation of each;
  • DML - Data Manipulation Language - This language is used for manipulating data stored in tables. Operations such as inserting data, updating data are done with this language and SQL Server specific commands fall under this language are INSERT, UPDATE and DELETE.
  • DDL - Data Definition Language - This helps us to define the structures used for holding data. This is used for operation like creating databases, creating tables and examples commands for this language are CREATE DATABASE, CREATE TABLE and CREATE VIEW.
  • DCL - Data Control Language - This language is mainly used for controlling the access permission on objects created in the database and operations that can be performed on them. Operations such as granting permission to a user on a table for updating records, allowing a group to execute a stored procedure and commands such as GRANT SELECT, GRAN ALTER are examples for this.
  • TCL - Transaction Control Language - Operations and commands related to transactions are come under this language. Starting a transaction with BEGIN TRAN and ending a transaction with either ROLLBACK TRAN or COMMIT TRAN  are part of this language.
  • DQL - Data Query Language - This represents SELECT SQL command that is used for retrieving data from the database.

Wednesday, April 15, 2015

What pushes SMP Architecture data warehouse to MPP Architecture

We have been developing data warehouses, centralizing enterprise data and addressing business intelligence requirements. Generally, almost all data warehouses built were based on traditional architecture which is called SMP: Symmetric Multi-Processing. Even though we use different design strategies for designing data warehouses for improving the performance and managing the volume efficiently, the necessity on scaling up often comes up. No arguments, without much considerations on factors related, we tend to add more resources spending more money for addressing the requirement but at a certain level, we need to decide, we need understand that the existing architecture is not sufficient enough for continuation, it needs a change, SMP to MPP.

What is SMP architecture? This architecture is a tightly coupled multi-processors that share resources, connecting to a single system bus. With SMP, system bus limits scaling up beyond a certain limit and, when number of processors and data load increases, the bus can become overloaded and a bottleneck can occur.

MPP, Massively Parallel Processing is based on shared-nothing architecture. MPP system uses multiple servers called Nodes which have dedicated, reserved resources and executes distributed queries with nodes independently offering much performance than SMP.


How do we know the boundary or what factors can be used for determining the necessity of MPP? Here are some, these will help you to decide.

Here is the first one;
This is all about data growth. Yes, we expect an acceptable data growth with data warehousing but if it increases drastically, and if we need to continuously plug more and more storage, it indicates a necessity of MPP. We are not talking about megabytes or gigabytes but terabytes ore more. Can't we handle the situation just adding storage? Yes, it is possible but there will be definitely a limit on it. Not only that, the cost goes up too. We do not see this limitation with MPP and in a way, adding additional storage after the initial implementation might not be as expensive as SMP.

Here is the second;
If somebody talks about BI today, the aspect of Real-time or Near-Real-Time is definitely a concerned area. Traditional implementation of data warehouse manages this up to some extent but not fully, mainly because of the capacity, loading and complexity of the query. Generally, with Microsoft platform, we use SSIS for data loading and de-normalized, semi-normalized tables designed either as general tables or star/snowflake structured tables for holding data. Assume that user requests real-time data and same fact table that contains billions of records have to be accessed, then performance of the query might not be at the expected level. With MPP, since data can be distributed with multiple nodes, performance on data retrieval is definitely fast and real-time queries are efficiently handled.

Third one;
Traditional data warehouse requires structured, in other words known relational formatted data. However modern BI is not just based on this, data with unknown structures are not rare and often required for most of the analysis. How do we handle this? One data warehouse for known, structured data and another for unstructured data? Even though we maintain two data warehouses, how an analysis can be performed combining these two? Can traditional tools attached with exiting architecture be used for combining them efficiently, process them fast and produce required result? No, it is not possible, and it means it is high time for MPP. This does not mean that MPP handles all these area but it supports. MPP helps to process unstructured data much efficient than SMP and Microsoft platform allows to combine structured and unstructured data with user-friendly interface using its solution which based on MPP.

Here is the forth:
Mostly, we extracts data from on-premises data storage and traditional ETLing handles this well. However, data generation is not limited to on-premises applications with modern implementation, many important data is generated with cloud applications. In a way, this increases the load as well as the complexity. And sometime this changes traditional ETL into ELT. MPP architecture has capabilities to handle these complexities and improve the overall performance, hence this reason can be considered as another reason for moving from SMP to MPP.

There can be some more reasons, but I think these are the significant ones. Please comment if you see more on this.

Saturday, April 11, 2015

Object Name Resolution - Stored Procedure

SQL Server does not resolve names of stored procedures just as it does on tables. This resolution is bit different. Here is the post I made on Object Name Resolution - Tablehttp://dinesql.blogspot.com/2015/04/object-name-resolution-table.html. Let;s see how this happens with Stored Procedure.

Have a look on the image below;


As per the example that shows in the image, Jane executes GetOrders stored procedure without adding its schema. In order to resolve this name, SQL Server initially adds sys schema. Since it does not success, it adds user's schema which is HR. As the stored procedure has been created under HR, Jane successfully executes the query.

Jack executes the same and SQL Server tries with sys.GetOrders. Since it is unsuccessful, SQL Server adds his schema which is FN. Again SQL Server cannot resolve an object called FN.GetOrders. SQL Server tries again with different schema which is dbo. That is the last try, and as it gives the same unsuccessful result, Jack gets an error.

Just like table names, makes sure you add schema to stored procedures when executing them. This makes sure that SQL Serve does not need to spend extra time for executing it and avoids overhead and errors.

Object Name Resolution - Table

How SQL Server resolves object names if you have not referred it is as a fully qualified object? If it is not a fully qualified object (a statement like below);

USE AdventureWorks2014;
GO

SELECT * FROM SalesOrderHeader;

it goes through additional steps for making it as a fully qualified object for resolving the name of the object. It is an additional cost for the execution engine and it adds extra time needed to execute the query. Not only that, if it cannot resolve the object, it throws an error saying Invalid Object even though the object is exist. Have a look on the image below.


Let's talk about the first example. Jane executes a query against SalesOrderHeader. She has not mentioned the schema of the table, hence it is treated as a non-fully-qualified-object. SQL Server tries to add her default Schema which is Sales. Once the schema is added, it becomes Sales.SalesOrderHeader and SQL Server could find the object. She executes the query successfully with an additional overhead.

Jack tries to execute the same query. Since Jack's schema is Finance, SQL Server initially tries as Finance.SalesOrderHeader. Since it does not success, it tries with its second Try which adds dbo schema. Again, dbo.SalesOrderHeader does not exist, hence it fails. Jack gets an error.

Realized how important it is to mention the schema? Make sure objects you have mentioned in your queries contains fully qualified object names for avoiding extra works and errors.


Wednesday, April 8, 2015

What are ROLLBACK WORK AND COMMIT WORK?

I am sure that you are familiar with ROLLBACK TRANSACTION and COMMIT TRANSACTION but have you heard about or used ROLLBACK WORK and COMMIT WORK?

ROLLBACK WORK and COMMIT WORK work exactly same way as ROLLBACK TRANSACTION and COMMIT TRANSACTION. WORK keyword is optional and this is ISO-compatible.

Can we use this instead what we have been used? Yea it is possible and no harm at all. Only missing part is, this does not accept user-defined transaction name.

Here is a sample code using ROLLBACK WORK and COMMIT WORK.

USE AdventureWorks2014;
GO

BEGIN TRAN

UPDATE Production.Product
 SET Color = 'b'
WHERE Color = 'Black';

-- simple logic to test
IF @@ROWCOUNT > 10
BEGIN

 ROLLBACK WORK;
 PRINT 'transaction rolled back';
END
ELSE
BEGIN
 
 COMMIT WORK;
 PRINT 'transaction committed.';
END

Tuesday, April 7, 2015

Some records are locked, can I skip them and read the rest? (READPAST)

Assume that you have a table with thousands of records and some of the records are being updated by another user. Now you try to read some records from this table. If your request needs to access records that are being updated by other user, your request will not be immediately satisfied, you have to wait till other user completes his transaction. This is the default behavior and this is what we referred as Blocking. Here is an example for it;

USE AdventureWorks2014;
GO

-- Starting a transaction and updating 93 records
BEGIN TRAN
 UPDATE Production.Product
  SET Color = ''
 WHERE Color = 'Black';

-- Open a new window and run this
-- You will not be able to see records
SELECT * FROM Production.Product;
GO

-- Stop the query and see locks placed
-- You should see the records exclusively locked
sp_lock;


What if you need to read only possible records? If you all need get your recordset and you have no issue with skipping locked records but get the available records without waiting, it can be done with a hint. The hint that has to be used for this is: READPAST.

READPAST instructs SQL Server Engine not to read records locked by other transactions and continue the reading process. Here is the same code using READPAST Table Hint.

-- Use the table hint.
-- This will skip 93 locked records
-- and show the rest
SELECT * FROM Production.Product (READPAST);
GO

Sunday, April 5, 2015

SQL Server Brain Basher of the Week #006

Let's talk about date and time. Have a look on following code and try to guess the value returned by last SELECT statement.

USE tempdb;
GO

CREATE TABLE dbo.TestTable
(
 Code char(4) NOT NULL
 , TimeRecorded datetime NOT NULL
)
GO

INSERT INTO dbo.TestTable 
 (Code, TimeRecorded)
VALUES 
 ('E001', '12/31/2014 23:59:59:999');
GO

SELECT TimeRecorded FROM dbo.TestTable;

The date and time we entered is a date related to 2014 but if you run the last SELECT statement, it will show a date for 2015, it will show the value as 2015-01-01 00:00:00.000.

How this can be happened? It can happen based on the "milliseconds" added to the value. What we have to remember is the Accuracy of DateTime data type. Accuracy of the datetime type is rounded to increments of .000, 003, or .007 seconds, hence .999 is rounded off to .000 increasing the second by 1. This changes the entire datetime value inserted. That is why we see 2014 date as 2015.

Considering this fact, if your application needs the accuracy at millisecond level, datetime2  should be used instead of datetime.

One more thing to remember. If you write a query like below to get some records related to 13th of June 2014 from a table;

SELECT Id
FROM dbo.Table
WHERE Date BETWEEN '06/13/2014 00:00:00:000' 
   AND '06/13/2014 23:59:59:999';


You might get records related to 14th of June too. Again the reason is same. It can be overcome by changing the query as below;

SELECT Id
FROM dbo.Table
WHERE Date >=  '06/13/2014 00:00:00:000' 
   AND Date < ‘06/14/2014 00:00:00:000’;

Friday, April 3, 2015

Cumulative updates for SQL Server 2012 and 2014

Few Cumulative updates have been released for SQL Server 2012 and 2014. Here are the links for them:

Cumulative update #6 for SQL Server 2014
Here is the link for downloading: https://support.microsoft.com/en-us/hotfix/kbhotfix?kbnum=3031047&kbln=en-us
Here is the link for the list of bugs fixed: http://support.microsoft.com/en-us/kb/3031047

Cumulative update #5 for SQL Server 2012 SP2
Here is the link for downloading: https://support.microsoft.com/en-us/hotfix/kbhotfix?kbnum=3037255&kbln=en-us
Here is the link for the list of bugs fixed: http://support.microsoft.com/en-us/kb/3037255

Cumulative update #15 for SQL Server 2012 SP1
Here is the link for downloading: https://support.microsoft.com/en-us/hotfix/kbhotfix?kbnum=3038001&kbln=en-us
Here is the link for the list of bugs fixed: http://support.microsoft.com/en-us/kb/3038001

What are hotfixes, Cumulative Updates and Service Packs?

No matter how hard the software has been tested, issues can be still encountered. Same applies to Microsoft SQL Server too and that is the reason we see numerous releases on same versions. These releases are published as a Hotfix, a Cumulative Update, or a Service Pack but what is the right time for applying these, should we apply them as soon as they are published?

Let's try to understand each of these SQL Server updates;
  • Hotfixes: These are built and released for addressing urgent customer concerns. Most of the time, this is done based on an issue reported by a customer (or few customers) and the fix is released immediately. Since this addresses a particular issue and the release is done in a urgent manner, not much testing is done hence it is not recommended to apply a hotfix to a production environment as soon as it is released unless the same issue is being experienced.
  • Cumulative Updates: Cumulative update is a bundle that holds a periodic roll-up releases of hotfixes. This goes through a test comparatively higher than testes done for each hotfix and the bundle is tested as a whole. In a way, this is more secure and advisable to apply rather than applying hotfixes individually. However, if possible, it is always better to wait till a service pack release as explained below.
  • Service Packs: Service pack is a periodic release that addresses many issues which may have (or may have not) addressed with previous hotfixes and cumulative updates. This goes through a thorough test and it is safe to apply this to production environment. 

Thursday, April 2, 2015

Should I rollback my explicit transaction or will XACT_ABORT do it for me?

Here is another question I got in this week. The question is all about rolling back transactions, whether we need to write a code with ROLLBACK TRAN for rolling back or can SQL Server automatically rollback the transaction if XACT_ABORT is on.

Many believe that once the transaction is handled using TRY/CATCH block, rolling back is guaranteed when an error or unexpected issue is thrown. Most of the cases, this is true, when something goes wrong, execution jumps to Catch block and execute the rollback tran statement. But what if execution is unable to jump to Catch block? Can it happen? Yes, it is possible. Assume that logic is implemented with a stored procedure and it is executed by an application. While it is being executed, if something happens at the application-end, application disconnects from the database. This stops continuing the code and executing the rollback tran. Not only that, this results the transaction remain in the database, keeping all the locked placed without releasing.

This type of issues can be solved using XACT_ABORT statement. All we have to do is, add SET XACT_ABORT ON inside the stored procedure because XACT_ABORT makes sure all transactions are rolled back and the batch is aborted when an error occured. For more info, read : https://msdn.microsoft.com/en-us/library/ms188792.aspx

Does this mean that we do not need to have TRY/CATCH block and handling errors? No, we still need them because it is the way of capturing errors and handling them.

Here is an example. This creates a table and stored procedure for inserting records.

Code 1
USE tempdb;
GO

DROP TABLE dbo.Account

CREATE TABLE dbo.Account
(   
 AccountId INT NOT NULL PRIMARY KEY, 
 Name    NVARCHAR (50) NOT NULL,
 Balance Money NOT NULL   
)
GO

CREATE PROCEDURE dbo.InsertAccount
AS
BEGIN

 BEGIN TRY

  BEGIN TRAN

  INSERT INTO dbo.Account(AccountId, Name , Balance) 
  VALUES(1, 'Account1', 10000)
  -- This throws an error
  INSERT INTO dbo.Account(AccountId, Name , Balance) 
  VALUES(1, 'Duplicate', 10000)
  INSERT INTO dbo.Account(AccountId, Name , Balance) 
  VALUES(2, 'Account2', 20000)
 
  COMMIT TRAN
 END TRY
 BEGIN CATCH
  SELECT ERROR_MESSAGE()
  ROLLBACK TRAN
 END CATCH
END
GO

Now let's open a new connection and execute the stored procedure.

Code 2
USE tempdb;
GO

EXEC dbo.InsertAccount;

SELECT * FROM dbo.Account;

Here is the result.


As expected it throws an error. if you check for active transactions using below code, you should NOT see the transaction we started as it has been handled.

Code 3
SELECT 
       est.transaction_id as TransactionID,
       tas.name as [Transaction Name],
       DB_NAME(tds.database_id) as DatabaseName
FROM sys.dm_tran_active_transactions tas 
 INNER JOIN sys.dm_tran_database_transactions tds 
  ON tas.transaction_id = tds.transaction_id
 INNER JOIN sys.dm_tran_session_transactions est 
  ON est.transaction_id=tas.transaction_id
WHERE est.is_user_transaction = 1 
AND tas.transaction_state = 2 
AND tds.database_transaction_begin_time IS NOT NULL

Now let's make a small modification to the stored procedure and execute the code in a different way. Insert WAITFOR statement in between first and second INSERT statements like below and alter the procedure.

Code 4
  INSERT INTO dbo.Account(AccountId, Name , Balance) 
  VALUES(1, 'Account1', 10000)

  WAITFOR DELAY '00:00:20';

  INSERT INTO dbo.Account(AccountId, Name , Balance) 
  VALUES(1, 'Duplicate', 10000)
  INSERT INTO dbo.Account(AccountId, Name , Balance) 
  VALUES(2, 'Account2', 20000)


Now open a new connection and execute Code 2 again. Open another connection immediately and execute Code 3 too. You should see following record with Code 3.


Go back to Code 2 immediately and stop execution. You need make sure you do this within 20 seconds. Once you have stopped the code, go back to Code 3 and execute it again. You should see the transaction which is still exist.

Same can happen with an application too. We stopped the application but still the transaction is exist with the database, locking some resources. Let's make another modification to the stored procedure and test the same. Add following code to the procedure and recreate it.

Code 5
ALTER PROCEDURE dbo.InsertAccount
AS
BEGIN

 SET XACT_ABORT ON
 BEGIN TRY

  BEGIN TRAN


Now do the same thing, open a new connection, execute the Code 2, and with a different connection, execute the Code 3, go back to Code 2, stop it and execute Code 3 again. You should NOT see the transaction now because it has been taken care by XACT_ABORT.