In order to increase the scalability and distribute workload among multiple servers, we can use a scale-out architecture for our DW/BI solution by adding more servers to each BI component. A typical BI solution that follows Traditional Business Intelligence or Corporate Business Intelligence uses following components that come in Microsoft Business Intelligence platform;
- The data warehouse with SQL Server database engine
- The ETL solution with SQL Server Integration Services
- The models with SQL Server Analysis Services
- The reporting solution with SQL Server Reporting Services
Not all components can be scaled out by default. Some support natively some need additional customer implementations. Let's check each component and see how it can be scaled out;
The data warehouse with SQL Server database engine
If the data warehouse is extremely large, it is always better to scale it out and scaling up. There are several ways of scaling out. Once common way is Distributed Partitioned Views. It allows us to distribute data among multiple databases that are either in same instance or different instances, and have a a middle layer such as a View to redirect the request to right database.
Few more ways are discussed in
here that shows advantages and disadvantages of each way.
In addition to that Analytics Platform System (APS) which was formerly named as Parallel Data Warehouse (PDW) is available for large data warehouses. It is based on Massively Parallel Processing architectures (MPP) instead of Symmetric Multiple Processing (SMP), and it comes as an appliance. This architect is called as Shared-Nothing architecture as well and it supports distributing data and queries to multiple compute and storage nodes.
The ETL solutions with SQL Server Integration Services
There is no built-in facility to scale out Integration Services but it can be done by distributing packages among servers manually, allowing them to get executed parallel. However this requires extensive custom logic with packages and maintenance cost might be increased.
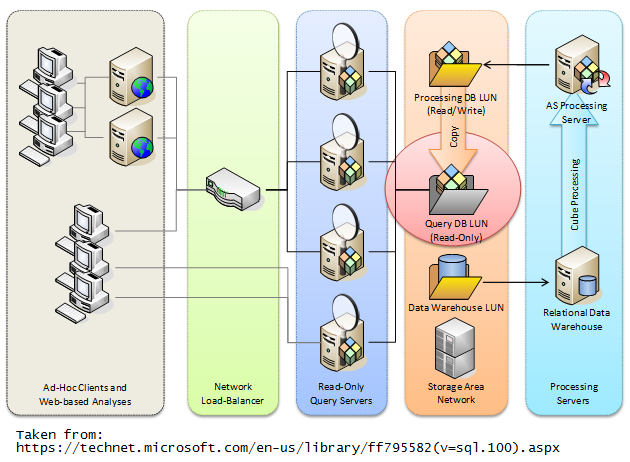
The models with SQL Server Analysis Services
Generally, this is achieved using multiple Analysis Services Query servers connected to read-only copy of multi-dimensional database. This requires a load-balancing middle tier component that handles requests of clients and direct them to right query server.
The same architecture can be slightly changed and implement in different ways as per requirements. Read following articles for more info.
The reporting solution with SQL Server Reporting Services
The typical way of scaling out Reporting Services is, configure a single report database with multiple report server instances connected to the same report database. This separates report execution and rendering workload from database workloads.